Problem
Within the big data ecosystem, highly performant workloads and queries are critical for keeping customers happy and businesses running successfully. Within the SQL database realm, indexes support query performance optimization opportunities quite gracefully. Within the Data Lakehouse, there have been limited methods of applying indexes to delta tables. Bloom Filter Indexes are space-efficient data structures that enables data skipping on chosen columns. It operates by stating that data is definitively not in the file, or that it is probably in the file, with a defined false positive probability (FPP). Bloom Filter Indexes are critical to building highly performant delta lake houses. In this article, we will address the question of how to get started with Bloom Filter Indexes.
Solution
A Bloom Filter Index is a Databricks specific index which can be applied to a particular column in delta tables. It is capable of improving query execution performance by over 50% when applied correctly. In this article, you will learn how to create and apply Bloom Filter Index on over a 1billion row table from the NYC Taxi Dataset and then compare the query execution performance to a replica table which does not have a Bloom Filter Index applied to the same replica column. Additionally, you will learn how to tune the Bloom Filter Index options and apply ZOrder optimizations on the table.
Create a Cluster
The very first step to getting started with Bloom Filter Indexes is to create a cluster in your Databricks environment. Note that Bloom Filters are automatically enabled. Nevertheless, you will see the code to enable bloom filter on delta tables in the subsequent sections. Also take note of the worker and driver type details for this cluster, which can be considered standard. This can be scaled as needed to further improve and optimize performance.

Create a Notebook & Insert Data
For this example, go ahead and create a SQL notebook. Most of the code and commands will be run using a combination of Scala and SQL within the notebook code blocks. The preliminary code that will need to be run will extract the 2019 NYC Taxi Data csv files and schema from Databricks datasets and will store it in a data frame. The original dataset contains approximately 84 million rows of data. The additional code which includes explode(array((1 until 14).map(lit): _*))) will duplicate the records 13 times to produce a dataset which is slightly over 1 billion rows. This larger dataset will prove useful when running queries, optimizing performance, and testing query times.

Here is the Scala code that you will need to run to create the required data set. You can either increase or decrease the number from 14 to size your dataset as desired.
%scala
import org.apache.spark.sql.functions._

val Data = "/databricks-datasets/nyctaxi/tripdata/yellow/yellow_tripdata_2019-*"
val SchemaDF = spark.read.format("csv").option("header", "true").option("inferSchema", "true").load("/databricks-datasets/nyctaxi/tripdata/yellow/yellow_tripdata_2019-02.csv.gz")
val df = spark.read.format("csv").option("header", "true").schema(SchemaDF.schema).load(Data)
val nyctaxiDF = df
  .withColumn("VendorID", explode(array((1 until 14).map(lit): _*)))
  .selectExpr(df.columns: _*)
Run a count on the dataset to confirm that you have over 1 billion rows in the dataset.
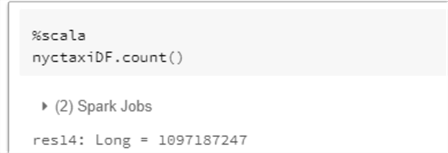
Here is the Scala code that you will need to run to get the count of the dataset.
%scala
nyctaxiDF.count()
At this point, you are ready to persist the staging dataset as delta format to your data lake using the following code. In this exercise, you will be required to create two versions of this for the Bloom and Non-Bloom tables. Let’s start with the Bloom data using this code.

Run the following Scala code to save the dataset to your ADLS gen2 storage account. Notice that the format is set to delta and the mode is overwrite.
%scala

  val nyctaxiDF_bloom = nyctaxiDF.write
  .format("delta")
  .mode("overwrite")
  .save("dbfs:/mnt/rcpdlhcore/datalakehouse/dlhcore/raw/delta/nyctaxi_bloom")
Similarly, run the following code to create an isolated and duplicated version of the non-bloom data in your ADLS gen2 account.
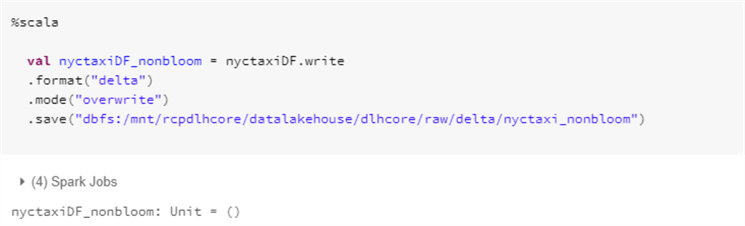
Here is the Scala code that you will need to run to create non bloom delta dataset in your ADLS gen2 account.
%scala

  val nyctaxiDF_nonbloom = nyctaxiDF.write
  .format("delta")
  .mode("overwrite")
  .save("dbfs:/mnt/rcpdlhcore/datalakehouse/dlhcore/raw/delta/nyctaxi_nonbloom")
After you run the code above, navigate to your ADLS gen2 account and folder structure to confirm that the data for bloom and non-bloom has been persisted to the data lake.

As expected, the data exists and has been created as Delta format.

Enable Bloom Filter Index
Now that you have some big data to work with, it is time to enable bloom filter in the notebook by running the following code. By default, this will be enabled, however I have noticed that this is not necessarily the case for the delta.bloomFilter, which is why it is always a good idea to manually enable this to ensure there are no errors caused further downstream.

Here is the SQL code that you will need to run to enable bloomFilter for both Spark and Delta.
SET spark.databricks.io.skipping.bloomFilter.enabled = true;
SET delta.bloomFilter.enabled = true;
Create Tables
In this section, you will need to create the required table which you will apply the Bloom Filter Index on. The following SQL code will create the delta table using the defined schema. Note that when you need to create an empty table, you would run the CREATE OR REPLATE TABLE command, and when you run this command, you will need to define the schema.

Here is the SQL code that you will need to run to CREATE OR REPLACE the nyctaxi_bloom table.
CREATE OR REPLACE TABLE nyctaxi_bloom (
      VendorID int,
      tpep_pickup_datetime string,
      tpep_dropoff_datetime string,
      passenger_count int,
      trip_distance double,
      RatecodeID int,
      store_and_fwd_flag string,
      PULocationID int,
      DOLocationID int,
      payment_type int,
      fare_amount double,
      extra double,
      mta_tax double,
      tip_amount double,
      tolls_amount double,
      improvement_surcharge double,
      total_amount double,
      congestion_surcharge double)
USING DELTA
As expected, upon running a SQL count on the newly created table, there are no records in the table.

Here is the SQL code that will give you the count of the nyctaxi_bloom table.
SELECT count(*) FROM nyctaxi_bloom
Also run the following SQL code to create the nyctaxi_nonbloom delta table. Notice that the schema is not defined here and will be inferred. Also, since you are specifying the location of the source data, the new table will be persisted with data on creation.

Here is the SQL code that you will need to run to create the nyctaxi_nonbloom table.
CREATE TABLE nyctaxi_nonbloom
USING DELTA
LOCATION 'dbfs:/mnt/rcpdlhcore/datalakehouse/dlhcore/raw/delta/nyctaxi_nonbloom'
As expected, upon running a count of the newly created nyctaxi_nonbloom delta table, notice that there are over 1 billion rows in the table. This table will be used to compare performance against the nyctaxi_bloom table which will have the Bloom Filter index applied.
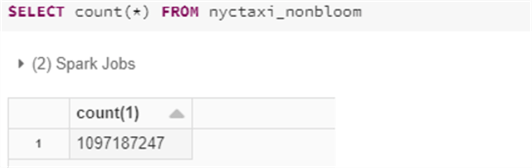
Here is the SQL code that you will need to run count the nyctaxi_nonbloom rows.
SELECT count(*) FROM nyctaxi_nonbloom
Create a Bloom Filter Index
It is now time to create the Bloom Filter Index on the nyctaxi_bloom table by running the following SQL code. For this exercise, use the tpep_dropoff_datetime column as the one to apply the Bloom Filter index on.
A Bloom Filter’s size depends on the FPP and number elements in the set for which the Bloom filter has been created. A lower FPP yields higher the number of used bits per element and the more accurate it will be, at the cost of more disk space and slower downloads. The default FPP of 10% requires 5 bits per element. The default FPP is 10% and the default numItems, distinct items in the column, is 1,000,000.

Here is the SQL code which you will need to run on the nyctaxi_bloom table to apply the Bloom Filter Index on the tpep_dropoff_datetime column. Leave the fpp to a default of 10% and apply 5% of the number of rows in the nyctaxi_bloom table as the numItems. In this case 5% of 1 billion is 50 million.
CREATE BLOOMFILTER INDEX
ON TABLE nyctaxi_bloom
FOR COLUMNS(tpep_dropoff_datetime OPTIONS (fpp=0.1, numItems=50000000))
Run the following code to view the metadata for columns in the nyctaxi_bloom table and notice from the details of column tpep_dropoff_datetime that the Bloom Filter Index has been applied.

Here is the Scala code that you will need to run to get the meta-data of the table, which would include details of a Bloom Filter Index if it has been applied to any of the columns.
%scala
spark.table("nyctaxi_bloom").schema.foreach(field => println(s"${field.name}: metadata=${field.metadata}"))
Next, run the following code to insert data into the nyctaxi_bloom table from the nyctaxi_nonbloom table and ensure the counts between the source and target matches.
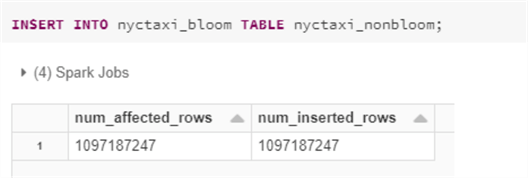
Here is the Insert SQL code that you will need to run.
INSERT INTO nyctaxi_bloom TABLE nyctaxi_nonbloom;
Optimize Table with Z-Order
The last step in the process would be to run a ZOrder optimize command on a selected column using the following code which will optimize the files by creating a zorder index on the VendorID column and will collocate the data based on this zorder column. Notice that this column is different from the Bloom Filter Index column. After the optimization completes, there are 36 files removed and 23 optimized files added. The max file size has been set to a little over 1.5 GB.

Here is the SQL code that you will need to run to optimize the nyctaxi_bloom table and zorder by VendorID.
SET spark.databricks.delta.optimize.maxFileSize = 1600000000;
OPTIMIZE nyctaxi_bloom
ZORDER BY VendorID
Verify Performance Improvements
Run the following count query on the nyctaxi_nonbloom table with a where clause applied to the Bloom Filter Index column and take note of the duration of the query execution.

Next, run the same query on the nyctaxi_bloom table and notice that time has been reduced by over 10 seconds, approximately a 50% improvement in performance.
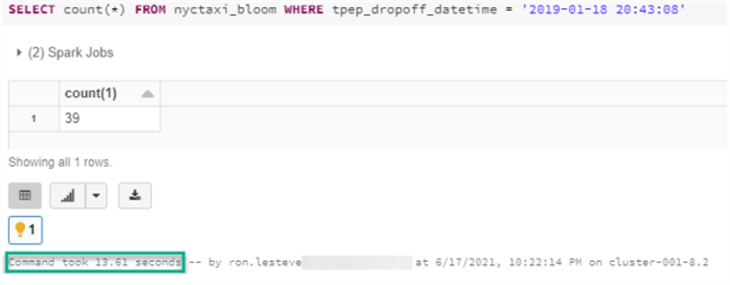
Here is the SQL count query which you will run as part of the performance test.
SELECT count(*) FROM nyctaxi_nonbloom WHERE tpep_dropoff_datetime = '2019-01-18 20:43:08'
Finally, for the nyctaxi_nonbloom table, try to filter on value which you know does not exist, which in this case would be to simply append the _ symbol after the date value, and take note of the execution time.

Once again, run the same query on the nyctaxi_bloom table and notice that the execution time is over 10 seconds less, an approximate 70% improvement in performance.

Summary
In this article, I introduced you to the Bloom Filter Index and walked you through an end-to-end exercise on how to create a Bloom Filter Index to optimize performance on a filtered column. Based on the stellar performance results, it is evident that the Bloom Filter Index is a promising performance booster to run needle in a haystack type queries which can filter extremely big datasets on a particular column. Overall, it promotes and support highly performant Data Lake houses.
Next Steps
- Read Microsoft’s article on Bloom filter Indexes for Azure Databricks Bloom filter indexes – Azure Databricks – Workspace | Microsoft Docs
- Read the following Wikipedia article to get a deeper understanding of exactly what a Bloom Filter is: Bloom filter – Wikipedia
- For more details on the specifics of the CREATE BLOOM FILTER INDEX command, read: CREATE BLOOM FILTER INDEX (Delta Lake on Databricks)

Ron C. L’Esteve is a Data and AI Leader and professional Author residing in Chicago, IL, USA. He is well-known for his impactful books and article publications on Azure Data & AI Architecture, Engineering, and Leadership. Ron holds a Master of Business Administration (M.B.A.) and Master of Science in Corporate Finance (M.S.F.) from Loyola University Chicago. Ron possesses deep technical skills and experience in designing, implementing, leading, and delivering modern Azure Data & AI projects for numerous clients around the world. He is a Motorola Certified Six Sigma Green Belt, a Microsoft Global Challenger, and also holds numerous additional Microsoft, Snowflake, and Databricks professional certifications in Big Data Engineering, Artificial Intelligence, Apache Spark and Data Platform Architecture.
- MSSQLTips Awards: Champion (100+ tips) – 2023 | Author of the Year – 2020-2021 | Rookie of the Year – 2019