Problem
Tables are the core of all databases. They are the most used objects in any database, and they are primarily what all other objects in a database are built around. Learning to create these tables in a structured way is the cornerstone for all DBAs. You cannot achieve a career of any kind as a DBA without first learning and mastering the art of table creation.
Solution
There are a couple of options available for creating a table in a database. One such option would be with a code block, often referred to as a script. In this option you create a block of code in SQL Server Management Studio (SSMS) to create your table, give the table a name, create columns, etc. The other option is by using the built-in SSMS Graphical User Interface (GUI). In this tutorial we will focus primarily on the latter option, using a GUI.
Pre-requisites
For this tutorial, you will need SQL Server and SSMS. I am using SQL Server 2019 Developer and SQL Server Management Studio v18.10. You can find a very good article for installing SQL Server and SSMS here. Although it covers the SQL Server 2019 Standard Edition, its similarity to the SQL Server 2019 Developer edition is remarkable. Its close enough to get you through the set up without any problems.
Create a Demo Database
Before we get started creating tables, we need a database where we can store them. You can use either an existing database or you can create a new one for testing. If you are planning on using an existing database, feel free to skip to the next section, “Check Database Permissions”.
Prior to creating a database, you may want to check your permissions to ensure that you have authority to create a database with your login. The following code snippet will verify your permission level on the SQL server instance you plan on using. Simply copy/paste the code into a new query editor in SSMS and press the F5 key on your keyboard. Don’t worry if you do not understand what all this is, how it works, or what it’s doing. This is something that you can learn later in other MSSQLTips tutorials. For now, just run the code to verify your permission level with the following syntax:
USE master;
GO

SELECT
   SYSTEM_USER AS 'User'
   , HAS_PERMS_BY_NAME ('master', 'DATABASE', 'CREATE DATABASE') AS 'Permission Status';
GO
Results:
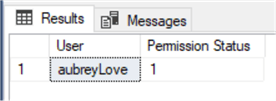
If a “1” is returned in the “Permission Status” column, congratulations, you have permission to create databases on your SQL Server instance. If a “0” (zero) was returned, you do not have permission to create a database. You may need to check with your IT department to get the necessary permissions applied to your login.
Now that we know we can create a database, let’s have a look at the two fundamental options for creating a database in SQL Server. One option is by using the SSMS (GUI) and the other is with a T-SQL command. The latter is accomplished by opening a new Query window and typing the following statement.
USE master;
GO
CREATE DATABASE MyTestDB;
GO
Since we are talking about creating objects through SSMS, let’s walk through that process. If you haven’t already done so, open your SSMS and connect to your SQL server instance. With that open, navigate to the “Object Explorer” and right click on “Databases” and select “New Database” from the list.
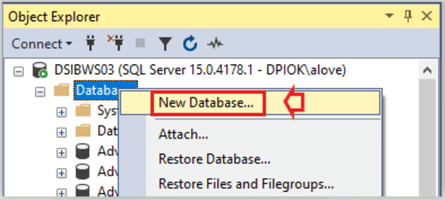
In the next dialog box that appears, simply add the name of your test database, like in the image below where I named my database as “MyTestDB”.

Next click “OK”. That’s it. Your test database is created and ready for you to use.
Check Database Permissions
Before we can create a table on a database, we first need to confirm that we have permission to do so. One of the easiest ways to accomplish this is with the following code snippet.
USE Mytestdb;
GO

SELECT
   SYSTEM_USER AS 'User'
   , HAS_PERMS_BY_NAME ('master', 'DATABASE', 'CREATE TABLE') AS 'Permission Status';
GO
Results:
If the number “1” is returned, congratulations, you have permission to create tables on this database. If a “0” (zero) is returned, then you do not have permission to create tables on this database. If you see a “0” (zero) returned, you can follow this link (Giving and Removing Permissions in SQL Server ) and try the options listed there. If that does not work, you may need to ask your IT administrator for assistance before continuing.
On a side note: if you have permissions to create a database, you probably have permissions to create tables and other SQL objects on that database.
SQL Table and Column Name Points of Interest
Before we jump right in and start building a database table, there are two important subjects that you must understand first. The first is covered in the remainder of this section “SQL Table and Column Name Points of Interest” and the second is contained in the next section “SQL Data Types”. These two sections cover the minimum you need to know before creating tables in SQL Server.
Only # and _ (pound sign and underscore) can be used as the first character of a column name. However, you should avoid using special characters or numbers as the first character in any database, table, view, column, etc. Numbers and special characters can be used in the middle or at the end of a column name.
When naming your tables and columns, there are a few guidelines that you must adhere to.
- Names cannot contain blank spaces.
- Names cannot start with numbers.
- Names cannot start with any special characters such as @,#,$, %, etc.
- Names can contain upper- and lower-case letters in any combination.
- Names can contain special characters and/or numbers as long as the name does not start with them.
- Names should be descriptive and at the same time be short and to the point.
- Names should not use reserved keywords or data types. More on those later.
Often you will see a SQL script that has the @ sign as the first character of a column or table name. This is the exception to rule but not in the sense that you might think. Using the @ sign in SQL is declaring that name as a variable or temporary table to be used only during the execution of that query.
One of the most important things you should do as a DBA, is to keep your naming convention consistent on all databases, tables, views, columns, etc. Check out this tip – Use Consistent SQL Server Naming Conventions.
SQL Data Types
SQL Server data types determine what type of data will be populated within a given column. All columns in a table must be associated with a data type, there are no exceptions to this rule. There are several data types available but often we find ourselves using one of three different categories of data types.
- Character (CHAR, VARCHAR, NVARCHAR, TEXT)
- Numeric (INT, BIT, DECIMAL, MONEY, NUMERIC, FLOAT, etc.)
- Date (DATE, TIME, DATETIME, YEAR, MONTH, etc.)
![]() For the record, “text”, “ntext” and “image” data types will be removed in future versions of SQL Server. Although you can still use them in versions as late as 2019, it is not recommended to do so. Also, it’s not recommended that you use the MONEY data type because of its rounding error. Instead, use the NUMERIC data type.
For the record, “text”, “ntext” and “image” data types will be removed in future versions of SQL Server. Although you can still use them in versions as late as 2019, it is not recommended to do so. Also, it’s not recommended that you use the MONEY data type because of its rounding error. Instead, use the NUMERIC data type.
For character data types, we declare them by appending a desired length to the end of the data type when it is called. For example; VARCHAR(20) or CHAR(20). The (20) represents the maximum number of characters we want to allow in that column. If we wanted an unlimited number of characters, such as in a column that will contain comments from the user, then we can use the VARCHAR(MAX) data type.
Likewise, we can use the DECIMAL data type to represent decimal valued numbers or currency. If we want a column to contain dollar values, we will create the DECIMAL data type as DECIMAL(12, 2). The “12” represents how many characters we want in total (to the right and the left of the decimal point) and the “2” represents how many characters we want to the right of the decimal point.
The table below shows some of the characteristics of the most common data types.
| Data Type | Range | Storage Size |
|---|---|---|
| BIT | Either 0 or 1 or NULL | 1 Byte |
| INT | -2,147,483,648 to 2,147,483,647 | 4 Bytes |
| BIGINT | -9,223,372,036,854,775,808 to 9,223,372,036,854,775,807 | 8 Bytes |
| SMALLMONEY | – 214,748.3648 to 214,748.3647 | 4 Bytes |
| MONEY | -922,337,203,685,477.5808 to 922,337,203,685,477.5807 | 8 Bytes |
| DATE | 0001-01-01 through 9999-12-31 – 00:00:00.0000000 through 23:59:59.9999999 | 8 Bytes |
| TIME | 00:00:00.0000000 through 23:59:59.9999999 | 5 Bytes |
| DATETIME | 0001-01-01 through 9999-12-31 – 00:00:00.0000000 through 23:59:59.9999999 | 8 Bytes |
| CHAR() | Up to 8,000 characters in Byte pairs | Varies |
| VARCHAR() | Up to 8,000 characters in Byte pairs | Varies |
You can read more about data types here and here.
Using SSMS Table Designer to Create a Table
In this section, we are going to create a simple table using the SSMS table designer. In short, we are going to use the built-in GUI.
With the SSMS interface open, expand “Databases” and expand “MyTestdb” that we created earlier in this tutorial. Now right click on “Tables”, select “New”, then “Table” as shown below.

In the query editor you will see a new query with three columns as shown below.

When creating a basic SQL table, we need, at minimum, these three columns (Column Name, Column Data Type, and Allow Nulls or Not Null) to be populated with acceptable values which serve as the basic column definition.
Unlike the process of creating a table using T-SQL commands, where you first declare the table name then the columns of the table, the GUI method requires the table name to be assigned in the last step.
Let’s create a table named Employees. We need to add columns that would be specific to employees like First Name, Last Name, Employee ID, Hire Date, etc. and assign the appropriate data type for each column. Finally, we will determine whether that column will allow null values.
As shown in the following image, you can manually type in the column names and data types, or you can select a data type from a drop-down menu.

The Allow Nulls column is a simple check box. If it’s checked, that column will allow nulls. Unchecked indicates that the column will not allow nulls and must be populated with data for every row.
As a general rule, you will need the employee first name, last name and ID set to not allow nulls. The middle name is optional (allows nulls) since not everyone has a middle name.
When you finish adding the columns that you would like in the table, press Ctrl + S to name and save the table. You should see a “Choose Name” dialog box appear with the default “Table_1” table name highlighted in blue, like in the image below.
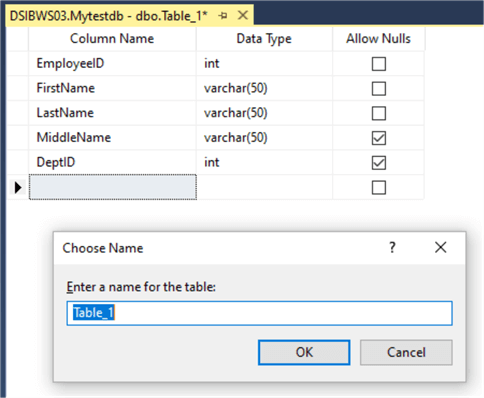
At this point you can name the table to something like “Employees” and click “OK” to continue.
Now that we have a basic table, let’s start adding some properties like a Primary Key.
Using SSMS Table Designer to Create Primary Keys
A Primary Key constraint is the cornerstone of a well-designed table. As the name suggests, the Primary Key uniquely identifies each row in a table. Primary keys will never have duplicate values within a table, and it will not allow NULL values. Whether you realize it or not, we all are connected to a primary key in a database table somewhere in our digital lives. This may be in a school, business, organization, etc. where we are assigned a unique ID such as studentID, employeeID, customerID, etc. This unique setup affords us the fact that every time a new student, employee, etc. is added to a database table, that new entry will be assigned a unique identification value.
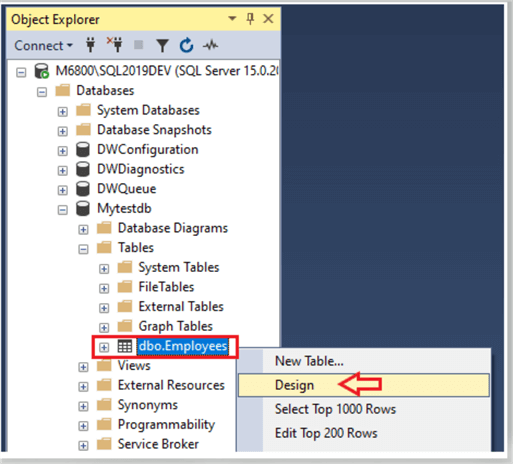
Using the SSMS Table Designer, we can specify various properties such as Primary Key, Foreign Key, Identity, Computed Column values, etc. Now that we have created our Employees table, let’s open it back up in the “Design” mode. This will be the same mode we were in when creating the table.
To get back in the design mode, right-click on our Employees table found in the object explorer and select “Design” from the drop-down menu as shown in the next image.
The image below shows what to expect if you have followed the process thus far and opened the “Employees” table in design mode. Here we see two main sections as we did when creating the table. The top section, called the “General” section, list the three main components of our table; column name, data type, and nullability status.
The column properties dialog box (just below the table structure) is broken into two basic categories, General and Table Designer. We will not cover most of those items in this section of the tutorial; we will focus only on the task of creating a primary key on our “Employees” table. Just know that the remaining features of the column properties will follow in the next section.

In the top dialog box, click on the arrow next to the “EmployeeID” column name and click on the “Set Primary Key” option in the drop-down menu.

As you can see in the image below, we now have a yellow key next to the “EmployeeID” column name. This indicates that a primary key has been set and assigned to the “EmployeeID” column in our table.

Every key assigned to a column in a table is given a unique name. There cannot be two or more keys with the same name on the same table. Likewise, this rule also applies at the database level as well. Each key in a database must be unique.
Creating a basic table and assigning a primary key is as simple as that using the SSMS designer mode. Now, let’s look at the “Column Properties” section in more detail.
Exploring Column Properties with SSMS Table Designer
When we select a column name such as “EmployeeID”, the properties for that column show up in the “Column Properties” box below the table.
The column properties dialog box is broken into two basic categories, General and Table Designer as highlighted in the green boxes.
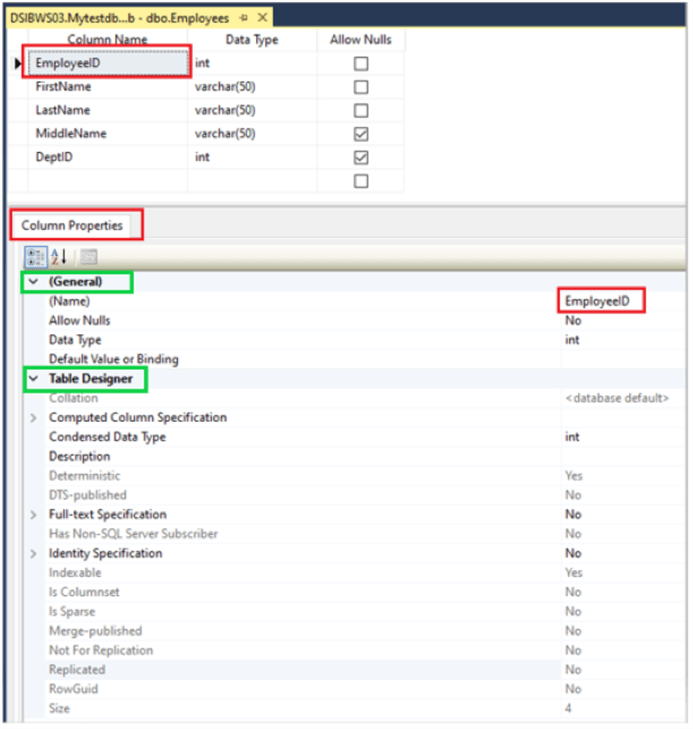
The properties in the General section allow the user to modify the column name, data type and change whether the column will allow nulls or not. You may also set a default value such as “Not Provided” for a column such as the middle name. This can be accomplished by selecting the column in the table design box, (top portion) and setting the default value you would like assigned to that column in the “General” section (bottom portion) if a user does not provide a value. In this case we assigned the value “Not Provided” as the default for the middle name. See the red box in the image below.
You can press Ctrl + S on your keyboard to save your changes at any time. Just for the record, it’s a good idea to save your work frequently.

Another common option in the “Column Properties” is to alter the primary key to auto-populate a unique value each time a new record is added. We do this by modifying the “Identity Specification” values that’s found in the “Table Designer” section of the Column Properties.

In the “Identity Specification” section we have three rows of options to work with.
- (Is Identity)
- Identity Increment
- Identity Seed
- Specification 1. – is a Yes or No option only selected via drop-down menu when you click on the word “No” (the default setting) in the right column.
- Specification 2. – Is the value that you wish to increment by. You can set this to any value you like such as 1, 3, 5, 10, etc. What ever value you set here determines the next value of the next row created.
- Specification 3. – Determines the seed value. This will be the starting (first) value assigned to first record.
Using our table “Employees” let’s set the “colID” column to auto-populate with a value each time a record is added. To do this, we set the (Is Identity) value to “Yes”. Next, we need to provide an increment value and a seed value. In the sample below, I set mine to a seed value of 1 with an increment value of 1.

Now, for every record inserted into the table, the “colID” column will populate with a new and unique value.
At this point, let’s press “Ctrl” + “S” to save our work and move on to creating a Foreign Key on our table.
For more information on the other options in the “Column Properties” refer to the article: Understanding Column Properties for a SQL Server Table
Using SSMS Table Designer to Create Foreign Keys
Let’s first look at what a foreign key (FK) is and how it works. A major part of relational databases is relationships, and the foreign key is an attribute that ensures referential integrity is applied. The foreign key is a column or combination of columns to enforce a relationship of the data in two or more tables.
Below is a sample diagram showing the relationship between the employees table and the “empDepartment” table. As you can see, the “DeptID” column in the employees table is a foreign key referencing the primary key “DeptID” in the “empDepartment” table.

In the following sections, we will go through the steps of making this Primary/Foreign key relationship that will bind these two tables.
First, add a new table called “empDepartment” as in the sample below:
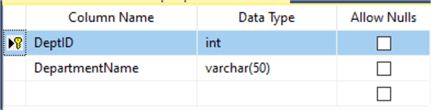
Don’t forget to set that Primary Key on the DeptID column.
Now, let’s go back to the “Employees” table and create a foreign key that relates to the DeptID column on the “empDepartment” table.
Right-click on the arrow next to the column “DeptID” and select “Relationships” from the drop-down menu.

In the next dialog box, select “Tables And Columns Specifications” then click on the “…” (ellipsis) that appears to the far right.

Okay, this is the part that gets a little tricky for some, but if you stop and think about it, it’s really quite simple. Remember, we want to create our Foreign Key on the employees table, and we will need it to reference a Primary Key on another table. You cannot have a Foreign Key reference a non-primary key column unless that column has a Unique constraint that prohibits duplicate values.
With that said, our Foreign Key will be on the employees table and it will reference the Primary Key column “DeptID” on the “empDepartment” table. In the image below, we can see that the left row is the Primary key table (in the red box) and the right row (in the green box) is the Foreign Key table.

Notice the values associated with item numbers 1-4 on the image above. Study that configuration and you will see how it makes sense. On the Primary Key table we want to select the “DeptID” #2 from the “empDepartment” table #1. Likewise, on the Foreign Key table, we want to select the “DeptID” #4 from the “Employees” table #3.
Clicking the “OK” button will save the changes to your tables and close the dialog box. Now that we have our tables built and our constraints in place, let’s add some data to experiment with.
Inserting Data into the Table Using SSMS Table Designer
There are a number of ways to insert data into a table. In this tutorial we will accomplish this via the SSMS GUI.
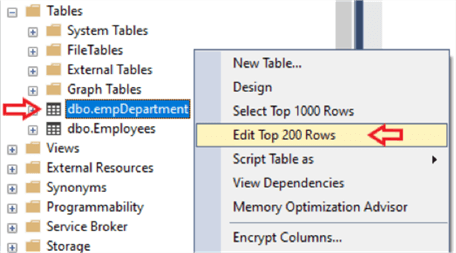
To start, right click on the “empDepartment” table and select “Edit Top 200 Rows” from the menu.
With the table opened in “edit” mode, insert the following data into the “empDepartment” table as shown in the image below.

Press “Ctrl” + S on your keyboard to save changes and close the query window by clicking on the “x” on the query tab.
Following the same process, right click on the “Employees” table and select “Edit Top 200 Rows” from the drop-down menu and add the following data.

Press “Ctrl” + S on your keyboard to save changes but don’t close the window. As you can see in our sample data above, the values in the “DeptID” column on our “Employees” table correspond to the values available in the “DeptID” column of the “empDepartment” table.
Now, what if we add an employee with a “DeptID” that does not exist in the “empDepartment” table. Basically, nothing, other than the row will be added just like the others were. If you do not want entries that contain an erroneous DeptID, then we need to go back to the design mode for the “Employees” table and add a restriction to prevent this from happening. As mentioned, currently we can add the following row to the “Employees” table and it will submit without any error, but that’s not what we want for our practice sample.
To resolve this issue and prevent unwanted data in our employees table, we must add a restriction to allow only the values that are available in the “empDepartment” table. To do this, right click on the “Employees” table and select “Design” from the drop-down menu. Right click on the arrow next to the “DeptID” column and select “Relationships” as we did earlier in this tutorial. Now click on the “INSERT and UPDATE Specifications”, option 1 in the image below, then click on option 2 “Update Rule” and finally on option 3, select “Cascade” from the drop-down menu.

This will provide a “cascading” effect on the two tables. What does that mean exactly? Well, this simply means that once these two tables are locked together in this manor, you cannot delete an existing row in the “empDepartment” table if there is a corresponding value listed in the “Employees” table. Likewise, you cannot insert a new row in the “Employees” table that contains a “DeptID” that’s not listed in the “empDepartment” table.
You can, however, remove a row in the “empDepartment” table as long as that “DeptID” value has not been used in the “Employees” table. Once you call that “DeptID” in the “Employees” table, that value cannot be removed from the “empDepartment” table without first removing all entries with that “DeptID” in the “Employees” table.
Now that we have the restriction in place, let’s try adding that row of data with the “DeptID” number that is not listed in the “empDepartment” table.
When we try adding an entry that has a “DeptID” not listed in the “empDepartment” table, then this error is returned.

This is because we do not have a value of 701 in the “empDepartment” table and as such it is not a valid entry. If we need this new “DeptID” value added, we can simply add it in the “empDepartment” table allowing us to then add it to the employees table as needed.
Summary
In this tutorial, we created two tables using the SSMS GUI and then added some constraints via that same GUI utility. We learned a few pitfalls along the way and most importantly, how to avoid them. We also touched on the option of creating a constraint that would limit what values could be added the data in one table with the restriction set via the reference of a different table.
Next Steps
- Take these a step further by modifying the code and experimenting \ learning.
- Test some of those scenarios to see if you can expand on their functionality.
- Review the following tips, SQL statements and other resources:
- Microsoft Docs CREATE TABLES
- Understanding Column Properties for a SQL Server Table
- SQL Server Data Types Tips
- SQL Server T-SQL Create Table Statement
- SQL Drop Table Examples with T-SQL and SQL Server Management Studio
- Alter Table Modify Column ONLINE Issues in SQL Server
- SQL Server SELECT Statement Examples
- SQL INSERT INTO SELECT Examples
- SQL UPDATE Statement
- The T-SQL DELETE statement

Aubrey Love is a self-taught DBA with more than six years of experience designing, creating, and monitoring SQL Server databases as a DBA/Business Intelligence Specialist. Certificates include MCSA, A+, Linux+, and Google Map Tools with 40+ years in the computer industry. Aubrey first started working on PC’s when they were introduced to the public in the late 70’s.
- MSSQLTips Awards: Author of the Year – 2022 | Trendsetter (25+ tips) – 2023