Problem
When working with a database you need the ability to create, read, update and delete data, this is an acronym for CRUD operations. In this SQL tutorial, we will look at some basic examples of how to do this with our test HR database that we have been using to cover various aspects of building a database application.
Solution
In this tutorial, we will build upon the concepts we learned from this article. We will work through the following CRUD functionality – INSERT, UPDATE, DELETE, and SELECT statements and highlight the areas you should be aware of when updating or deleting data. We will be using the HRDatabase, tables and data from this previous article. All of these queries will be run in the HRDatabase we created in the previous article.
SELECT from Tables
To choose data from a SQL database, you use the SELECT statement, and the information returned is known as the result set.
To get all the data from the Companies table, you do a “select all from the companies table”, in the example below we use an asterisk (*) which means all columns.
USE HRDatabase
GO
SELECT * FROM dbo.Companies
Remember that we created relationships between tables, such as one-to-one or one-to-many. For example, one Company can have multiple Employees, and many Employees can work at one Company.
You can run the below SELECT statements against the HRDatabase to return all of the data.
SELECT * FROM Companies
SELECT * FROM Employees
SELECT * FROM Title
SELECT * FROM Gender
SELECT * FROM LeaveTypes
SELECT * FROM Leave
SELECT * FROM Addresses
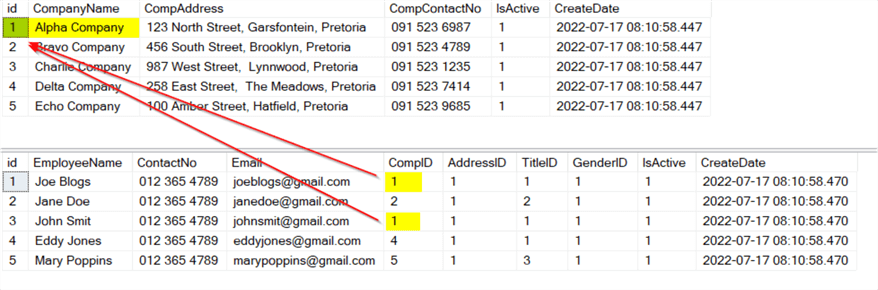
In the output below, I show how the data relates to other data.
Here is an explanation of the relationship between the Companies and Employees data (the first two outputs in the image below):
- The id column from Companies has a link to the Employees CompID column
- Anyone Company can have multiple Employees, which is a one-to-many relationship

SELECT Data from Single and Multiple Tables
To combine data from two tables (Companies and Employees), you use a join, where we specify that the CompID values in the Employees table have to equal the ID values in the Companies table.
SELECT Companies.CompanyName
      ,Employees.EmployeeName
      ,Employees.ContactNo
      ,Employees.Email
      ,Employees.CompID
FROM Companies
JOIN Employees ON Employees.CompID = Companies.id
See the following SQL Server JOIN Tables Tips for more information.
To make the code easier to write and read, we can also use aliases. Here is additional information on SQL aliases:
- SQL Alias – SQL aliases are used to give a table, or a column in a table, a temporary name.
- SQL – Alias Syntax – You can temporarily rename a table or a column by giving another name known as Alias. Table aliases are used to rename a table in a specific SQL statement. The renaming is a temporary change, and the actual table name does not change in the database. The column aliases are used to rename a table's columns for the purpose of a particular SQL query.
Here is an example where we alias Companies as "co" and Employees as "emp".
SELECT co.CompanyName
      ,emp.EmployeeName
      ,emp.ContactNo
      ,emp.Email
      ,emp.CompID
FROM Companies co
JOIN Employees emp ON emp.CompID = co.id
Here is another example with a WHERE clause:
-- Get all the Employees working for Alpha Company, add the following filter (where clause):
SELECT co.CompanyName
      ,emp.EmployeeName
      ,emp.ContactNo
      ,emp.Email
FROM Companies co
JOIN Employees emp ON emp.CompID = co.id
WHERE co.id = 1
INSERT a New Record into a Table
When your database is set up correctly using primary key and foreign key relationships, you will not be able to issue an insert statement for an employee that works for a company that does NOT exist. This also holds true for some of the other tables we setup that have foreign key relationships.
Let’s check out one example.
SELECT * FROM Employees
SELECT * FROM LeaveTypes
SELECT * FROM Leave
Joe Blogs would like to take annual leave over the second half of December this year. Let’s insert his leave.
INSERT INTO Leave (LeavetypeID, StartDate, EndDate, LeaveNotes, EmpID)
VALUES (1, '2022-12-15', '2022-12-31', 'For a well-deserved break in South Africa Kruger National Park!', 1)
SELECT * FROM Leave
UPDATE the Data
When updating the data, you should always be careful and keep your focus. Always do a SELECT of the data that you want to work with first to test your WHERE clause.
IMPORTANT TIP: Always make sure an UPDATE, DELETE, or INSERT is preceded by comments (–), this is a personal preference!
It is easy to just press F5 to execute the contents of the query window and accidentally do a DELETE, UPDATE or INSERT that should not have happened!
Create the select statement of the data that you want to update:
SELECT *
FROM Employees e
WHERE CompID = 1 -- parameter
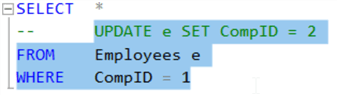
Make sure that the result set is the data you want to UPDATE, then add the UPDATE after some comments, as in the example below.
SELECT *
-- UPDATE e SET CompID = 2
FROM Employees e
WHERE CompID = 1 -- parameter
Now, you can highlight at the start of the UPDATE until after the WHERE clause, and then run it or press F5!
Always make sure you have a WHERE clause in your UPDATE!
DELETE Operations on a Table
Deleting some records is straightforward, but ALWAYS make sure you have a WHERE clause in the DELETE script!
SELECT *
FROM Employees
Again, you can add the DELETE with some comments in front to protect you from an UNWANTED DELETE!
SELECT *
-- DELETE
FROM Employees
WHERE CompID = 4
I want to emphasize, when working with UPDATE, INSERT and DELETE, you should always be focused to ensure what you are doing!

Manipulating Data when Working with a JOIN
As in the examples above, create your join statement, add the UPDATE statement after some comments, and test your statement, first by highlighting the whole SQL statement, and run it.
When your result set has the records you want to update, highlight from the UPDATE until after the WHERE clause, and run it.
SELECT  c.id
      , c.CompanyName
      , e.EmployeeName
      , e.ContactNo
      , e.Email
      , e.CompID
-- UPDATE e SET CompID = 3
FROM Companies c
JOIN Employees e ON e.CompID = c.id
WHERE c.id = 2
Check your result set to make sure the UPDATE worked as expected.
SELECT  c.id
      , c.CompanyName
      , e.EmployeeName
      , e.ContactNo
      , e.Email
      , e.CompID
FROM Companies c
JOIN Employees e ON e.CompID = c.id

CASCADE Option when Defining the Foreign Keys
To conclude this tutorial, let’s look at the CASCADE option when you define foreign keys. If you remember from the third tutorial, the CASCADE option in the foreign key takes care of handling associated data. Let’s take a look!
Run the two selects below.
SELECT * FROM Companies
SELECT * FROM Employees
As you can see, two employees are working at Alpha Company. What will happen if you delete Alpha Company, which has two employees working for it?
DELETE Alpha Company from the Companies table.
SELECT *
--DELETE
FROM Companies WHERE ID = 1
Check the Companies and Employees tables again.
SELECT * FROM Companies
SELECT * FROM Employees

You can see that Alpha company has been removed and the two employees linked to Alpha company have been removed.
Foreign Key Settings
How can we check the actions defined on the foreign keys? Just use the command below.
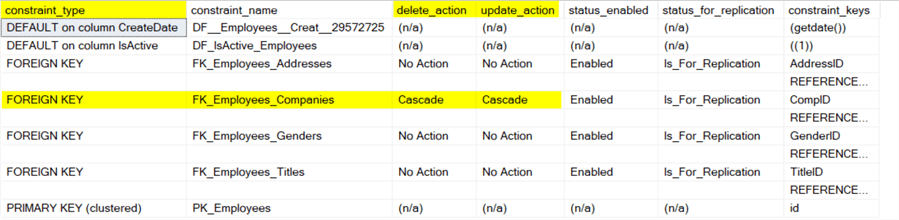
EXEC sp_help Employees
See the delete_action and the update_action of the FK_Employees_Companies foreign key in the image below. It has been created with a CASCADE option on delete and update actions, meaning that the employees will be deleted when the company they are working for (connected to) is removed (deleted) from the Companies table.
Clean up by dropping the HRDatabase database
Use this code to drop the HRDatabase if you don’t want to keep it.
--Clean up the database
USE master
GO

ALTER DATABASE HRDatabase SET SINGLE_USER WITH ROLLBACK IMMEDIATE
GO

DROP DATABASE IF EXISTS HRDatabase
GO
Next Steps
In the next step, we will look at how to create Clustered and Non-Clustered indexes.
See the following articles as well:

Jan has years of experience in Information Technology which ranges from Unix Administration through System Administration and development, Web and Database Development and Administration and applying Agile methodologies. Jan has been working with databases since 1996 when he had his first exposure to Sybase databases. He got involved with SQL Server in the early 2000’s and had exposure to SQL Server 2000, 2005, 2008 and all the rest. Jan likes to find easy and secure ways to host data and has been using Sybase, SQL Server, and MySQL. He has a great passion for working with data and believe the best way to become an expert in a field is by teaching the subject.
- MSSQLTips Awards: Rookie of the Year Contender – 2022


