Problem
On many occasions, I have seen business users implementing this very common business requirement of extracting email attachments from their emails and loading them to a folder in SharePoint before utilizing the data either in Power BI or Excel. Some then take a further ‘boring’ step of renaming the files, particularly when the email attachments have the same file names.
Users have found it easier to set up a Power Automate flow to automate the extraction of email attachments to SharePoint folders. But I have seen them struggle with the later part of renaming the files. Since the files are not renamed, they would be overwritten each time a new file arrives in the SharePoint folder. This might not be the plan for the business team.
Solution
However, in this tip, I will demonstrate a step-by-step approach to configure and order the Power Automate flows to ensure uniqueness in the data files in the SharePoint folder by applying a datetime stamp to each file loaded.
To demonstrate this, I will assume the email attachments are coming from an Outlook email account, that there is a single attachment on each email, and that the attachments would be extracted using Power Automate and loaded into a SharePoint folder.
Step 1: Create When a New Email Arrives
This is the first step to creating a monitor for when an email with certain attributes and content arrives in the email account configured.
Since we are automating the process, we need to choose the “Automated cloud flow” option, as seen in the image below.

Once you click on Automated cloud flow, the next window asks you to name the flow, search for Outlook, and select “When a new email arrives (V3),” as seen in the image below.

Step 2: Configure When a New Email Arrives (V3)
To configure this step, consider where the emails with the attachments are landing in your Outlook account. In this demo, I will assume it is landing in your “Inbox,” but if this is not the case, click on the file symbol within the “Folder” section and select the appropriate landing section, as seen in the image below.

Next, for simplicity, I have ignored the “To,” “CC,” “To or CC,” “From,” and “Importance” sections. These are not very important in this example. But if you are sure the email comes from a particular sender, then you can enter the email id in the “From” section. Once all relevant info is entered, that completes the configuration of this flow step.

Step 3: Create a File in SharePoint
Once the step above is completed, click on “New step,” as seen in the image below.
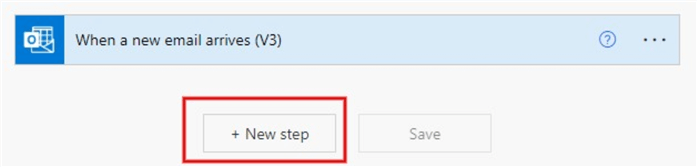
A new window will appear called “Choose an operation.” Enter “Create a file” or “Create file” in the search box and select Create file | SharePoint, as seen in the image below.

Step 4: Configure Create a File
There are four sections to configure in this step, but it’s where much of the work would be done.
In the “Site Address” section, click the dropdown and select your SharePoint site address from the list, as seen in the image below.

In the “Folder Path” section, as in the case of the Site Address, click on the folder symbol and navigate to the folder where you want to save the attachments. For simplicity, I have provided images of how I navigated to the root folder path I created to save the attachments, as seen in the images below.


So, as can be seen in the last image above, my root folder path entered is indicated in the next image below, yours might not be this long.

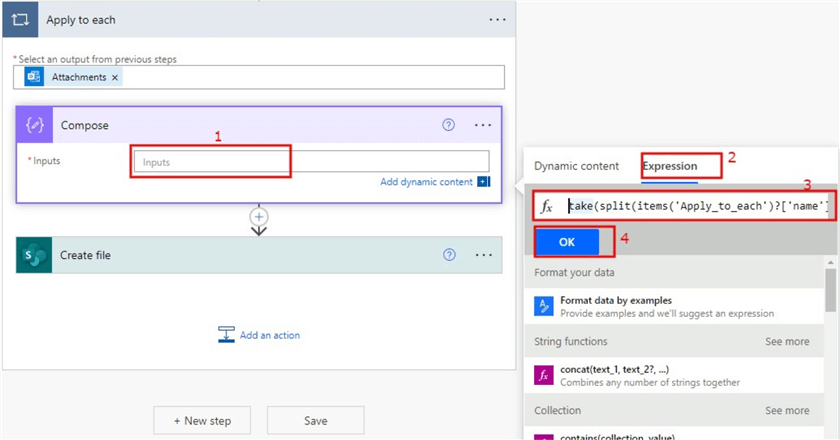
In the “File Name” section, I used the Dynamic content value of “Attachments Name,” as seen in the image below.

However, once I select the Dynamic content, an “Apply to each” operation is automatically created, as seen in the image below. This ensures that if there is more than one attachment in the email, it should be able to perform a loop on the attachments individually.

In the “File Content” section, click on Dynamic content and select “Attachments Content,” as seen in the image below.

After completing the above steps, click Save.
At this stage, the flow should be able to automate the extraction of the attachment files and save them in the SharePoint folder.
The remaining steps in this tip will help with the following:
- If the file names are always the same and you do not want to overwrite an existing file in the SharePoint folder
- If you want to add a datetime (date) stamp to each file as they are loaded into the folder.
Step 5: Create Three Compose Actions for File Name, Extension, and DateTime
Within the Apply to each operation, we need to isolate and create three compose action steps:
- Get the File Name
- Get the Extension
- Get the DateTime
To ensure we can add a datetime stamp to the file name, we first need to separate (split) the file name and extension. For example, we are working with an Excel file called “Book1.xlsx.” To add a datetime stamp, we would need to 1) split the “Book1″ from “xlsx,” 2) include the datetime between them, and 3) combine them again to something like “[_Book1_]_19-12-2022 04_02 PM.xlsx“.
Get the File Name
To get the File Name, we would add a compose action to the “Apply to each” operation earlier and enter the expression below. Please see this article for more information on how this expression was constructed.
take(split(items('Apply_to_each')?['name'],'.'),add(length(split(items('Apply_to_each')?['name'],'.')),-1))
On the Power Automate flow, within the “Apply to each” step, click on “Add an action,” and in the search section, enter “Compose” and select “Compose Data Operation,” as seen in the image below.

Next, click the “Create file” action created earlier, and while holding it down, drag it to the bottom of the new Compose action step such that the ordering is as seen in the image below.

Next, click on the “Inputs” section of the compose action step and select the “Expression” tab. On the expression (fx) section, enter the expression to split the file name from the extension as declared earlier. Click “OK.” See the image below.
Note: It is good practice to rename this step. To do this, click on the ellipses on this step and select “Rename,” as seen in the image below. For this example, I have renamed it “File Name part.”

Get the Extension
To get the Extension, we need to add another Compose action step to the “Apply to each” operation and enter the expression below:
last(split(items('Apply_to_each')?['name'],'.'))
Similar to when we added the “Get the File Name” compose action, within the “Apply to each” step, click on “Add an action.” On the search section, enter “Compose” and select “Compose Data Operation.” However, this time it should be under the initial compose action created earlier, as seen in the image below.

Paste the “Get the Extension” expression declared earlier into the expression section and click “OK.”
Note: It is recommended that you rename this action step, too. For this example, I have renamed it “File Extension part,” as seen in the image below.

Get the DateTime
To get the DateTime stamp part of this solution, we could use the utcNow() function, but this might give a date output that doesn’t match your actual time zone. Thus, I have applied some logic to ensure this can be altered to match my time zone in London. For a complete list of all UTC Time Zone strings and display names, check out this Microsoft documentation.
As we did with the other two, another compose action is needed. Within the “Apply to each” step, click on “Add an action.” On the search section, enter “Compose” and select “Compose Data Operation,” as seen in the image below. In the Input section, paste the expression below, then click “OK.”
convertfromutc(utcNow(), 'GMT Standard Time', 'dd-MM-yyyy hh:mm tt')
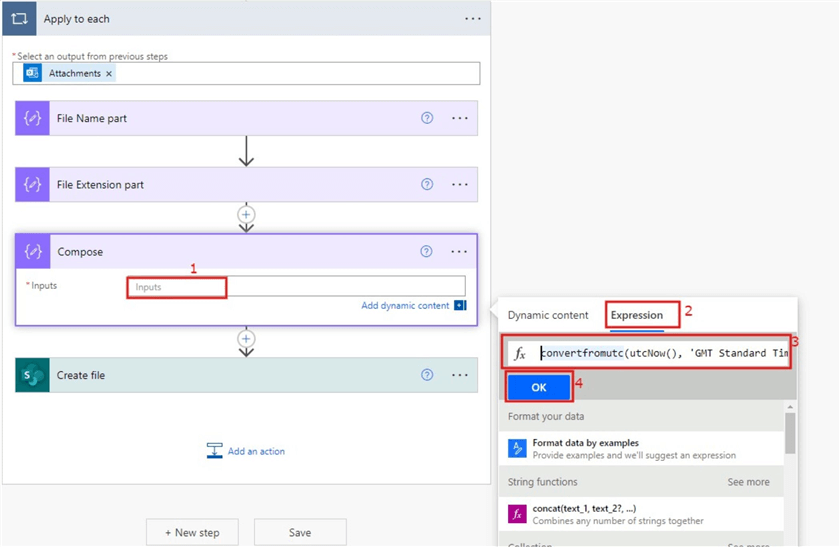
Note: Again, it is recommended to rename the action. For this example, I have renamed it “Date part.”
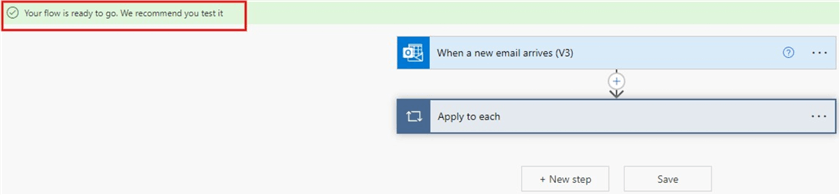
At this point, the flow should now look like the image below.

Step 6: Combine the Outputs of the Three Compose Actions as File Name
In Step 4, we used the “Attachments Name” from the dynamic content to fetch the file name. This will create the file in the SharePoint location, but it will be overwritten each time the flow is triggered.
To ensure uniqueness in the file names, we need to combine (concatenate) the outputs of the three compose actions we have created in Step 5. To do this, we need to use the expression below.
concat(outputs('File_Name_part'),'_',outputs('Date_part'),'.',outputs('File_Extension_part'))
In the expression above, I have concatenated the “File Name part” compose action with the “Date part” compose action, separating them with an underscore (“_”). Then I added the “File Extension part” compose action, which was separated with a dot (“.”) delimiter from the other combination. Read this blog to learn more about the Power Automate CONCAT function.
To enter the expression, delete the “Attachments Name” on the “File Name” section we initially entered. Then, click on “Add dynamic content,” click on the “Expression” tab, enter the expression above in the expression (fx) section, and click “OK,” as seen in the image below.

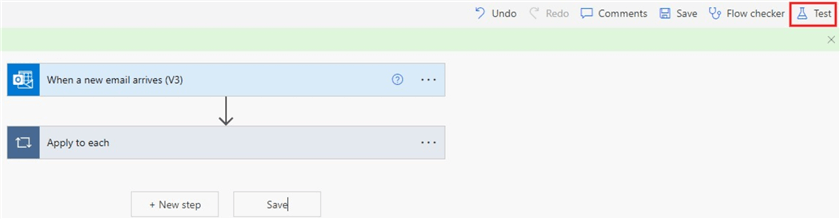
Step 7: Save and Test the Flow
To save, click on the “Save” button at the bottom of the page, as seen in the image below.

If the flow is saved successfully, you should see a message appear at the top:
Next, we need to test to see if this flow works. Click “Test” at the top right corner of the screen, as shown below.
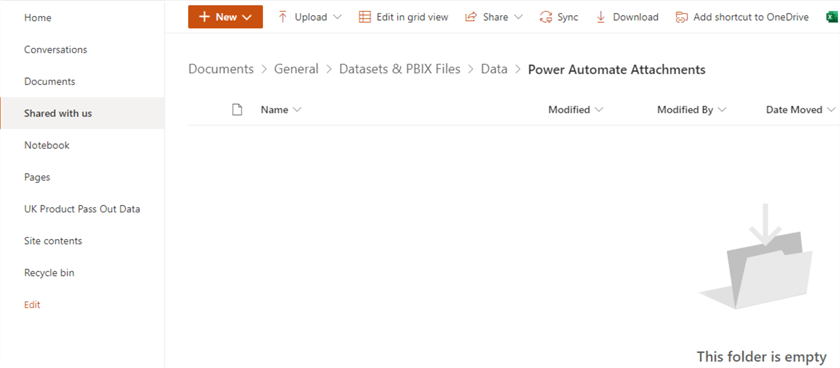
Quickly, let’s verify that we have no files currently in the SharePoint folder, as seen in the image below.
Select “Manually” on the window that pops up on the Power Automate flow and click “Test,” as seen in the image below.

Next, I’ll send an email with the attachment to my Outlook email. Below is an image of my inbox with the email and attachment.

Now, go back to the Power Automate flow and see if it has tested and worked, as seen in the image below.

Also, if we check the SharePoint folder, we can now see that a file with a datetime stamp attached to it has been uploaded automatically, as seen in the image below. Note: You may need to refresh your SharePoint page.

To test this further, I will send another attachment file to my Outlook email and see if it will create a new file with a different datetime stamp in the SharePoint folder. Below, a new file with a unique datetime stamp has been created after the first one.

In summary, it is beneficial and essential that readers understand the basics of using Power Automate to navigate more easily within this Power Platform tool. I have included a link in the next steps in getting started with Power Automate. This blog demonstrates an approach to creating a datetime stamp on file names using Power Automate, creating unique file names each time an attachment is uploaded. It is not an approach to make the file names more beautiful, but it will keep them unique.
Next Steps
- Get more information on getting started with Power Automate in this Microsoft documentation.
- See this excellent blog on adding datetime stamp to file names in Power Automate by tomriha.com.
- Read more on Time Zone Ids from this Microsoft documentation.
- Read this blog by SPGuides.com on using CONCAT in Power Automate.
- Read more on SPLIT function in Power Automate in this blog.
- Read more on LAST function in Power Automate.

Kenneth A. Omorodion is a Microsoft Certified Solutions Associate (MCSA) with 12+ years of enterprise application experience in Power BI, DAX, Microsoft Fabric, Business Intelligence, data warehousing, SSRS, T-SQL, and Azure. Beyond his technical skills, Kenneth has expertise working with stakeholders’ and business leaders to help them better understand key insights. He has a great track record of successfully delivering full life cycle Business Intelligence and data solutions to organizations with measurable business impact.
- MSSQLTips Awards
- Achiever Award (75+ Tips) – 2025
- Author of the Year-2021
- Author Contender-2022/2023/2024

Hi Kenneth,
Thank you for posting this!! I have this setup for all new emails coming in, but I am really struggling to create a flow to do this for everything I had received previously. Do you know of a way?
Thank you,
Dallas