Problem
Data comes in different forms and shapes, and having structured data that allows for easy transaction and reading is in high demand in the ever-growing world of data. It is impossible to overestimate the importance of structured data that can be easily used for company operations and intelligent analytics.
Solution
Databricks Delta Lake supports table creation in both Databricks SQL and Databricks Runtime. In this article, I will discuss the different tables that can be created using Azure Databricks and dive deep into the importance of Delta Lake tables.
What is Structural Data?
Data organized in a predefined way, often in rows and columns, are usually referred to as structured data. This data format is often used for analytic purposes and stored in a database, spreadsheet, and other data format.
Hive Metastore
Databricks Hive Metastore, or a legacy store, is a centralized repository of metadata about Hive tables and partitions. Information like the table name, schema, location, and partitioning information are stored here.
Hive Metastore Storage
Hive Metastore in Databricks are stored in two ways:
- Databricks Managed Hive Metastore: Databricks oversees running its own Hive Metastore instance in this approach. The Databricks platform itself houses and manages the metadata. To store the metadata data, Databricks builds its own database and metastore tables.
- External Hive Metastore: Databricks can be set up to use a Hive Metastore external to the Databricks platform. It may be set up on many platforms, including Apache Hive, MySQL, and PostgreSQL. Databricks clusters can connect to the external metastore using a JDBC connection.
Differences Between the Managed and External Metastores
Data stored in legacy storage in Databricks is used in these two scenarios. Understanding the differences and which is best for your organization will help make business and cost decisions.
| Features | External Hive Metastore | Managed Hive Metastore |
|---|---|---|
| Location | Outside of Databricks clusters | Inside/Within the Databricks clusters. |
| Flexibility | More adaptable for integrating many tools. | Less adaptable to blending in with others. |
| Scalability | Scalable to accommodate the requirements of massive data warehouses. | Limited scalability. |
| Maintenance | Requires independent maintenance and backups. | Supervised as a function of Databricks management. |
| Governance and Control | Uses a separate governing process. | Conforms to the Databricks governance model |
What are TempViews?
In Databricks, a temporary table, called a TempView, is produced during the active SparkSession and is only available to that SparkSession. TempViews are usually associated with a SparkSession and are dropped automatically when a current SparkSession ends. Therefore, you are not required to explicitly remove TempViews.
Local TempView
The Local TempView is usually visible within a current notebook or script. When the notebook separates from the cluster, it will no longer exist and cannot be referenced outside the notebook or script. The Local TempView can be created with the command createOrReplaceTempView().
Create a Local TempView
Step 1: Read CSV File
We will be working on the Databricks notebook. First, we need to check all the mount points available in our Databricks. The dbutils.fs.mounts() command retrieves information about all currently mounted storage in Databricks. This can be Azure Storage (Blob or Data Lake Gen 2), Amazon S3 bucket, or Google Cloud Storage attached to the Databricks workspace.

We need to set the data schema; this is done to prevent schema evolution.
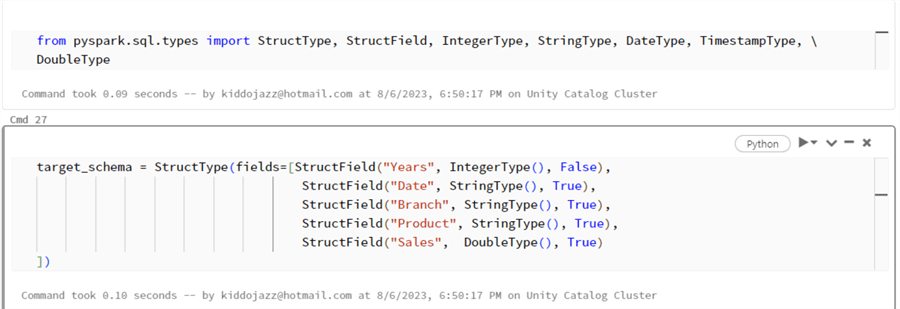
Now that we have set the schema for the individual columns, read the CSV file from the mount point.
target_bronze = spark.read. schema(target_schema) .csv("/mnt/xxxxxxxxxxxxx/xxxxxxxxxxxx/Sales Target.csv", header=True)
Step 2: Create TempView
To create a TempView, use the line of code below. This will create a temporary view where you can perform SQL commands.
#Create TempView
target_bronze.createOrReplaceTempView("temp_view_target")
Step 3: Query TempView
Databricks allows users to switch between different languages by using the magic command.
%sql
select *
from temp_view_target;

Run SQL from Spark Command. Spark enables users to run SQL queries on data using the Spark SQL modules. You may query and manage structured data using SQL syntax thanks to Spark SQL, which enables you to integrate SQL queries with your Spark applications seamlessly.
# Query the temporary view using SQL
target_df = spark.sql("SELECT * FROM temp_view_target")
display(target_df)

Close SparkSession. It’s crucial to correctly end the SparkSession after finishing your Spark SQL queries to free up resources. This can be done by using the command below.

Global TempView
Global TempView is visible in all notebooks and scripts that share the same cluster. It may be cited in further notebooks or scripts, even those part of the same dashboard.
Create a Global TempView
Step 1: Create View
Creating a Global TempView can be done using the command .createOrReplaceGlobalTempView() method on a DataFrame.
# Creating a Global TempView from a DataFrame
target_bronze.createOrReplaceGlobalTempView("global_temp_view_target")
Step 2: Query Global View
Let’s start by running a query that shows us all available global views.
%sql
SHOW TABLES IN global_temp;

As you can notice, we have one Global TempView. Now, let’s query the view using the database and TableName.
%sql
SELECT * From global_temp.global_temp_view_target
-- Use the "global_temp" for Global view

Run SQL from Spark Command. You can also run the SQL command using Spark on your notebook.
# Query the global temporary view using SQL
target_df_2 = spark.sql("SELECT * FROM global_temp.global_temp_view_target")
display(target_df_2)

Query in a Different Notebook. One of the amazing features of Global TempView is that it allows users to query the view in different notebooks, provided they are using the same cluster.

Managed Tables
Databricks Managed Tables are a type of storage system controlled and managed by Databricks. The Databricks environment uses Managed Tables to organize and store structured data, making it simpler to query, analyze, and manage.
Create a Managed Table
The following steps should be followed when creating a managed table.
Step 1: Create a New Table
A database is a collection of data arranged to make it simple to access and administer. All kinds of data, including customer records, product inventories, and financial and scientific data, are kept in databases.
%sql
CREATE DATABASE IF NOT EXISTS mssqltips;
-- This command is used to create a new database called "demo"
By default, the database will be created in the Hive Metastore. In the line of code below, we have set the file format to “parquet” and saved the file as a managed table. Note: You can also create a managed table from SQL command.
Parquet files are columnar storage formats designed for efficient data compression and retrieval.
target_bronze.write.format("parquet"). saveAsTable("mssqltips.target_bronze")
Step 2: Query Table
Let's query the managed table using SQL command.

External Table
The external tables in Databricks are tables stored outside the Databricks file system (DBFS). This implies that they can be kept in a range of platforms, including Hadoop Distributed File System (HDFS), Azure Blob Storage, and Amazon S3.
Create an External Table
The following steps should be followed when creating a managed table:
Step 1: Set Location
To work with an external table, we must first set a directory for where the data will be saved in our cloud storage.
#Set location
location = "/mnt/xxxxxxxxxxxx/xxxxxxxxxxxxx/silver"
Step 2: Create Table
We can create an external table either by using Python or SQL. For this article, we will use Python.
target_bronze.write.mode("OVERWRITE").format("parquet"). option("path", f"{location}").saveAsTable("mssqltips.target_2") #Table name "target_2"
After successfully running the code, you can locate the external file in this location below.

Difference Between Managed and External Tables
Understanding the differences between these two tables and when to use them can be critical in choosing the best for one’s organization.
| Features | Managed Table | External Tables |
|---|---|---|
| Storage Location | In Databricks managed storage system (DBFS) | Stored externally such as Amazon S3, Azure Blob Storage, or Hadoop Distributed File System (HDFS). |
| Management and Ownership | Databricks oversees metadata management and data storage. | Data is managed by an outside system, and metadata is managed by Databricks. |
| Storage Cost | Charged within Databricks | Charged based on external storage. |
| Performance | Queries are faster than external tables, which means performance can be improved with Databricks. | Improvements in performance are dependent on an external storage system. |
Databricks Lakehouse
The Databricks Lakehouse refers to the modern data architecture combining the best features of data lakes and data warehouses to create a unified platform for managing and analyzing data. You can read more about the Data Lakehouse in the official research paper: Lakehouse: A New Generation of Open Platforms that Unify Data Warehousing and Advanced Analytics.

Source: Databricks/Microsoft, Different Storage History
Databricks Lakehouse is built on top of Delta Lake, an open-source storage layer offering ACID transactions, schema evolution, and other capabilities that make it a strong choice for data lakes.
The Delta Tables are table formats built on top of the Apache Parquet file, providing lighter data storage.

Source: Microsoft Lakehouse Principles and Component
Below are some of the key features available in Delta Table:
- ACID Transactions: This feature ensures the data are always consistent and dependable. This is crucial for data lakes since they frequently update and change their data.
- Schema Evolution: You can alter your data schema without worrying about data loss or affecting your queries. This is crucial for data lakes because the data’s schema is frequently unknown at the beginning.
- Time Travel: This feature lets you quickly return to an earlier version of your data. This is important if users want to return to a previous version and make changes.
- Incremental Data Loading: This feature allows you to load new data into an existing table in the Delta Lake table. It is usually done in batches.
- Built-in Data Lineage: Data lineage tracking is built into Delta Tables, allowing you to examine the history of your data and how it was created and altered. You can use this to analyze the history of your data and troubleshoot issues.
Create Delta Lake Table
Let’s create a Delta Lake table by following the line of code below. Note: You can also create the table using SQL commands.
# Add the mergeSchema option
target_bronze.write.format("delta")            .option("mergeSchema", "true")            .mode("OVERWRITE")            .saveAsTable("mssqltips.target_delta")
The format was set to delta, meaning the data will be saved as a parquet file.
Incremental Load. One of the many features of the Delta Lake table is the support for the incremental load. This involves the process of loading new data into an existing data warehouse. It only loads new data into the warehouse. This can be achieved by only loading the rows that have changed after comparing the data in the source system and the target system.
# Add the mergeSchema option
target_bronze.write.format("delta")            .option("mergeSchema", "true")            .mode("APPEND")            .saveAsTable("mssqltips.target_delta")
Time Travel. This feature in Delta Lake allows users to access earlier iterations of a Delta table. This feature comes in handy for debugging, auditing, and reproducing experiments.
Delta Lake uses a transaction log to keep track of all table modifications. It is possible to recreate previous iterations of the table using this transaction log.
Accessing the Delta Lake log history can be done in SQL using the HISTORY command. This command gives the user a list of all available table versions, with the timestamp and the optional activity created in each version.
%sql
DESCRIBE HISTORY mssqltips.target_delta;

From the image above, you will notice all the different versions of the Delta table with the timestamp and operation conducted on it.
Check a Particular Version. Delta Lake Table also allows users to check a particular version to better understand changes made to the data.
%sql
select * from mssqltips.target_delta version as of 3;
Reason for Time Travel. The ability to check a previous version for a better understanding of your data is one of the many features of Delta Lake tables. Below are the various advantages of using Delta Lake:
- Debugging: This feature helps the user check a prior version of the table to determine whether a problem was there in that version if you are having issues with your data. This is helpful when trying to locate the origin of a problem.
- Version Rollback: You can return to an earlier version of the table if you’ve made data modifications you want to undo. This can be helpful if you make a mistake or wish to return your data to an earlier state.
- Data Audit: You can examine previous iterations of your data to monitor changes over time.
- Comparison: Data comparison can be helpful for data integrity and quality management since it reveals changes, inconsistencies, or missing records.
- Data Forensics: Checking specific versions can assist in determining when illegal changes took place and what data was impacted by data breaches or security events.
Restore to Previous or a Particular Version. Version rollback in Delta Lake Table allows users to return to an earlier or a particular version of the table. This is done for modification and correction purposes.
%sql
RESTORE TABLE mssqltips.target_delta TO VERSION AS OF 3; -- 1 This is to Restore back to a particular

Conclusion
In this article, we have talked about the different tables that can be created in Azure Databricks. We discussed the Hive Metastore being a legacy store and a centralized repository and how they can be stored.
The article also covers other tables such as TempView, Managed Table, External Tables, and the Data Lakehouse, a modern data architecture combining the best features of data lakes and data warehouses. In the article, readers should be able to define the various tables and when to use them.
Next Steps
- Download scripts
- Databricks Lakehouse Fundamentals
- Databricks Unity Catalog
- Effortless Data Processing with Delta Live Tables
- Storage and Serving Layers in the Data Lakehouse
- Ingestion and Processing Layers in Azure Data Lakehouse

Temidayo Omoniyi is a Microsoft Certified Data Analyst, Microsoft Certified Trainer, Power Platform Developer, Azure Data Engineer, Content Creator, and Technical writer with over three years of experience.
Currently, he works as a data and business intelligence analyst for a training and consulting company in Lagos, Nigeria.
Temidayo enjoys creating educative content on YouTube, LinkedIn, Twitter, and other online platforms. He loves sharing his knowledge and writing about systems, applications, tools, and processes.
Apart from training, writing, and coding, you will find him watching and reading Anime. He is a big fan of DC Comics.
- MSSQLTips Awards: Trendsetter (25+ tips) – 2025 | Author of the Year – 2023, 2024


Hello Noel,
I appreciate you for taking the time to read the article and yes, for Databricks warehouse I use it a lot when building a lake house system.
I should work on something soon regarding this.
very useful. Where does a DataBricks SQL Warehouse fit in?