Problem
With the rise of technology and artificial intelligence (AI), keeping track of the amount of data generated daily makes data governance more complex. Having organizational data dispersed across multiple cloud services, locations, organizations, and workspaces results in complex security and governance architectures.
Solution
Organizations are beginning to switch to storage that provides unified data governance to company resources. Databricks’ launch of Unity Catalog gives users a specific location to manage rights while offering granular access control and several other useful features.
What is Databricks Unity Catalog?
The Databricks Unity Catalog is a centralized managed metadata solution provided in the Databricks workspace with unified access control, auditing, lineage, and data discovery features. They are built on Delta Lake and offer a centralized location to manage all organization data assets.
Unity Catalogs are usually hosted outside of your Databricks Workspace. You may specify permissions once and have them apply to all workspaces in a region. Workspace Admin can modify permissions using Databricks as a user interface or, for those who are more comfortable with coding, a SQL API.
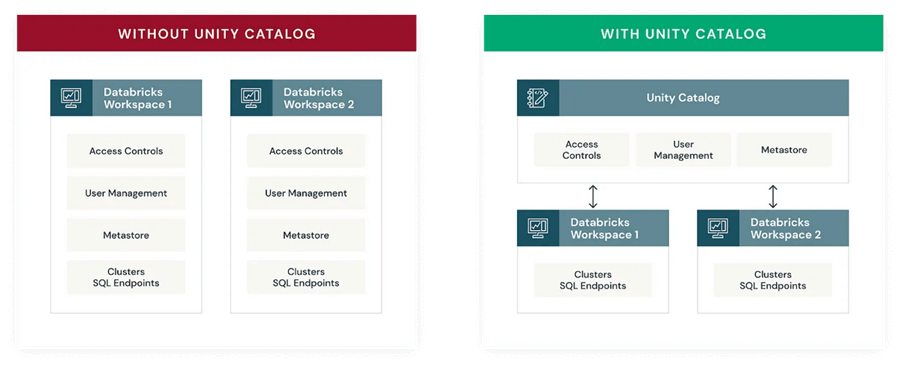
Source: Azure Databricks
Databricks Unity Catalog Key Features
Databricks Unity Catalog cuts across multiple features such as data, governance, discovery, lineage, and sharing. Below are some of the features available in the Databricks Unity Catalog:
- One Definition, Secure Everywhere: This feature refers to the ability to set data access permissions in one location and have those permissions applied to all workspaces that use the Unity Catalog.
- Data Discovery: It provides a single view of all data assets, irrespective of where they are stored.
- Standards-compliant Security Model: The security model offered by the Databricks Unity Catalog uses the ANSI SQL and enables administrators to issue permissions in their existing data lake using a familiar syntax at the level of catalogs, databases (also known as schemas), tables, and views.
- Data Lineage and In-Built Auditing: Unity Catalog automatically logs user-level audits that track data access. This way, users can track all actions conducted on the storage and back-roll when needed. Users can follow the movement of assets through the data ecosystem of a company, and it also includes data lineage.
Components and Architecture of Databricks Unity Catalog
The Databricks Unity Catalog object model is broken into three-level namespaces to address the various asset types. Unlike most databases and data warehouses, where you can refer to data, this is different.
The hierarchy of primary data objects in Unity Catalog flows from the metastore to the table or volume:
- Metastore: The metastore is the central repository for all your data assets’ metadata. Your data is organized in a three-level namespace that each metastore exposes (catalog.schema.table).
- Catalog: The first level of the object hierarchy is where your data assets are organized.
- Schema: Schemas, or databases, are the next tier of the object hierarchy and include tables and views.
- Volume: It sits alongside tables and views at the lowest base of the object hierarchy and offers governance for non-tabular data.
- Tables and Views: These objects have the lowest level in the object hierarchy.

Unity Catalog Architecture – Microsoft
Setting Up Databricks Unity Catalog
To set up the Unity Catalog in Databricks, we must provision some necessary resources in our Azure Portal. These resources are essential in achieving our set goal.
Create Azure Databricks
Databricks is a unified platform for data professionals that provides an integrated environment where data engineers, machine learning, and data analysts can work together. Databricks is a PaaS run on the cloud and provides a centralized location for developing, maintaining, and deploying several data pipelines, ML models, and analytic dashboards.
Apache Spark, a unified analytics engine for handling enormous amounts of data, is the foundation for Databricks.
Provisioning Azure Databricks in the Azure portal requires the following steps:
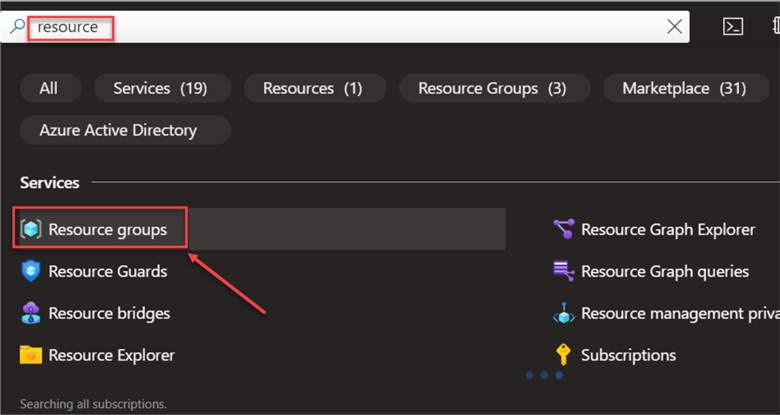
Step 1: Create an Azure Resource Group
The Azure Resource group is a logical container for holding connected Azure resources. It makes it easy to manage and watch over your resources. With Azure, resources connected to a particular application, environment, or project can be grouped using resource groups.
In your Azure portal, click the search icon and type Resource Group. This will take you to another window.
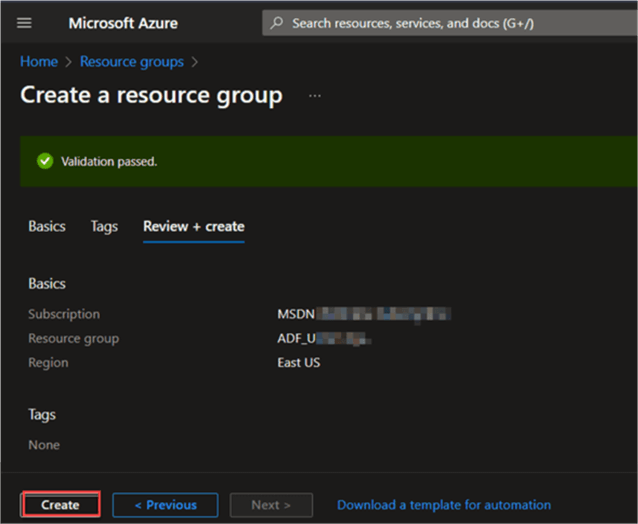
In the new window, click the Create icon in the top left corner. You must fill in the essential information in the Create Resource Group and create a resource group name.

Click on the Review + Create button. This might take a few minutes, but a Validation Passed icon should appear if the resource is set correctly.
Step 2: Create Databricks Workspace
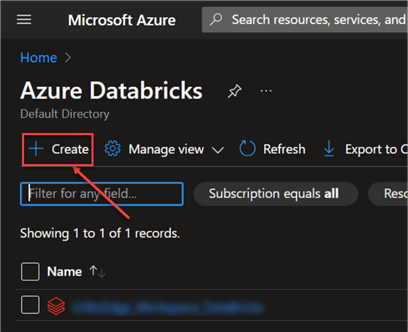
Now that we have successfully created the resource group, head to the Azure Portal home page and search for Databricks.

In the new window, click the Create icon in the top left corner.
Basic Configuration: In the Databricks configuration setting, we need to fill in the following information:
- Subscription: This is the current subscription linked to your Azure account.
- Resource Group: Select the new resource group we created earlier.
- Workspace Name: This should be a unique name.
- Region: Select any hosting region. We will be using the West US 2.
- Pricing Tier: Two tiers are provided by Databricks, which are Standard and Premium. For the Unity Catalog, we will be using the Premium Tier, as the Standard does not support this feature.
- Managed Resource Group name: This is a parameter in the azurerm_databricks_workspace Terraform resource. Azure will automatically create a resource group named “Terraform resource.” We will leave this space bank as we will not integrate Databricks into Terraform.

Step 3: Review + Create
The other stages can remain as default. Click the Review + Create button.

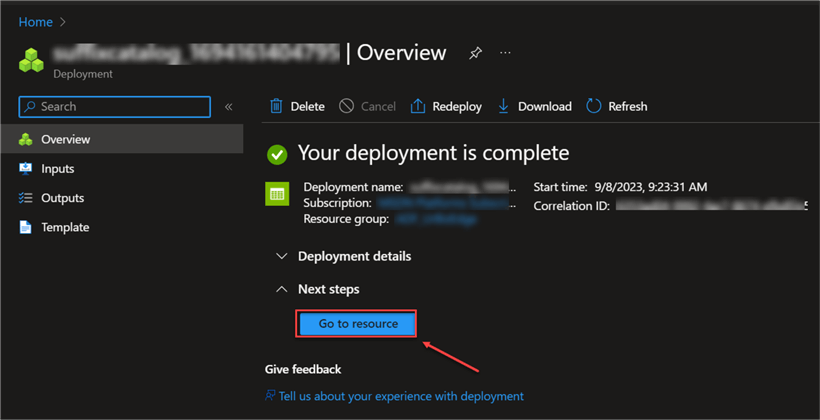
The deployment stage can take a few minutes to fully provision. Click Go to resource when done.

In the new resource environment, click Launch Workspace. This should open another window, taking you to the Azure Databricks Workspace.
Create Azure Data Lake Gen 2
This is a single, centralized repository for storing all forms of data, whether structured, semi-structured, or unstructured. Organizations worldwide use it, enabling users to store data rapidly without necessarily conforming to a particular data format.
The following steps are needed when creating an Azure Storage Container:
Step 1: Create a Storage Account
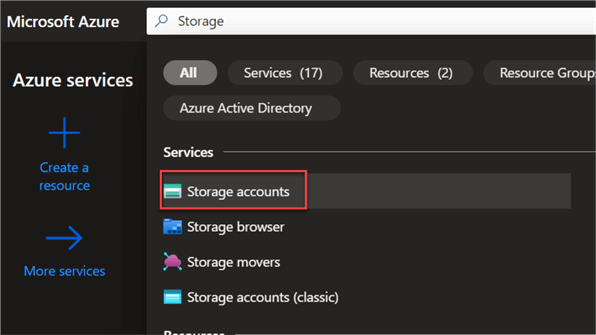
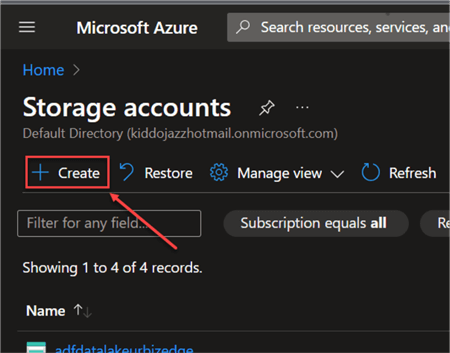
In your Azure Portal, search for a storage account. This should take you to a new window.
Click the Create icon at the top right corner and set the storage configuration.
Step 2: Basic Configuration
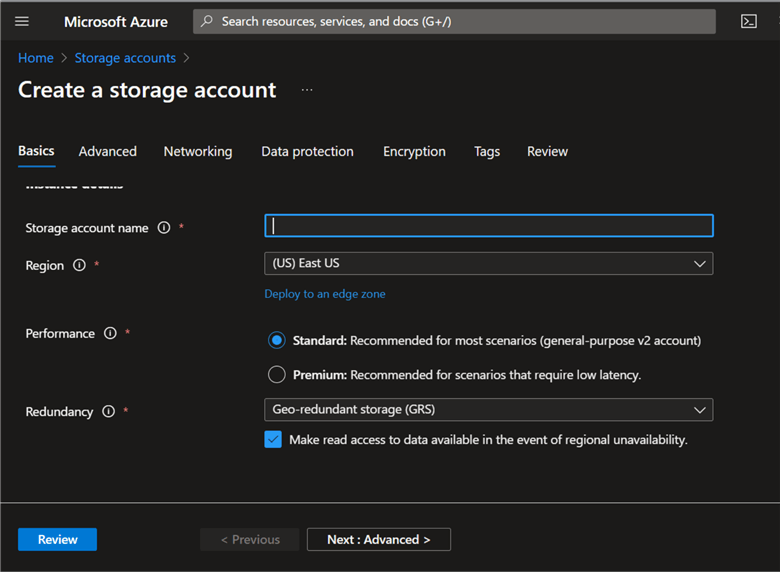
In the basic configuration, you are expected to fill in the following information:
- Storage Account Name: Your storage account’s name is a special identifier. Only lowercase letters and digits are permitted, and the length must fall between 3 and 24 characters.
- Region: The region designates where your storage account is physically located. Select the region with high availability and disaster recovery.
- Performance: The performance setting determines your data’s access speed. For this, we will use Standard, the default performance option. It strikes an excellent mix between price and performance.
- Redundancy: How many copies of your data are stored and where they are kept depends on the redundancy level. We will use the Locally redundant storage (LRS), which stores three copies of data in the same region. My selection is due to cost, you can select any of the other options.
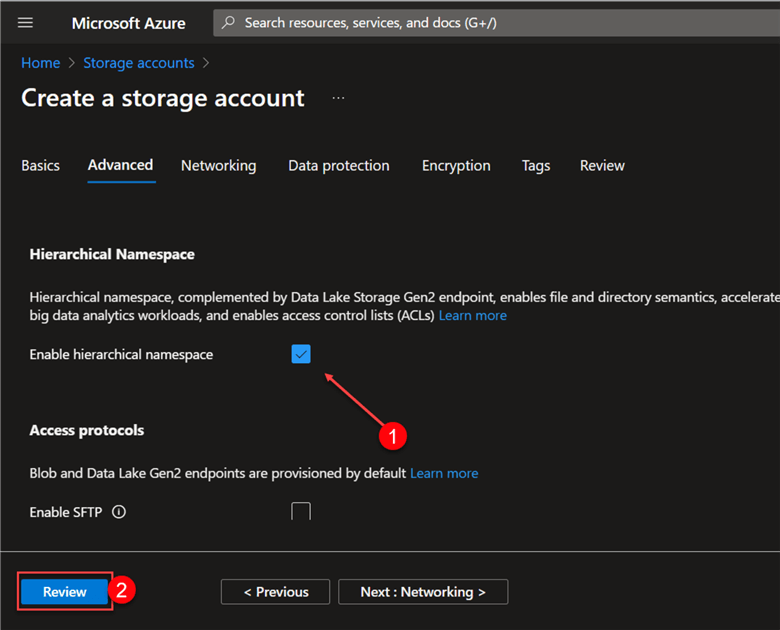
Step 3: Advanced Configuration
In the Advanced settings, check the Enable hierarchical namespace, which is required for creating Data Lake Gen 2. This is so that the Data Lake Gen 2 may organize your data using a hierarchical namespace. Click the Review button at the bottom left corner, then click Create. This process may take a few minutes to deploy and provision fully.
After successfully provisioning the resource, click Go to resource. This should take you to the Data Lake Gen 2 storage.
Step 4: Add Container
A container is a logical collection of blobs. Directories in a file system are comparable to containers; however, containers are more capable and adaptable.

Create Access Connector
Users can connect managed identities to an Azure Databricks account using the Access Connector for Databricks, a first-party resource. Access to additional Azure resources can be granted using managed identities without providing confidential information.
The following steps can be used to set up the Access Connector in Databricks:
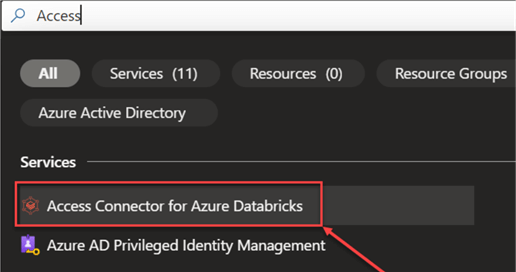
Step 1: Create Access Connector Resources
In your Azure Portal, search for the Access Connector. Click the Create icon at the top left corner.
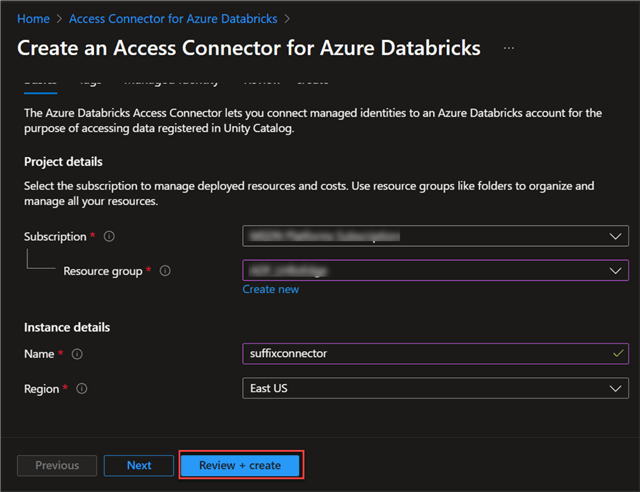
Step 2: Access Connector Configuration
In the Basic configuration, fill in the following information, then click the Review + Create button.
Add Role Storage Blob Data Contributor
Users with the Storage Blob Data Contributor role in Azure have read, write, and delete access to the data in Azure Blob Storage. With this role, users are not given access to manage the storage account itself, including adding or removing containers or blobs.
The following steps can be used to add role storage blob data contributor:
Step 1: Add Access Control (IAM)
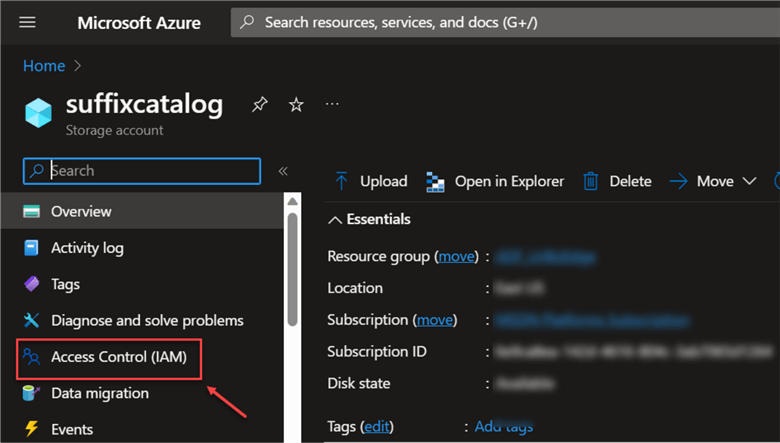
Navigate to the new storage (ASLG2)we created and click Access Control (IAM). This can be found at the left corner of your user pane.
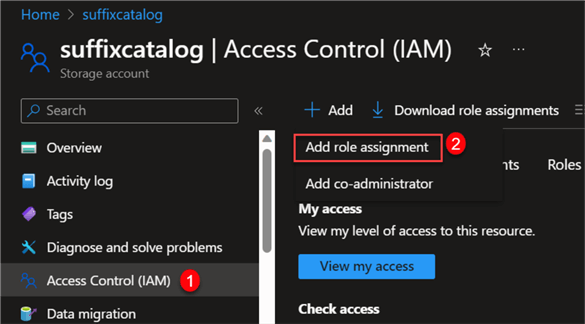
In the new window, click + Add and select Add role assignment.
In the Role Assignment, search for Storage Blob Data Contributor and click Next.

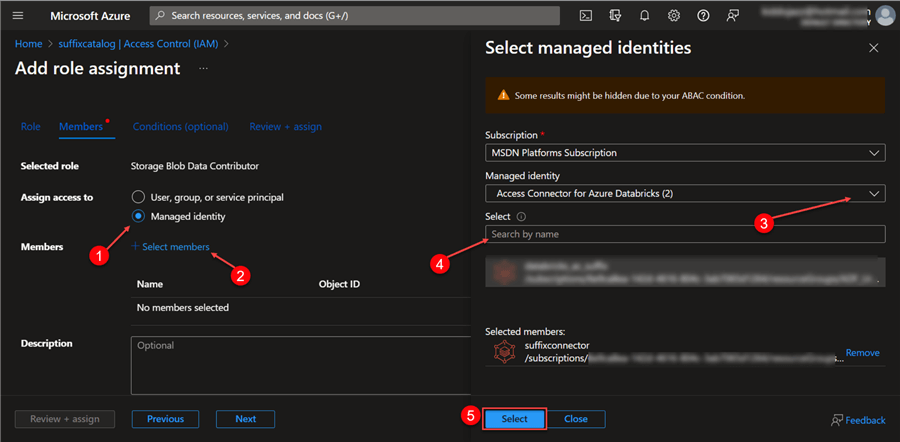
Step 2: Member Settings
In the IAM settings, fill in the following information from the image below.
Step 3: Review + Assign
Click Review + Assign to have the resources provisioned.

Create Unity Catalog Metastore
Now that we have configured the settings in the Azure Portal, let’s go back to the Databricks workspace we created earlier.
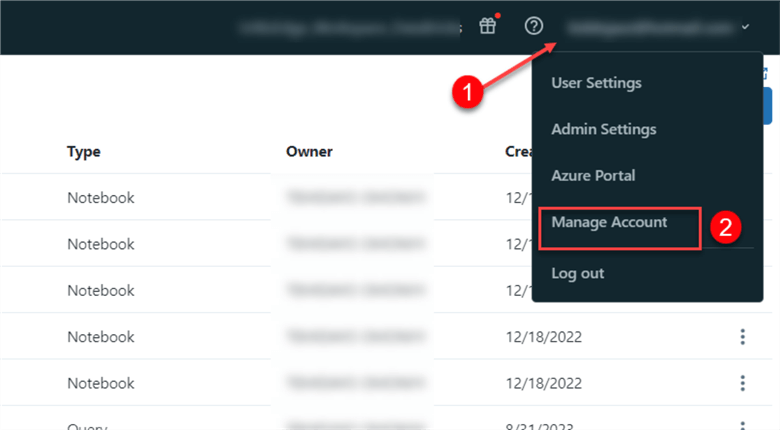
On your Databricks homepage, click on your username (email) at the top right corner and select Manage Account, which will open another window tab.
In the new window, the following steps should be completed to create a metastore:
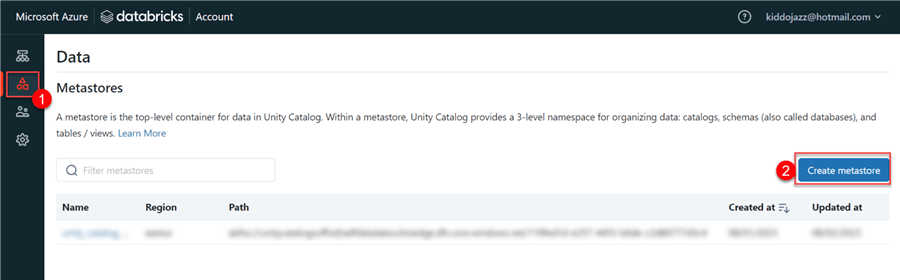
Step 1: Create Metastore
Click Data in the left pane in the new window, then select Create metastore.
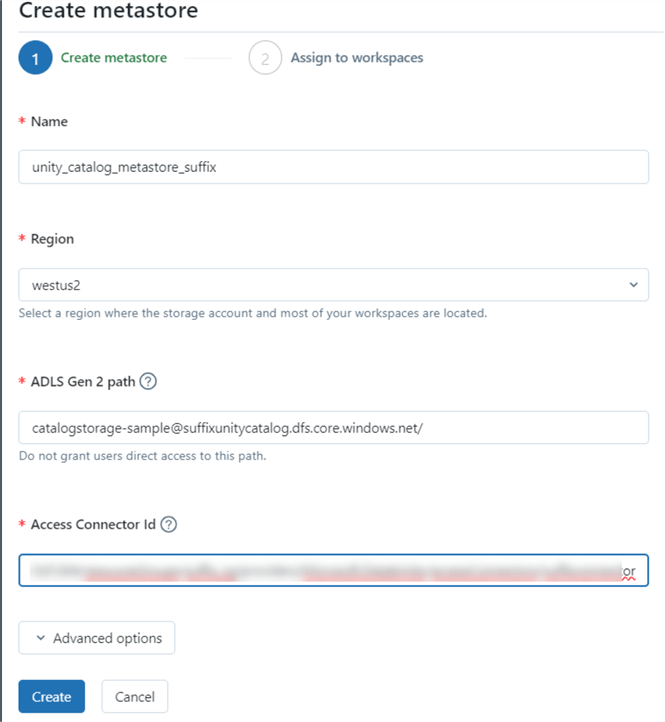
Step 2: Configuration Settings
From the configuration settings, fill in the following:
- Name: This is a unique name for your catalog.
- Region: Preferably use the region where most of your resources are located. I will use West US 2.
- ADLS Gen2 Path: Select the Mount Point for your Unity Catalog.
- Access Connector ID: This is from the Access Connector for Azure Databricks.
In the Azure portal, select the Access Connector, click on Properties, and copy the ID.
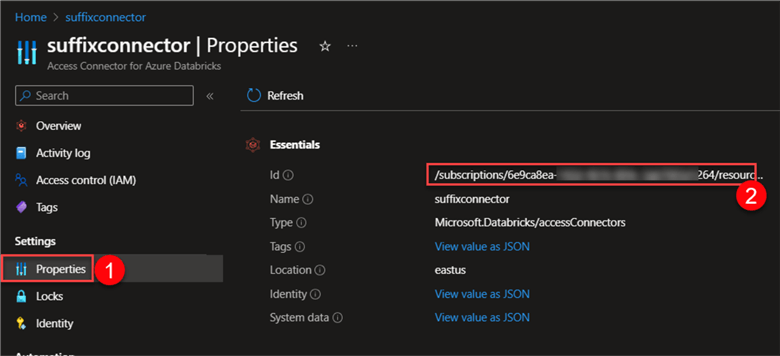
With the ID URL from Properties, fill in the following configuration settings:
Step 3: Select Workspace
A Databricks workspace is a cloud-based platform for creating, evaluating, and deploying data applications. After you have completed the configuration, click on the next tab or workspace. From the workspace, select Assign to Workspace, then check the workspace we created earlier.
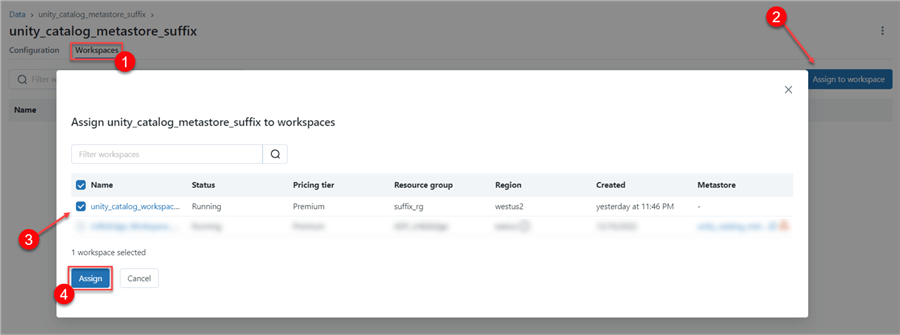
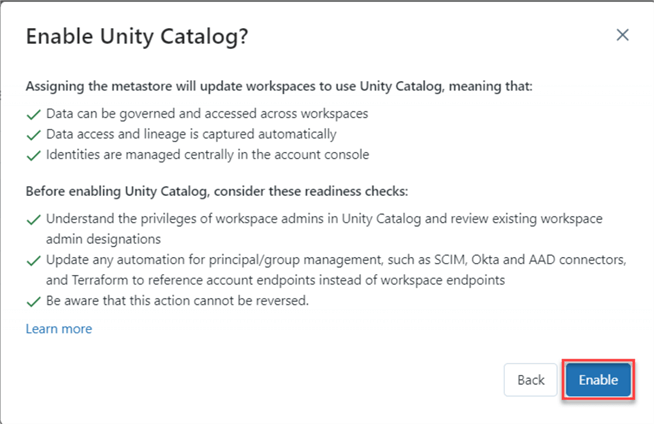
A pop-up window will appear asking to enable the unity catalog for this workspace.
Test Unity Catalog
Now that we have successfully created the Unity Catalog in Azure Databricks, we need to check if it was successfully activated.
First, refresh the web browser and go back to the Databricks workspace. In the workspace, click on the Compute icon at the left corner of the web page. Compute in Databricks is a set of machines that are managed by Databricks in running workloads.
In the compute configuration, you will notice a Unity Catalog as part of the features in Databricks compute now.

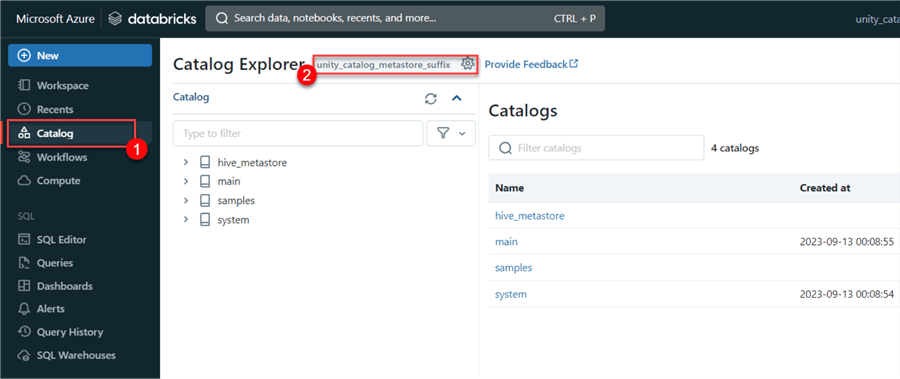
Understanding Unity Catalog Interface
In your Databricks workspace, click on the data/catalog tab in the left pane. You will notice the workspace is now assigned to the unity_catalog_metastore_suffix we created earlier.
Now, let’s set up the Unity Catalog using the UI approach:
Step 1: Create a Catalog
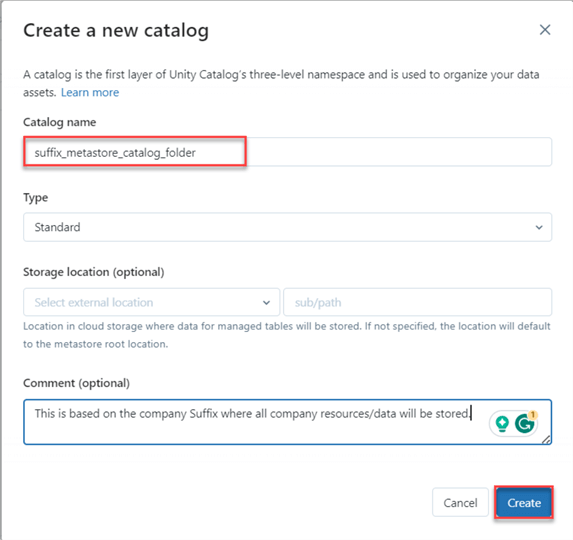
In your Catalog/Data environment, click Create Catalog, and a new window will appear.

You must fill in the following information in the new window, including the catalog name and type. Click Create.
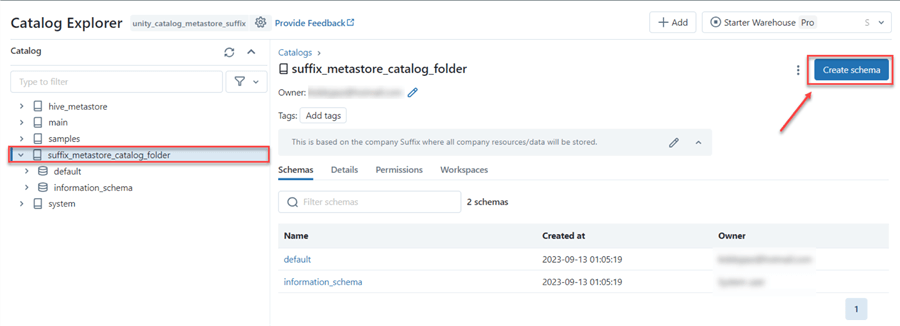
Step 2: Catalog Overview
The Catalog we just created provides us with the following information:
Schemas. In Unity Catalog, Databases are referred to as Schemas. This can be confusing when you see Schema and Database.

Details. This is information about the Catalog created.

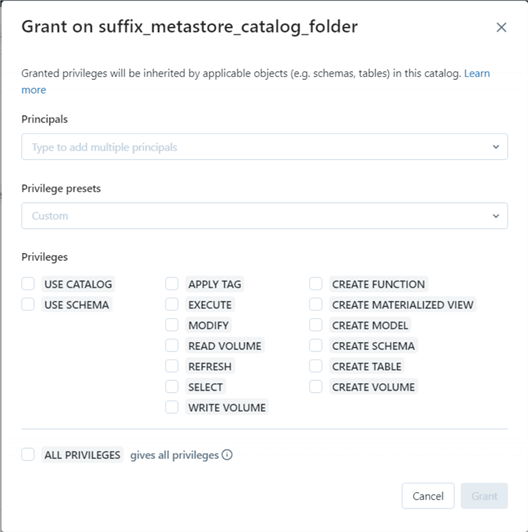
Permissions. This tab involves granting permissions to specific users or giving them all privileges.
Workspaces. This is the workspace for the Unity Catalog.

Step 3: Create Schema
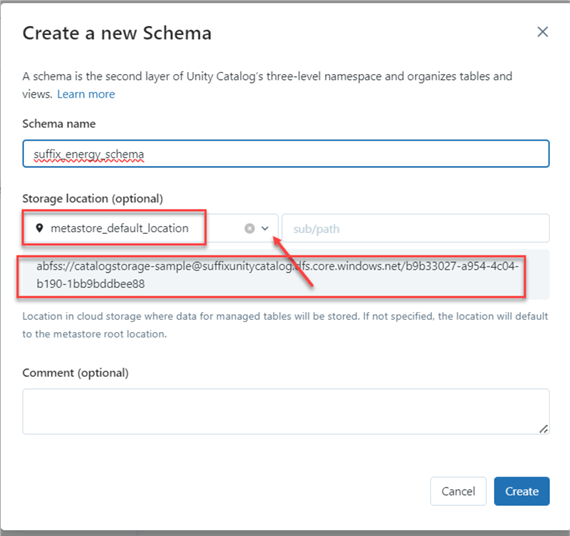
Database in Unity Catalog are referred to as a Schema. Click on Create schema at the top right corner of the Catalog environment.
In the new window, type the schema name and select the metastore location we created earlier.
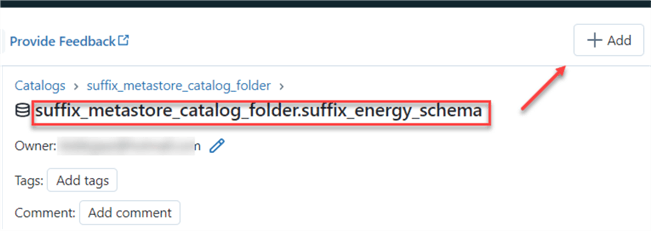
Step 4: Add Table
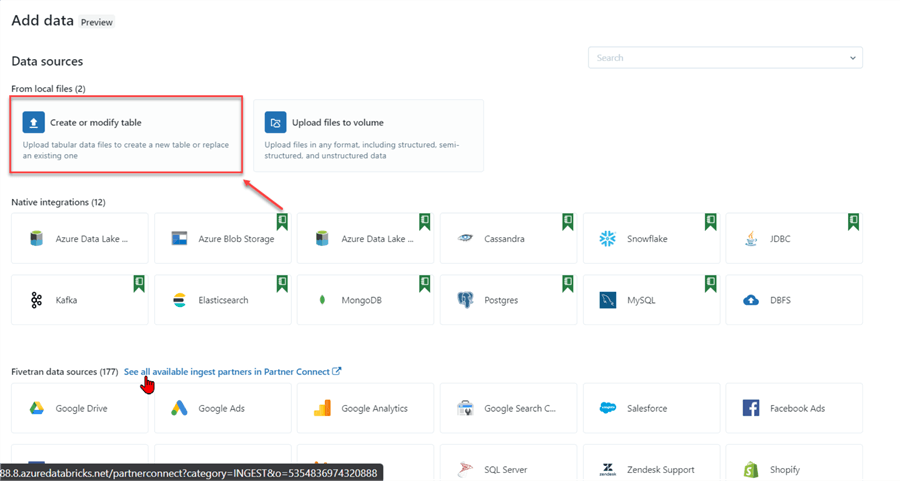
After you have successfully created the Schema for the Unity Catalog, we need to add tables to the schema. In your Catalog window, click +Add at the top right corner and select Add data.
In the Add Data environment, click Create or Modify table, then select data from your local machine.
After importing the data, you are taken to the data preview, where you can further analyze your data. You will notice the Catalog Hierarchy from suffix_metastore_catalog_folder > suffix_energy_schema > sales. If you are satisfied with the catalog’s three-level hierarchy, click the Create Table icon.

The created table will also be made available in your Data Lake Gen 2 container, saved as a parquet file.

Access External Data Lake for Unity Catalog
In the architecture of the Databricks Lake House, data is usually stored in a parquet file in an Azure storage system. We must create a credential that helps push the data to the correct container in our Azure Storage.
Create Storage Credential
The following steps should be taken to set up the storage credential.
Step 1: Create a Credential
From your Azure Databricks workspace, click on Catalog and select External Data. This should take you to another window.
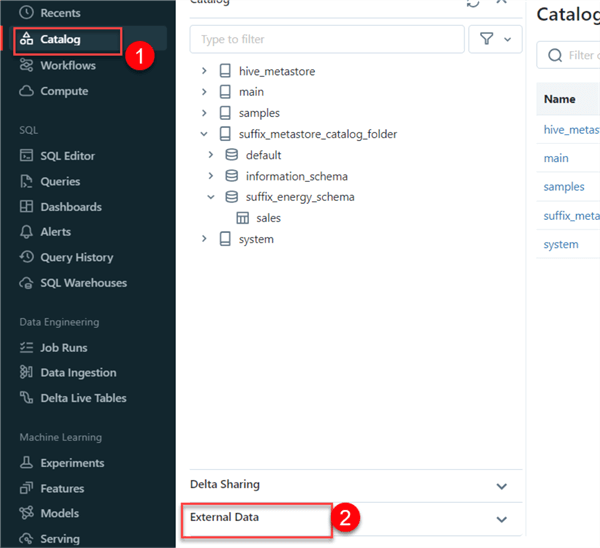
Click Create Credential.
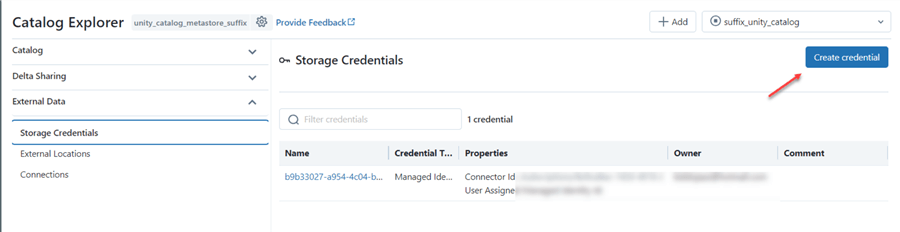
Step 2: Credential Settings
In the storage credential area, fill in the following information:
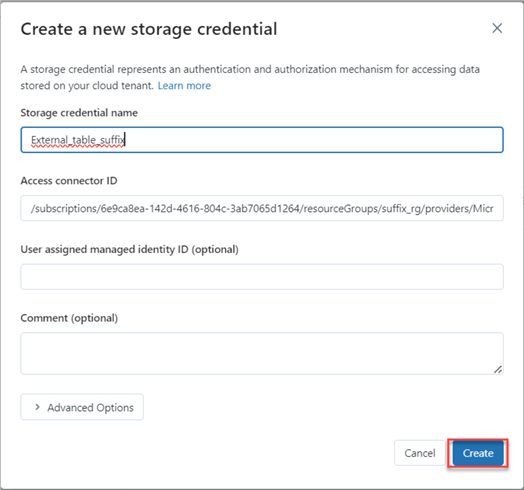
To get the Access connector ID, navigate to your Azure Portal, select the Databricks connector, and copy the ID.

You will notice your external credentials were successfully created.

Create External Location Using Databricks User Interface
Now that we are done with the credential creation, let’s create the external location.
Step 1: Create Location
To create a location for your External Data, click on External Location > Create Location.

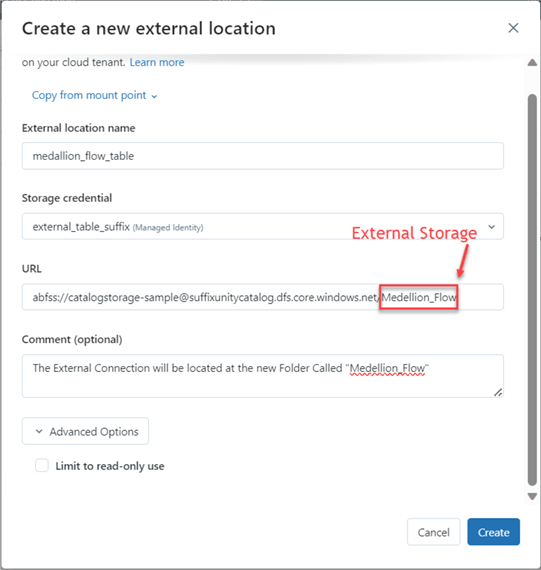
Step 2: Set Up the External Location
The following information must be provided in the new window. The URL is the source of the mount point, and an extra directory was created called Medellion_Flow.
Step 3: Test Connection
Now that we have created the External location, we need to evaluate the connection to verify all are working well. Click on Test connection at the top right corner. A pop-up window should appear, showing that all location types are successful.

Step 4: Test External Location
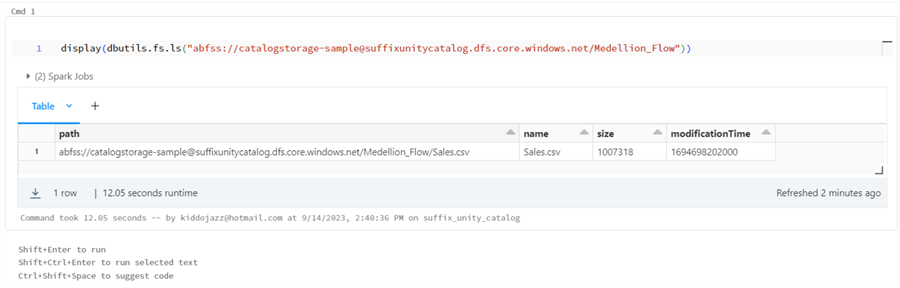
Upload a new file to the catalogstorage-sample/Medellion_Flow to check if all configurations are working properly.

After successfully uploading the file, open your Databricks Notebook and write the below line of code to check the file in Databricks.
display(dbutils.fs.ls("abfss://catalogstorage-sample@suffixunitycatalog.dfs.core.windows.net/Medellion_Flow"))
Create External Location Using SQL
External location can also be created for the Unity Catalog using SQL commands. We will create another folder in our catalogstorage-sample container called SQL_Bronze_Folder and repeat the same process for other folders in your Azure Storage.
We will use the Medallion Flow design pattern, which uses three layers to organize data in a Lakehouse. These layers can be broken down into Bronze, Silver, and Gold, with every layer having a different stage in transformation.
%sql
CREATE EXTERNAL LOCATION IF NOT EXISTS Suffix_Bronze
  URL "abfss://catalogstorage-sample@suffixunitycatalog.dfs.core.windows.net/SQL_Bronze_Folder"
  WITH (STORAGE CREDENTIAL External_table_suffix)
  COMMENT 'This is for the bronze storage'

CREATE EXTERNAL LOCATION IF NOT EXISTS Suffix_Silver
  URL "abfss://catalogstorage-sample@suffixunitycatalog.dfs.core.windows.net/SQL_Silver_Folder"
  WITH (STORAGE CREDENTIAL External_table_suffix)
  COMMENT 'This is for the Silver storage'


CREATE EXTERNAL LOCATION IF NOT EXISTS Suffix_Golder
  URL "abfss://catalogstorage-sample@suffixunitycatalog.dfs.core.windows.net/SQL_Gold_Folder"
  WITH (STORAGE CREDENTIAL External_table_suffix)
  COMMENT 'This is for the Gold storage'
Create Schema for Unity Catalog
Now that we have successfully created an external location, let’s create Schemas in our Unity Catalog.
The following steps should be performed to create a schema:
Step 1: Setup Catalog
The Unity Catalog is a three-name space, and we need to select the Catalog to use.
%sql
USE CATALOG suffix_metastore_catalog_folder
This line one SQL command will set the suffix_metastore_catalog_folder as the default Catalog.
Step 2: Create Schema
We will create the Schema with the external location we created earlier.
%sql
-- Create Schema/Database with the External storage location
CREATE SCHEMA IF NOT EXISTS BronzeDB
MANAGED LOCATION "abfss://catalogstorage-sample@suffixunitycatalog.dfs.core.windows.net/SQL_Bronze_Folder";

-- Create Schema/Database with the External storage location
CREATE SCHEMA IF NOT EXISTS SilverDB
MANAGED LOCATION "abfss://catalogstorage-sample@suffixunitycatalog.dfs.core.windows.net/SQL_Silver_Folder";

-- Create Schema/Database with the External storage location
CREATE SCHEMA IF NOT EXISTS GoldDB
MANAGED LOCATION "abfss://catalogstorage-sample@suffixunitycatalog.dfs.core.windows.net/SQL_Gold_Folder";
Step 3: Verify Schema Location
Click the Catalog tab and select any of the Schemas we just created. You will notice in the Storage Root the directory for storage.

Conclusion
This article taught us about the Databricks Unity Catalog and its advantages. We also set up the Unity Catalog step-by-step by creating an Azure Data Lake Gen 2 storage account, Azure Databricks workspace, and Azure Databricks connection, which serves as an identifier for the Databricks workspace.
Next Steps
- Introduction to Databricks Workflows.
- Git integration with Databricks Repos.
- Databricks with Azure DevOps.
- Check out related articles

Temidayo Omoniyi is a Microsoft Certified Data Analyst, Microsoft Certified Trainer, Power Platform Developer, Azure Data Engineer, Content Creator, and Technical writer with over three years of experience.
Currently, he works as a data and business intelligence analyst for a training and consulting company in Lagos, Nigeria.
Temidayo enjoys creating educative content on YouTube, LinkedIn, Twitter, and other online platforms. He loves sharing his knowledge and writing about systems, applications, tools, and processes.
Apart from training, writing, and coding, you will find him watching and reading Anime. He is a big fan of DC Comics.
- MSSQLTips Awards: Trendsetter (25+ tips) – 2025 | Author of the Year – 2023, 2024