Problem
Azure Databricks is an Apache Spark-based analytics platform for easy, fast, and collaborative work between data professionals. Companies frequently utilize Databricks, a cloud-based data engineering tool, to manage, examine, and transform large amounts of data.
Microsoft Azure storage comes in different forms, suitable for data engineering and science. Azure has various storage for big data analytics and other data-related projects and the ability to mount different Azure storage to Azure Databricks will speed up most transformation and migration projects.
Solution
Azure Databricks runs on Apache Spark, an open-source distributed computing engine created for processing large amounts of data by batch or real-time. For this tip, I will walk you through how to mount different types of Azure storage, i.e., the Azure Blob Storage, Azure Data Lake Gen 2, Azure SQL, and Azure Cosmos DB, to Azure Databricks for data-related projects.

Project Architecture
What is Azure Databricks?
Azure Databricks is an Apache Spark-based platform built in the Microsoft Azure ecosystem and used for processing large amounts of data, allowing collaboration between data scientists, business analysts, and data engineers.
To create Azure Databricks resources, you must have an active Azure subscription. You can check Data Transformation and Migration Using Azure Data Factory and Azure Databricks, which explains how to create a Microsoft Azure Databricks resource in your Azure portal and Azure Databricks.
Azure Databricks has a variety of environments to support different data projects:
- Databricks SQL: This enables analysts who work with SQL queries to develop and share dashboards, perform queries on Azure Databricks, and establish various virtualizations.
- Databricks Data Science and Engineering: Data engineers, data scientists, and machine learning engineers can work in an interactive environment with the help of Databricks.
- Databricks Machine Learning: Databricks aid in managing services for experiment tracking, feature development, and model training.
Azure Blob Storage
Microsoft Azure Blob Storage, known as "Binary Large Object," is a cloud service offered by Microsoft that allows users to store enormous amounts of unstructured data in the form of files, photographs, text, videos, or a combination of these.
Azure Blob storage offers various tiers, such as hot, cold, and archive tiers enabling you to optimize storage costs following your access and retention requirements. The hot tier is designed for frequently accessed data, while the cool and archive tiers are rarely accessed or are accessed infrequently.
To work with Azure Blob storage, you must have an active Azure subscription. Navigate to your Azure portal and create a resource group to house the Azure Blob storage we intend to create.
Create a Resource Group
The Azure resource group is a container that houses related resources for an Azure solution. However, you can only include the resources you want to manage collectively in the resource group or put all of the solution's resources in it.
Check out Connect Power BI to Azure Data Lake Gen2 Storage for Reporting for more information on creating an Azure resource group.
Azure Blob Storage Service
In your Azure portal, you are provided with multiple options for creating the Azure Blob service. In your portal, click "Storage accounts" or select the top search and type "Storage account".

In the storage account environment, click + Create to open another window where you are expected to put in the right configuration setting.

Basic Settings
At this point, fill in all necessary settings for your Blob storage.
- Subscription: Select the Azure subscription you want to use in creating the Blob storage.
- Resource Group: Choose the newly established resource group. You will store all Azure resources here.
- Storage Account Name: Give your storage a unique name.
- Performance: There are two types:
- Standard: Uses hard disk drives (HDDs) and is designed to store data like backups, logs, and archives accessed infrequently. High durability and availability are features of standard storage.
- Premium: This storage uses solid-state drives (SSDs) for reading and writing with low latency.
- For this article, we will be using the Standard tier.
- Redundancy: This refers to the accessibility and longevity of data and is crucial in cloud storage. The replication settings control how data is stored and disseminated across many physical locations.

Advanced Settings
You have multiple options in the advanced settings, such as the Access tier.
- Hot Tier: This tier is optimized for storing frequently accessed or modified data. This tier has higher storage costs but cheaper retrieval costs. It is appropriate for regularly used databases, active virtual machines, or real-time analytics data accessed numerous times per month.
- Cool Tier: Optimized for storing infrequently accessed or changed data. This has a lower storage cost but high retrieval cost. This is appropriate for logs, backups, archives, and other rarely accessed material accessed less than once monthly.

Review + Create
You can leave the other settings with the defaults and skip to the "Review" step. After creating your storage account, it should take a couple of minutes for the deployment to complete.

Create a Container
You need to create a new container in Azure storage resources and save your files here.

Only "$logs" is created in your Blob service by default. You will need to add new containers by clicking on the "+ Container" at the top left corner and entering a unique name for the container.

Upload File
In the Azure container you create, click the Upload (1) button, then browse for files (2) you want to upload from your local machine.

Edit Uploaded File
Azure storage allows you to edit the uploaded file by clicking on the three dots next to the file and selecting the view/edit button. This should take you to the data preview, where you can preview the data as shown below.

Using Azure Blob with Azure Databricks
There are two ways of mounting Azure Blob storage to Azure Databricks: Account Key or SAS Key.
For this article, we will be using Account Key.
Step 1: Get the Access Key
The Access Key is a security credential used to authenticate requests to access or change resources in a storage account.
In the Blob storage service, (1) search for the word "Access Keys," (2) click on the show tab, and (3) copy the Access key to a secure place.

Step 2: Configure Blob Storage
In your Azure Databricks notebook, you need to configure the Blob storage.
The following directories are important for mounting the Blob storage.
- <folder>: The folder you want to mount on the Azure Databricks is the "rawsamplemsssq" folder.
- <Blob_Storage_Name>: This is the name of your Blob storage.

- <Access_Key>: This is the key from the Blob storage.
dbutils.fs.mount(source='wasbs://<folder>@<Blob_Storage_name>.blob.core.windows.net',
                mount_point = '/mnt/blobstorage/<folder>',
                extra_configs= {'fs.azure.account.key.<Blob_Storage_name>.blob.core.windows.net':'<Access_Key>'})
Step 3: Check Available Data
To check for available data in the Azure Blob storage mounted, use the code below.
#Check the list available in that folder
dbutils.fs.ls('/mnt/blobstorage/rawsamplemsssq')

Using Azure SQL Database
An Azure SQL database is a cloud-based, fully managed platform service by Microsoft that handles most of the database management tasks, such as updating, patching, backups, and monitoring. It provides several deployment options, such as managed instances, elastic pools, and single databases.
To create an Azure SQL database from your Azure portal, review this tip, Data Transformation and Migration Using Azure Data Factory and Azure Databricks, where we explain how to go about creating the Azure SQL storage.
There are multiple ways of mounting Azure SQL to Databricks. But for this tip, we show two ways to go about it.
Method 1: Using Azure SQL Credentials
For this method, we will use database information for mounting.
Step 1: Get Configuration Settings
In the Azure portal, click on the Azure SQL resource you just created and copy the list of information.

Step 2: Mount SQL in Databricks
In your Azure Databricks notebook, write the line of code below. This will be used in mounting the Azure SQL to Databricks.
jdbcHostname = "<Server name>"
jdbcPort = 1433 #use this by default
jdbcDatabase = "<SQL_Database_Name>"
jdbcUsername = "<Username>"
jdbcPassword = "<Password>"
jdbcDrivers = "com.microsoft.sqlserver.jdbc.SQLServerDriver" #This is the Microsoft Driver usually constant.

#Create a variable to capture all information
jdbcUrl = f"jdbc:sqlserver://{jdbcHostname}:{jdbcPort};databaseName={jdbcDatabase};user={jdbcUsername};password={jdbcPassword}"
Step 3: Query Database in Azure Databricks
Now let’s query a table in the database we just mounted using Spark in the notebook:
car_df = spark.read.format("jdbc").option("url", jdbcUrl).option("dbtable", "dbo.Cars").load()
display(car_df)

Method 2: Using String Connection
The connection string describes the data source's details and how to connect to it. It provides a breakdown of the different steps leading to the data source.
Step 1: Write Connection String
In your Azure Databricks notebook, write the below code. This will create a connection to the data source.
connectionString = "jdbc:sqlserver://<Server_Name>:1433;database=<Database>;user=<username>@<server>;password={<password>};encrypt=true;trustServerCertificate=false;hostNameInCertificate=*.database.windows.net;loginTimeout=30;"
Step 2: Query Connection String
To test if the connection is successful, run this line of code in your Azure Databricks.
df = spark.read.jdbc(connectionString, "dbo.Cars") #Put the name of the table you want to see
display(df)

Using Azure Data Lake Gen 2
Azure Data Lake Gen 2 is a cloud-based data storage and analytics service designed to handle a large amount of data from multiple sources and analyze such data.
Data Lake Gen 2 combines the advantages of a file system with big data analytics and offers excellent scalability, durability, and availability built on top of Azure Blob storage.
Create Azure Data Lake Gen 2
To create Azure Data Lake Gen 2 from your Azure portal, check out this tip, Connect Power BI to Azure Data Lake Gen2 Storage for Reporting, which explains how to create the Azure Data Lake Gen 2 storage.
Mount Azure Data Lake Gen 2 to Azure Databricks
Mounting the Azure Data Lake Gen 2 to Databricks needs the following principle listed:
- Create a Service Principal for Azure.
- Grant access to Azure Service Principal.
- Mount to Databricks using Service Principal.
Mounting Azure Data Lake Gen 2 requires some prerequisites, which we detailed in the tip, Data Transformation and Migration Using Azure Data Factory and Azure Databricks. We provided brief details on how to mount Azure Data Lake Gen 2 to Databricks.
Using Azure Cosmos DB
Azure Cosmos DB is a multi-model database service provided by Microsoft for modern app development. It is intended for massive scalability, low latency, high availability, and consistency in data management.
Key Features of Azure Cosmos DB
The Azure Cosmos DB comes with many features:
- Globally Distributed: Data can be copied globally due to the global distribution of Azure regions. This provides low-latency access to your data for a worldwide user base.
- Scalability: This depends on your application's demand, with Cosmos DB scaling up or down done in the throughput and storage scaling.
- Multi-model: Stores data in Key-value Pairs, Document-based, Graph-based, Column Family-based databases.
- High Availability: The multiple regions of Azure Cosmos DB make it 99.99% available to read and write operations.
- Index: It indexes all fields automatically by default.
Azure Cosmos DB APIs
The Azure Cosmos DB offers multiple database APIs depending on their use case:
- NoSQL API: Used in storing data in document format, it supports querying data using the SQL syntax, usually one of the common ways of querying JSON objects.
- Mongo API: Allows you to use existing Mongo DB applications and tools to interact with the Azure Cosmos DB.
- Cassandra API: Cassandra stores data in the column-oriented schema. The API allows existing Cassandra applications and tools to communicate with Cosmos DB.
- Gremlin API: Allows users to use graph queries and store data in edges and vertices.
- Azure Table API: This stores data in key/value format.
Create Azure Cosmos DB
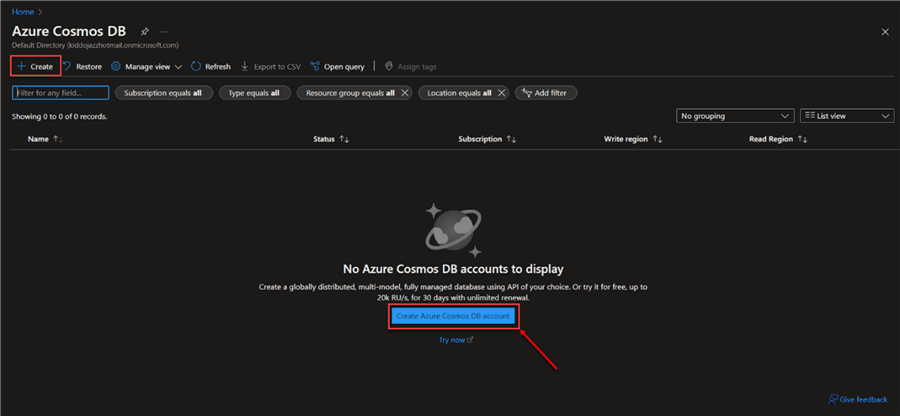
The Azure Cosmos DB can be created in the Azure portal by using the following steps:
Step 1: Create Azure Cosmos DB Resource
In the Azure portal environment, search for "Azure Cosmos DB" and select the resource.

In the new window created, click + Create. This will take you to another window where you will put in all the necessary information.
Step 2: Select Cosmos API
At this stage, select the API you want to work with. We already explain each API and its capabilities. For this article, we will use the Azure Cosmos DB for NoSQL.

Step 3: Configurations
Fill in all necessary configuration settings and add your resource group. When completed, click the Review + create button.

In the new window, click Create. This will provision the new Azure Cosmos DB, taking a couple of minutes before the deployment process is complete.

After deployment is completed, go to the resource group to create a new container.

Step 4: Create Database and Container
In your Cosmos DB resource, click on Data Explorer in the bottom left corner.

Click on the New Container tab and insert all necessary information.

In your new container, enter the setting in the pane.

Step 5: Add to the Database
In the Azure Cosmos DB explorer, expand the ToDoList database you just created and select Items. Select "New item" in the top tab and write the following document structure to the right side of the document pane.
Note: Clicking Save saves the item with "id": "1".

Repeat the same process by creating a "New item" and paste the data structure into the document pane. Click Save to update the id list.

Step 6: Query Data
To query the items we just created, click on the Query icon on the top and execute the selection. This request pulls all documents from the container and presents them in order of ID.

Mount Azure Cosmos DB to Azure Databricks
The following steps are needed to mount Azure Cosmos DB to Azure Databricks.
Step 1: Get URI & Primary Key
In your Azure Cosmos DB resource, navigate to Keys. Copy the "URI and Primary Key" to a secure place. These are the keys that will be used during the configuration settings.

Step 2: Install Azure Cosmos DB Connector for Apache Spark
In your Azure Databricks Cluster, navigate to a library and select Install new. This should open another window. Select the "Maven Tab" and paste the coordinates link below.
com.azure.cosmos.spark:azure-cosmos-spark_3-1_2-12:4.17.2
Note: Ensure you install the appropriate Spark and Scala versions for your cluster.

Step 3: Configuration
In your Azure Databricks notebook, set the configuration. This will help with the connection and authentication of the Azure Cosmos DB.
readConfig = {
  "spark.cosmos.accountEndpoint": <URI-Link>,
  "spark.cosmos.accountKey": <Primary-Key>,
  "spark.cosmos.database": "ToDoList",
  "spark.cosmos.container": "items",
  "schema_samplesize":"1000",
  "Upsert": "true",
  "query_custom" : "SELECT * FROM c"
}
Load the Cosmos DB Document into Spark. The code below will help load the Azure Cosmos items document into Azure Databricks.
users_view = spark.read.format("com.microsoft.azure.cosmosdb.spark").options(**readConfig).load()
users_view.createOrReplaceTempView("c")
Step 4: Query Data
Use the magic command listed below to run a SQL query that outputs data. Note: By default, the cells are in Spark. To easily convert to Sequel, use the "%sql" before writing your command.
%sql
Select * from c
Conclusion
In this article, you learned about different storage in the Microsoft ecosystem. We created Azure storage and discussed how to mount the Microsoft Azure storage to Azure Databricks for migration and transformation purposes. However, to fully appreciate this article, we advise you to read Data Transformation and Migration using ADF and Databricks.
Lastly, check out these other Azure Tips.
Next Steps
- Implement Azure Databricks with an Azure Cosmos DB endpoint
- Create Azure Cosmos DB
- Azure Databricks
- Check out these related articles:

Temidayo Omoniyi is a Microsoft Certified Data Analyst, Microsoft Certified Trainer, Power Platform Developer, Azure Data Engineer, Content Creator, and Technical writer with over three years of experience.
Currently, he works as a data and business intelligence analyst for a training and consulting company in Lagos, Nigeria.
Temidayo enjoys creating educative content on YouTube, LinkedIn, Twitter, and other online platforms. He loves sharing his knowledge and writing about systems, applications, tools, and processes.
Apart from training, writing, and coding, you will find him watching and reading Anime. He is a big fan of DC Comics.
- MSSQLTips Awards: Trendsetter (25+ tips) – 2025 | Author of the Year – 2023, 2024