By: Nai Biao Zhou | Comments (10) | Related: > Python
Problem
Data are valuable assets and play an essential role in the business decision-making process. Many solutions, such as Power BI reports and SharePoint lists, can offer end-users timely access to the requested information. Under certain circumstances, the use of websites is also an ideal candidate for data access. There are many programming languages and frameworks for web development. Django, a Python-based web framework, is now the web development framework of many organizations' choice (Rubio, 2017). Some organizations may not have a dedicated web development team, still, they have some IT professionals to support their data and database management systems. These professionals expect a straightforward and step-by-step tutorial that quickly creates a proof-of-concept website using Microsoft SQL Server as a database backend. They can then decide if their companies would pursue building a full-featured website based on the Django framework.
Solution
Django, which is pronounced "JAN-go" with the "D" silent (Dayley, 2008), is an ideal framework for any IT professionals looking to develop websites and web applications. Django has a built-in web server that is used for development purposes. The framework supports several database management systems including Microsoft SQL Server. This article walks through developing and testing a website using Visual Studio 2019, an integrated development environment (IDE). At the end of this tutorial, we will create a proof-of-concept website as shown in Figure 1. The website, which is database-driven, retrieves data in a SQL Server database table and presents the contents on a web page.
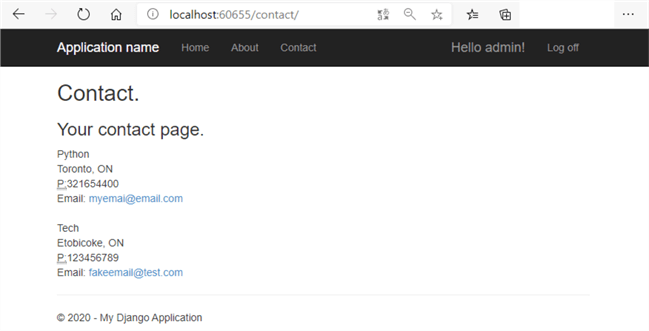
Figure 1 The Proof-of-concept Website Produced from this Tutorial
This article does not explain how to design, develop, and deploy a website. It barely scratches the surface. Use this tutorial as a starting point for creating a database-driven website. When the proof-of-concept website gets approval, we can start to learn more about web development. For IT professionals who already know Python and HTML, the learning curve is small. Visual Studio Docs (Petersen et al., 2018) teach how to build a website from an empty Django project in Visual Studio. The Django website (Django, 2020) provides everything you need to know about Django. A free online version of "The Django Book" (Behrens, 2012) is useful for further learning.
The author organizes this Python Django tutorial into six sections that help navigate the steps to create a website that uses Microsoft SQL Server as a database backend. Section 1 covers the basics of creating a Django web development with Python project using Microsoft Visual Studio 2019 (Community Edition). In Section 2, the article goes through a four-step process of creating and configuring access to a SQL Server database from the Django framework. To demonstrate work with data and databases, Section 3 creates a Contact data model. We create a view function in Section 4. The function embeds data retrieved from the database into a web response object. Then, in Section 5, we write display logic in a template to format data. To add data into the database, we register the Contact data model in the Django admin application and use the admin interface to add two contacts in Section 6. Finally, the author wraps up this tutorial in the Summary section.
The author tested code in this article with Visual Studio 2019 (Community Edition), Django 2.2.17, and Python 3.9 on Windows 10 Home 10.0 <X64>. The DBMS is Microsoft SQL Server 2019 Developer Edition (64-bit).
1 – Creating a Django Python Web Project
There are several ways to start a Django project. This article creates a Django project using Visual Studio 2019 (Community Edition) with the installed Python development workload. This tip (Zhou, 2020) on MSSQLTips introduces installing Python development workload for Visual Studio 2019. After launching Visual Studio 2019, select the "Create a new project" button on the start screen, as shown in Figure 2.
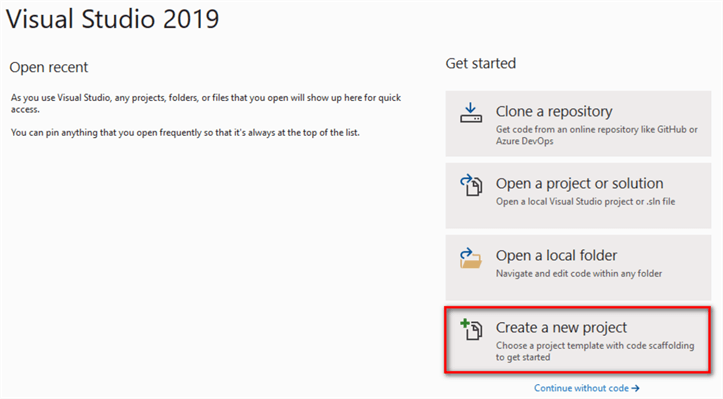
Figure 2 The Visual Studio 2019 Start Window
The "Create a new project" window appears. To shorten the template list in the window, select the option "Python" as a programming language and the option "Web" as a project type. We should then be able to find the "Django Web Project" template on the list, as illustrated in Figure 3. This window also shows us other web frameworks. According to Herman, Django is a full-featured web framework that simplifies web development (Herman, 2020).
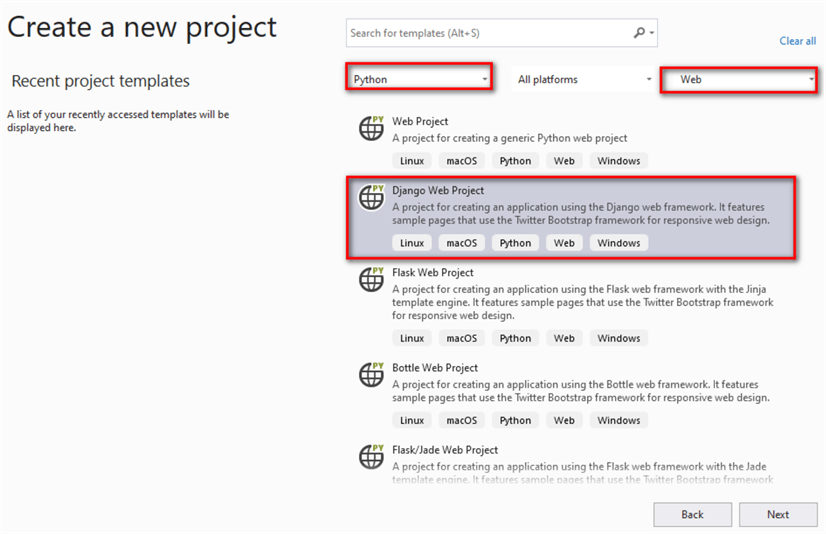
Figure 3 The Create a New Project Window
Select the "Django Web Project" from the template list and click on the "Next" button. The "Configure your new project" window appears. Enter a project name and select the location of this project. We use default settings for other configurations. The window should look like Figure 4.
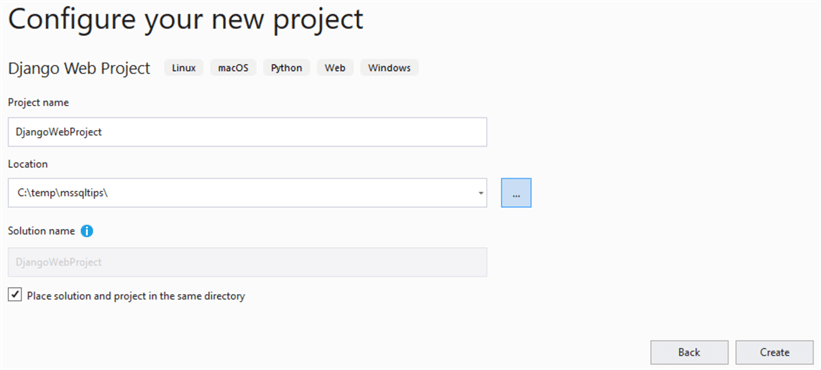
Figure 4 The Configure Your New Project Window
Click on the button "Create" to create the project. The Visual Studio user interface should look like Figure 5. To avoid version conflicts, get into a habit of running each Python project in isolation. Thus, we create a virtual environment for each Python project and install the required packages. Check the default Python environment. Clicking on the arrow beside the project item "Python Environments," we observe that the default environment uses Python 3.9 in the author's computer. This tutorial also works on other versions, for instance, Python 3.7 and 3.8.
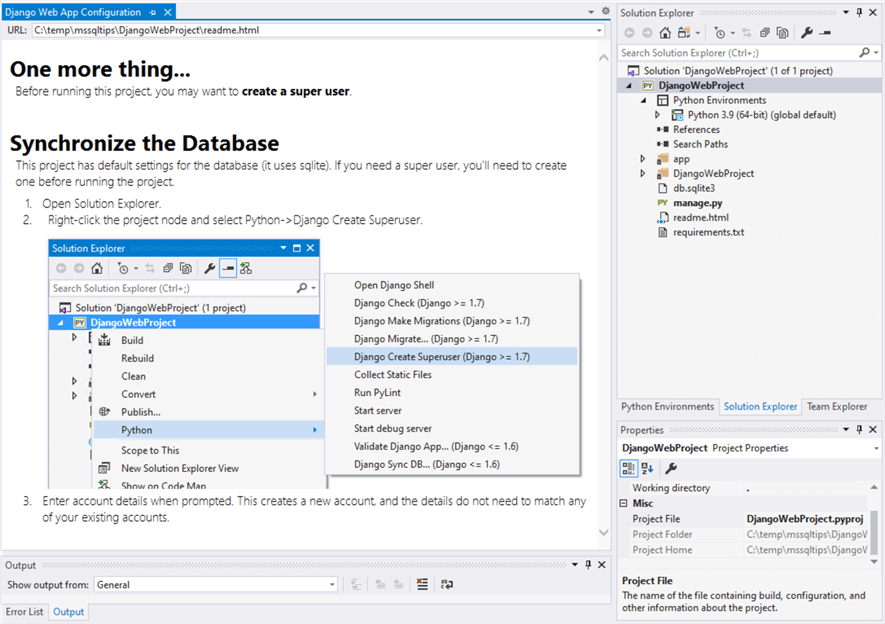
Figure 5 The Visual Studio 2019 User Interface
In the Solution Explorer pane, when we right-click on the "Python Environment," a context menu appears as shown in Figure 6. We select the menu item "Add Environment" from the list.
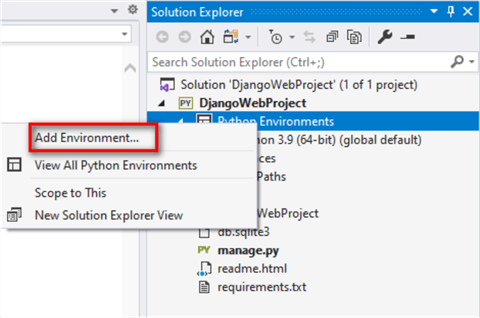
Figure 6 The Python Environment Context Menu
The "Add environment" dialog appears. We enter a name for the virtual environment and use the default setting for other configurations. The dialog should look like Figure 7. Click on the "Create" button to accept all configurations and close the dialog.
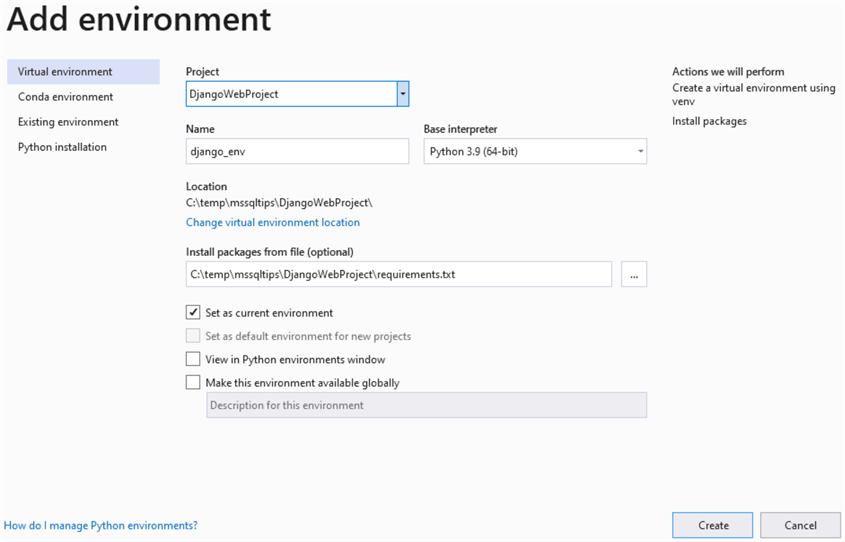
Figure 7 The Add Environment Dialog
Expanding the environment node in the Solution Explorer pane, we can see the virtual environment with Django (2.2.17) installed, as shown in Figure 8. With the virtual environment, the project can run in an isolated environment. We can find a list of installed packages in the file "requirements.txt." When we want to recreate this virtual environment on other machines, we can use this text file to install the same packages.
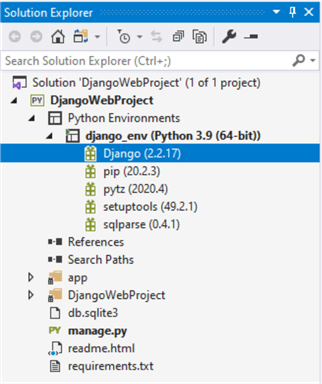
Figure 8 The Installed Packages in the Virtual Environment
Switch to the Python Environment pane, as shown in Figure 9. If any package has a new version, an arrow indicator beside the version number appears. We can click on the arrows to upgrade corresponding packages; however, we use the default versions to avoid incompatibilities. Since this project runs in a specific virtual environment, other Python applications on the same computer can install packages with different versions.
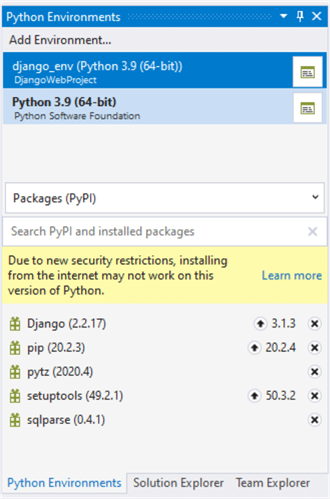
Figure 9 The Python Environments Pane
By default, Django adds a SQLite database for the project. We can see the database file "db.sqlite3" in Figure 8. Companies that adopt Microsoft technologies may want to use SQL Server databases for their websites. We should make the Django framework use a SQL Server database as a database back-end before running the project. The project folder also contains other subfolders and files. Petersen and her colleagues examine the boilerplate code (Petersen et al., 2018). It is worth noting that, by default, the startup file is "manage.py."
2 – Using Microsoft SQL Server as a Database Backend
Django officially supports five database management systems: PostgreSQL, MariaDB, MySQL, Oracle, and SQLite (Django, 2020). Some third parties provide backends for other DBMSs, such as CockroachDB, Firebird, and Microsoft SQL Server. To use a Microsoft SQL Server database with Django, we need to install a third party package, "django-mssql-backend" (ES Solutions AB, 2020). We can follow a four-step process to set up the database backend for Django.
2.1 Installing Django backend for Microsoft SQL Server
Right-click on the virtual environment name "django_env" in the Solution Explorer pane. The context menu should look like Figure 10. We select the menu item "Manage Python Package…" from the context menu.

Figure 10 The Virtual Environment Context Menu
The Python Environments pane appears, as shown in Figure 11. We enter "django-mssql-backend" in the "search PyPI and installed packages" box and then click on "Run command: pip install django-mssql-backend". The package installation process starts.
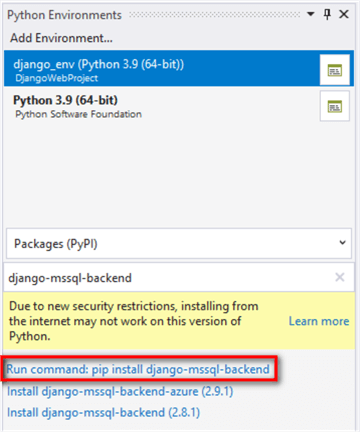
Figure 11 Install Django backend for Microsoft SQL Server
After the installation process completes, we switch to the "Solution Explorer" pane. The installed package, "django-mssql-backend," should appear in the package list as shown in Figure 12.
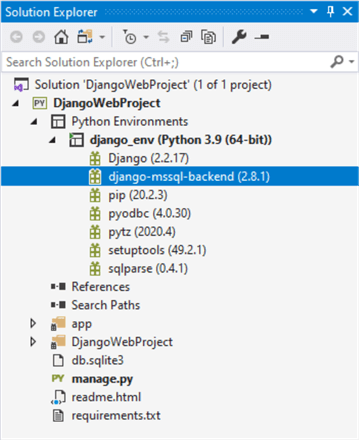
Figure 12 The List of Installed Packages in the Current Virtual Environment
2.2 Creating a SQL Server Database
Launch Microsoft SQL Server Management Studio. Create a new database, "django_db," and a database user, "django." The user "django" should be a member of the db_owner role. We connect to the empty database using the new user account to confirm the database creation, as shown in Figure 13. The database can reside in the local server or a remote server.
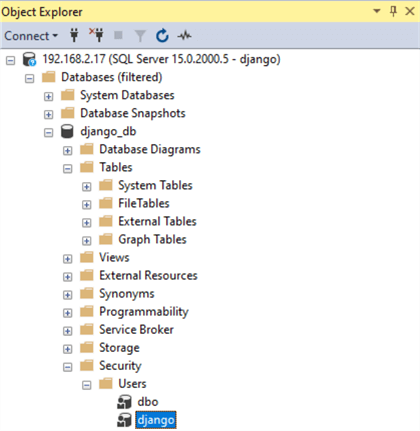
Figure 13 Create a Database and a Database User
2.3 Configuring Database Access in Django Settings
After creating a SQL Server database, we can delete the SQLite database file "db.sqlite3." We then configure the SQL Server database access. When we create a new Django web project, Django automatically adds the settings.py file to the project’s root folder. The settings.py file holds the project’s settings. There is a database section in the file, and, by default, the section should look like Figure 14.
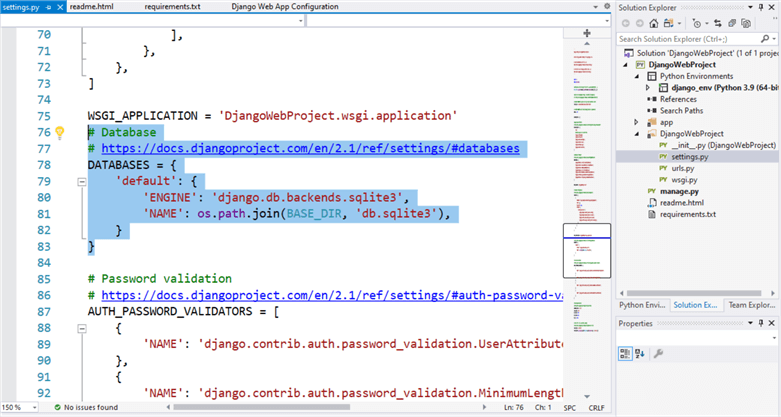
Figure 14 The Database Section in the settings.py
Open the file "settings.py," and substitute the highlighted code block in Figure 14 with the following code snippet. The package website (ES Solutions AB, 2020) explains these settings.
DATABASES = {
    'default': {
        'ENGINE': 'sql_server.pyodbc',
        'NAME': 'django_db',
        'USER': 'django',
        'PASSWORD': 'password',
        'HOST': '192.168.2.17',
        'PORT': '',
        'OPTIONS': {
            'driver': 'ODBC Driver 13 for SQL Server',
        },
    },
}
2.4 Synchronizing the SQL Server Database
After configuring the access to the SQL Server database in the setting.py file, we run the synchronization process to create database objects in the SQL Server database. Right-click on the project name and select the "Python->Django Migrate…" menu item from the context menu, as shown in Figure 15.
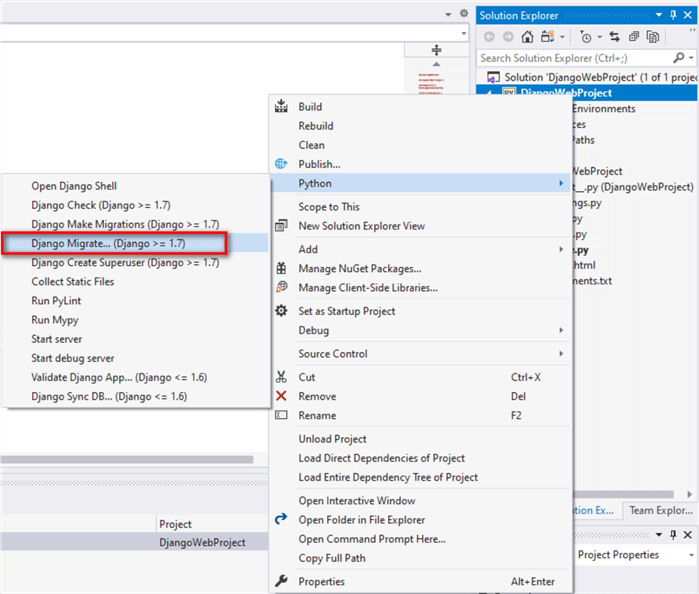
Figure 15 Navigate to the Django Migrate Menu Item
The command menu item, "Django Migrate…," creates database objects in the database. The output in the Django Management Console, seen in Figure 16, shows that the synchronization process prepared necessary tables for these four applications: django.contrib.admin, django.contrib.auth, django.contrib.contenttypes, and django.contrib.sessions.
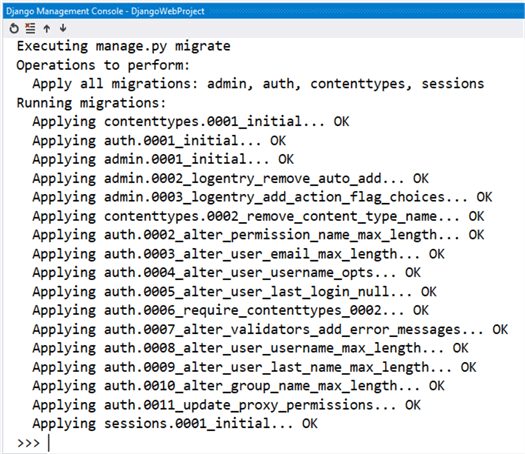
Figure 16 Synchronize the Project to the Database
As mentioned in the readme file, shown in Figure 5, we need to create a superuser before running the project. Right-click on the project name and select the menu item "Python->Django Create Superuser" from the context menu, as shown in Figure 17.
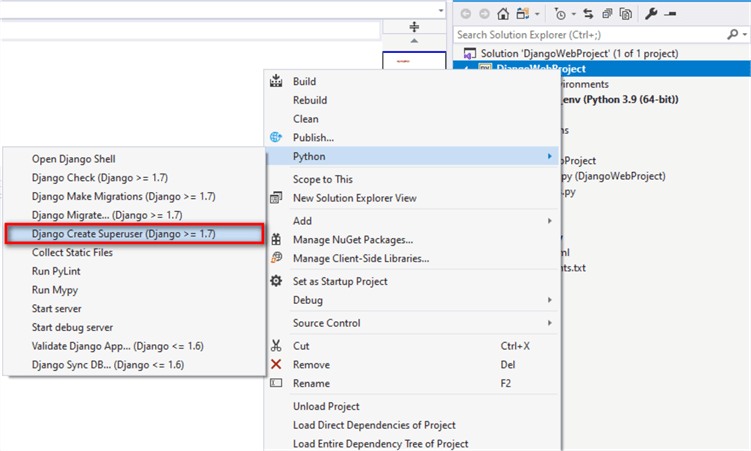
Figure 17 Navigate to Django Create Superuser Menu Item
Follow instructions in the Django Management Console to create a superuser as shown in Figure 19. Ignore the warning messages.
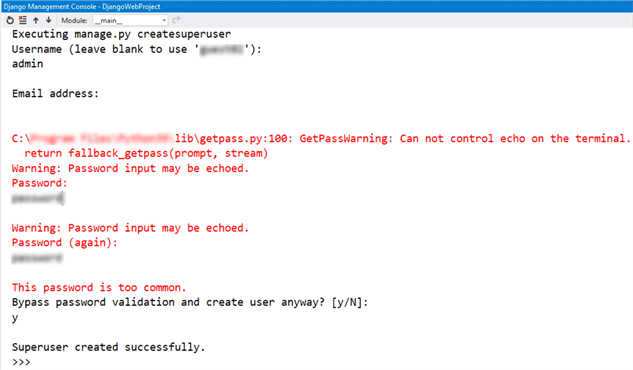
Figure 18 Django Create the Superuser
Switch to the Microsoft SQL Server Management Studio and connect to the Django_db database. The "Django Migrate" command created several tables as shown in Figure 19. The superuser we created is in table "dbo.auth_user."
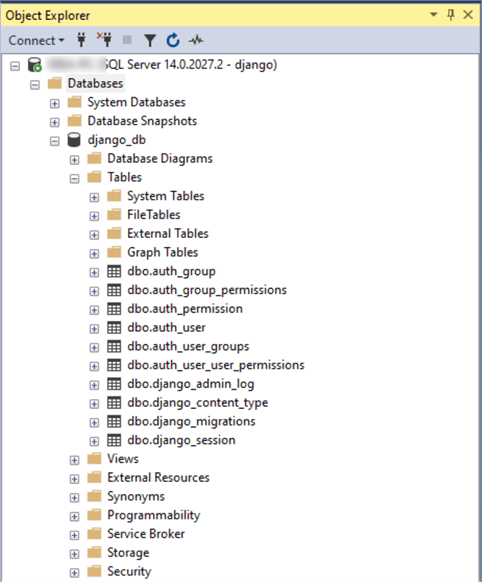
Figure 19 Database Tables
Once the setup is complete, we can use Django's built-in web server to verify that the website is working as expected. The filename "manage.py" in the project folder should be bold to indicate that it is the startup file. Click on the "Web Server (Microsoft Edge)" button in the toolbar, as shown in Figure 20. The browser name inside the parentheses can be different from the screenshot. As of writing this tip, Visual Studio 2019 indicates an error in the startup file "manage.py" when running the project in Python 3.9. We can ignore this error. After launching the website, we see two windows: a web browser and a console window.
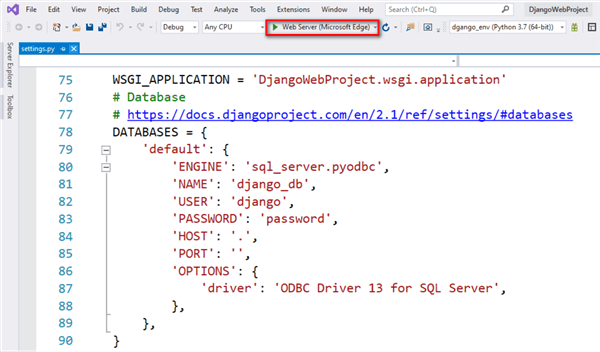
Figure 20 The Button in the Toolbar to Start the Project
The web browser window should look like Figure 21. This simple website has as many functions as a small-scale website. We can navigate pages on the website and log in to the site using the superuser account. If we can log in to the website, that means the Django framework has communicated with the SQL Server successfully.
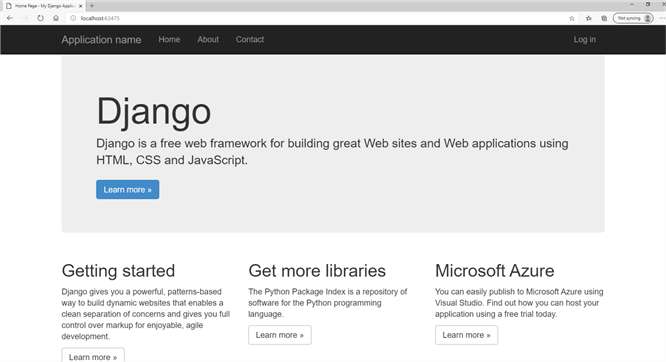
Figure 21 The Website Home Page
The console window shown in Figure 22 displays server logs. When we navigate to other pages or sign into the website, the window shows all these activities. The window also can show the output of a variable when we use the Python print () function. Besides, we can observe error messages in this window if errors occur. Thus, we may use this window for debugging.
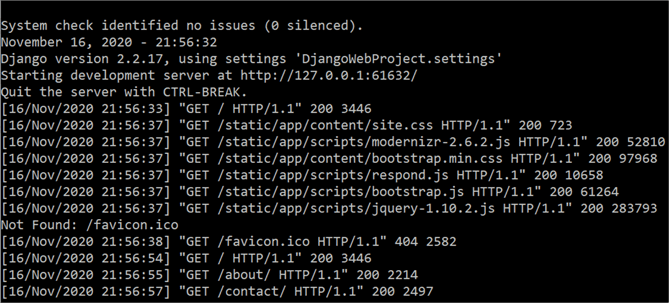
Figure 22 The Console Window
We have had a taste of the Django Web Application Framework. After several steps, we developed a simple website using Visual Studio 2019. To make the website database-driven, we must be able to perform database operations through web interfaces. A fundamental process is retrieving data from a database and then presenting the formatted data to end-users through web pages. Components in various layers of the Django framework work together to complete the process.
Django, a loosely coupled framework, includes three layers: the model layer, the view layer, and the template layer. In the model layer, we use Django data models to represent data and data relationships in databases. Templates in the template layer, written in plain text, provide end-users with formatting data. The view layer, sitting between the model layer and template layer, retrieves data from databases via the models and then transports models to templates for displaying. We can manage modes, views, and templates independently.
3 – Creating the Contact Model
We can communicate with a SQL Server database via Django models. Django wants developers to define data models in one place, the model layer. In other places, database management systems should derive definitions from the model layer. Therefore, when using a SQL Server database with the framework, we need to synchronize changed data models to the database. Visual Studio 2019 provides command menu items to simplify this synchronization process.
For the sake of demonstration, we create the Contact model that defines the contact entity. We assume the entity has these attributes: name, city, state, phone number, email address, and the entity creation date. The synchronization process creates a database table corresponding to this model. Switch to the "Solution Explorer" pane. Open the file "app/models.py," and write a model class as follows:
# Create your models here.
class Contact(models.Model):
   name = models.CharField(max_length=50)
   city = models.CharField(max_length=50)
   state = models.CharField(max_length=2)
   create_date = models.DateTimeField()
   phone_number = models.CharField(max_length=20)
   email = models.CharField(max_length=20)

   def __str__(self):
      return self.name
After creating a Django model, we should synchronize the changes to the database. By running the "makemigrations" command, we store the changes as a migration. Navigate to the menu command item shown in Figure 23 and execute the command.
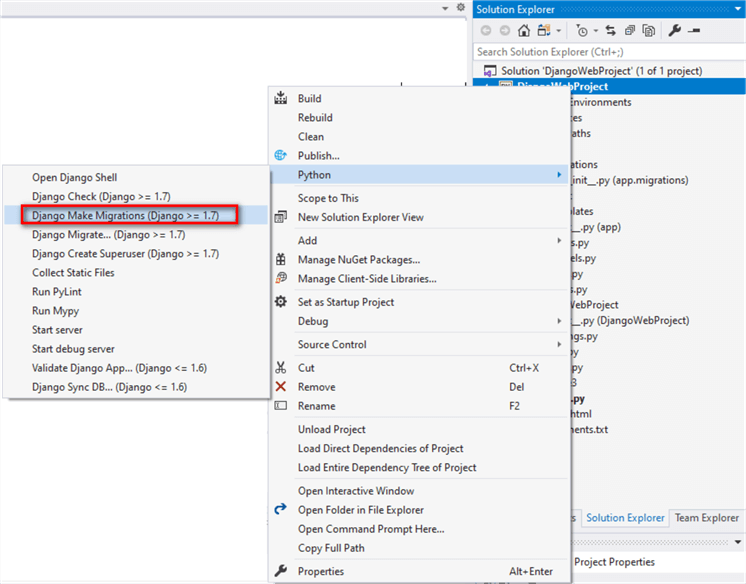
Figure 23 Navigate to the Django Make Migrations Command
Figure 24 shows the output of executing the "Make Migrations" command. This command creates a file "app\migrations\0001_initial.py" that contains the changes in the model.
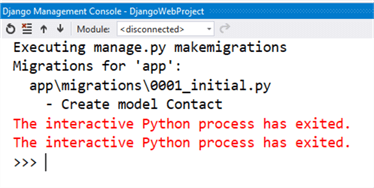
Figure 24 The Make Migrations Output
We then execute the "Migrate" command to create the corresponding table in the database. We bring up a context menu by right-clicking on the project name. In the context menu, we drill down into the menu item: Python ->Django Migrate…, as shown in Figure 25, then execute the command.
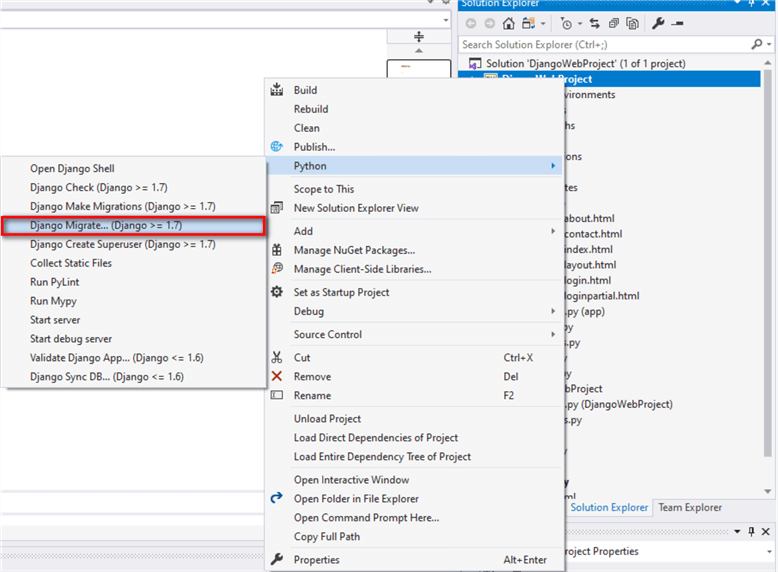
Figure 25 Navigate to the Django Migrate Command
Figure 26 shows the output of executing the "Migrate" command. This command applies the changes in the data model to the database. Connecting to the database, we find the new database table, "app_contact." The prefix "app" is the Django app name. The IDE created this app by default.
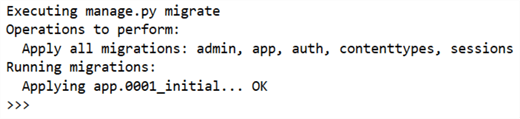
Figure 26 The Migrate Command Output
4 – Creating the View Function
We created the Contact model and the corresponding database table. We want to use a view to retrieve data from the database table and bundle data up in a web response object. End-users can get access to data embedded in the web response object through a web browser. Generally, the view, working similarly as a Python function, receives a web request, executes some business logic, and generates a web response (Behrens, 2012).
There are several ways to create views such as class-based views and view functions. For simplicity, we create a view function. Opening the file "app/views.py," we observe that the IDE created these view functions: home (), contact (), and about (). In this tutorial, we only need to update the function contact (). To make the data model available in the view, we use the "import" keyword. We add the following line to the file views.py:
from .models import Contact
We then modify the contact () function in the view layer. After retrieving data from the database table, we add the data into a context dictionary. Next, we call the render () function that returns a web response object. After this change, the function should look like the following:
def contact(request):
   """Renders the contact page."""
   assert isinstance(request, HttpRequest)

   # Retrieve all contacts in the database table
   contact_list = Contact.objects.order_by('name')

   return render(
      request,
      'app/contact.html',
      {
         'title':'Contact',
         'message':'Your contact page.',
         'year':datetime.now().year,
         'contact_list': contact_list, # Embed data into the HttpResponse object
      }
   )
5 – Creating the Template
In the view function, we used the render () function that combines a Django template with a dictionary and returns a web response object. The Django template parses and formats data in the response object and provides end-users with styled contents. The template is composed of HTML elements, variables, and template tags. Besides the dictionary, the template also takes variables from URL options and context processors. Django offers a robust library of built-in filters to enhance the rendered output. With template tags and filters, we can write complex display logic. To put it simply, we design web pages with HTML elements and then use the variables, template tags, and filters to generate dynamic content.
The template uses the syntax – {{variable name}} – to output the content of a variable. The syntax of the template tags looks like {% tag %}. Create HTML files and add the variables and template tags to display dynamic contents. The project has some templates created already that can be viewed in the project folder "app/templates/app/." In this article, we modify the template "contact.html," to look like the following code snippet. It is worth noting that the variable "contact_list" is a key of the dictionary constructed in the view function. We use the "for" tag to navigate through the contact list and generate HTML code for each item.
{% extends "app/layout.html" %}
{% block content %}
<h2>{{ title }}.</h2>
<h3>{{ message }}</h3>
   {% if contact_list %}
      {% for contact in contact_list %}
      <address>
         {{contact.name}}<br />
         {{contact.city}}, {{contact.state}}<br />
         <abbr title="Phone">P:</abbr>{{contact.phone_number}} <br />
         Email: <a href="mailto:{{contact.email}}">{{contact.email}}</a>
      </address>
      {% endfor %}
   {% else %}
      <p>No contact are available.</p>
   {% endif %}
{% endblock %}
Let’s use Django's built-in web server to verify that the "Contact" page is working as expected. Click on the "Web Server" button in the toolbar. The project starts and the home page appears. When we navigate to the "Contact" page, it should look like Figure 27. Since there is no contact in the database and the contact list is empty, the "if" tag evaluates the variable as false. The template renders code inside the {% else %} block.
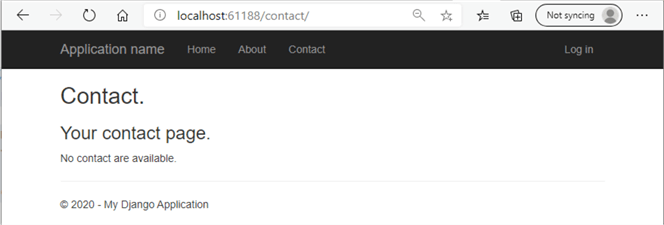
Figure 27 The Contact Page without any Contact
6 – Manipulating Data in the Django Admin Interface
Visual Studio 2019 adds a Django admin application to a website when we create a Django web project. The application has a full-featured admin interface. Through the interface, we can manage data in the Django project’s database from an administrator perspective. By default, the URL to access the admin interface follows this pattern: "http://localhost:60655/admin/".
To access the database, we should register data models in an "admin.py" file in a Django app folder. Visual Studio 2019 does not automatically generate the "admin.py" file. We manually add this file and Figure 28 shows the folder structure.
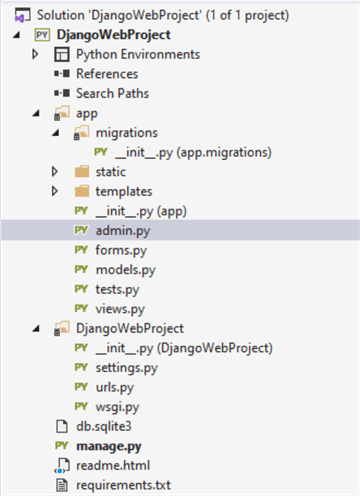
Figure 28 The Django Application Folder Structure
Several methods can be used to register Django models for the Django admin in the "admin.py" file. Some of them can customize the admin behavior for a model. This article uses the most straightforward method to register the Contact model by adding the following code snippet to the "admin.py" file.
from django.contrib import admin
from .models import Contact

admin.site.register(Contact)
Let’s start the project again and we will land on the home page. In a web browser, the URL in the address bar should look like "http://localhost:60655/". The port number may be different. We access the admin interface by changing the URL to http://localhost:60655/admin. The admin interface should look like Figure 29.
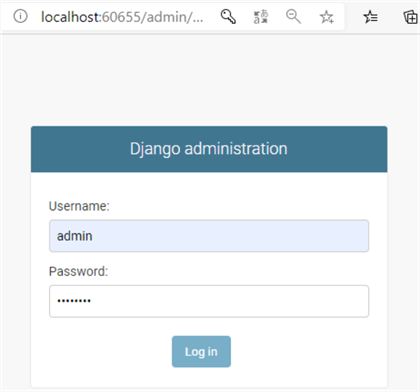
Figure 29 The Admin Application Login Interface
We use the superuser account, created in Section 2.4, to sign into the admin application. The interface should look like Figure 30. The "Contacts" item in the APP section links to the contact data in the database. Provided we click on the "Contacts" item, we should see a new page with a list of contacts. However, the list is empty at the moment.
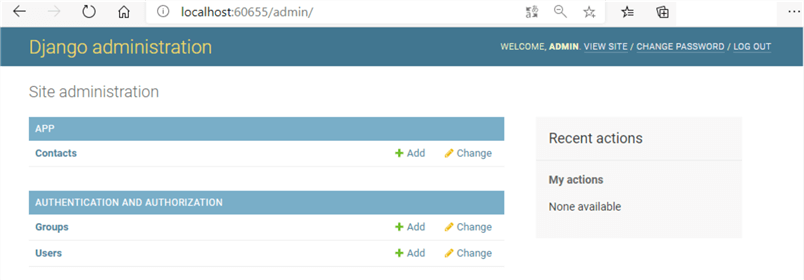
Figure 30 The Django Administration Interface
We can add new contacts to the database table through the "Add" button shown in Figure 30. According to Figure 31 and Figure 32, we add two contacts. Navigating to the "Contact" page shown in Figure 1, we see two contacts we added through the admin interface. These two contacts are in the database table, "app_contact." The "Contact" page demonstrates that, through the Django framework, we retrieved data from the database and presented formatted data to end-users.
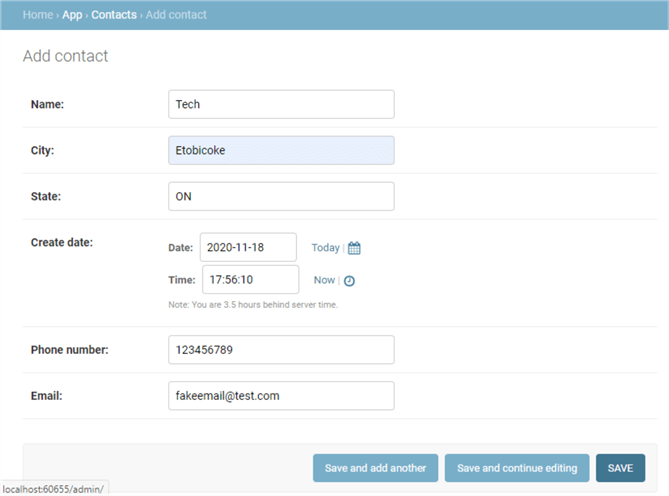
Figure 31 Add Tech to the app_contact Table
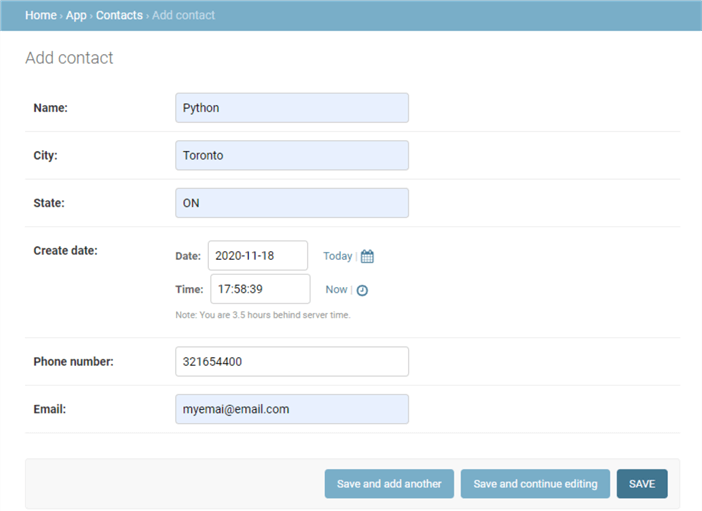
Figure 32 Add Python to the app_contact Table
By the end of this tutorial, we have created a website that with contents in a database. The techniques used in this article allow us to create database-driven websites or dynamic websites within which most contents are not in HTML files but are in database tables. With security settings, we can also allow a page to display contents according to user permissions. Users can see data that they are allowed to view. If we want to enhance the web page appearance, we can use front-end technologies such as CSS and JavaScript.
Summary
Data are valuable assets and people want to access data when and where they need it. Using websites to retrieve data from databases and deliver formatting contents to end-users is a candidate solution. Some companies may not have dedicated web developers. IT professionals in these companies can use the Django framework, a robust web development framework based on Python, to develop websites. According to Rubio, Django is one of the most productive frameworks for building the features needed by most medium to large scale web applications (Rubio, 2017). Additionally, the Django framework has healthy open-source communities; and, the framework website provides well-written documents (Django, 2020). With these resources, people can learn the Django framework quickly.
Many companies adopt Microsoft technologies and use SQL Server as a database management system. This article explored the process to quickly create a proof-of-concept website using Microsoft SQL Server as a database backend. We started by creating a Django web project. The project ran in an isolated virtual environment. We then installed Django backend for Microsoft SQL Server in the virtual environment. After we created a database and were granted rights, we configured database access in Django settings. Next, we synchronized the Django project to create initial database tables for the framework.
Django is a loosely coupled framework and the basic architecture includes three layers: the model layer, the view layer, and the template layer. We created a Contact data model in the model layer to structure and manipulate the website's data. In the view layer, we added a view function to process users' requests, retrieved data from the database via the data model, and returned web responses to end-users. We designed the web page through a template in which we used a designer-friendly syntax to format contents.
Finally, we briefly introduced the Django admin interface which we can use to manage entities in the Django project. We registered the Contact model in the application, then, added two contacts to the database through the admin interface. Putting all these together, we created a database-driven website that has contents not in HTML files but database tables. With the techniques introduced in this article, we can improve the website and make it more pertinent to real-world needs.
References
Behrens, M. (2012). The Django Book. https://django-book.readthedocs.io/en/latest/
Dayley, B. (2008). Sams Teach Yourself Django in 24 Hours. SAMS.
Django (2020). Django documentation. https://docs.djangoproject.com/en/3.1/
ES Solutions AB (2020). django-mssql-backend 2.8.1. https://pypi.org/project/django-mssql-backend/
Herman, M. (2020). Django vs. Flask in 2020: Which Framework to Choose. https://testdriven.io/blog/django-vs-flask/
Petersen, T., Brockschmidt, K., Warren, G., Rohm, W. A., Fosmark, T., Agiewich, R., Partlow, J., Coulter, D., & Caserio, C. (2018). Tutorial: Get started with the Django web framework in Visual Studio. https://docs.microsoft.com/en-us/visualstudio/python/learn-django-in-visual-studio-step-01-project-and-solution?view=vs-2019
Rubio, D. (2017). Beginning Django: Web Application Development and Deployment with Python. Manning Publications.
Zhou, N. (2020). Learning Python in Visual Studio 2019. MSSQLTips. https://www.mssqltips.com/sqlservertip/6442/learning-python-in-visual-studio-2019/
Next Steps
- Some people may be reluctant to start a web project if they do not have any web development background. This article provided a straightforward, step-by-step tutorial to quickly create a proof-of-concept website using Microsoft SQL Server as a database backend. By the end of the tutorial, we created a simple database-driven website. This process demonstrated that web development is not complicated and we can quickly create a website with modern tools. Certainly, web development is not as simple as the sample in this article. The article also did not introduce the Django framework and Model-View-Template (MVT) design pattern in depth. After creating a website using this article, the author recommends a tutorial from Microsoft: Tutorial: Get started with the Django web framework in Visual Studio. This tutorial creates a website using the "Blank Django Web Project" template. Studying this tutorial helps us understand the website structure and the Django framework. After completing this tutorial, we can move to the "Getting started" tutorial provided by the website https://docs.djangoproject.com/. The application created in this tutorial has two parts: (1) end-users view polls and vote in them; (2) Administrators can add, update, and delete polls. The tutorial has not used Visual Studio, but it has explained the Django framework in depth.
- Check out these related tips:


About the author
 Nai Biao Zhou is a Senior Software Developer with 20+ years of experience in software development, specializing in Data Warehousing, Business Intelligence, Data Mining and solution architecture design.
This author pledges the content of this article is based on professional experience and not AI generated.
View all my tips
