Problem
One of the most common real-time tasks performed in any relational database is the Extract, Transform and Load (ETL) of information. SQL Server Integration Services (SSIS) and Oracle Data Integrator (ODI) are the native on-premises ETL tools from Microsoft and Oracle, respectively, but they’re completely different in how they are used for data processing, data management, data warehouse \ business intelligence projects, automation and more. If you need to switch from one ETL tool to another, what are their similarities and differences?
Solution
This tutorial will create a simple data pipeline workflow in both tools that will read a table from the source database, modify the data, and insert it into the destination table, ultimately showing the differences and similarities between them. The installation has already been covered in SSIS vs Oracle Data Integrator: Command Line Installation, but you will need Windows with a graphical environment for ODI and Visual Studio 2019.
In this walkthrough, we will show how to create a table from an existing table and how to calculate some of the columns in the new table, along with setting up the environment via a real world ETL pipelines.
Oracle ETL Solution
Set Up – PowerShell
Before running ODI, you must have several components running.
Here are the PowerShell commands to start the database and listener:
- Start the database service:
net start OracleServiceORCL
- Start the database:
"startup" | sqlplus / as sysdba
- Start the listener:
lsnrctl start
Here are the PowerShell commands to start the WebSphere components in the application server, you will get prompted for the WebLogic username and password:
& C:\app\oracle\user_projects\domains\odiDomain\bin\startNodeManager.cmd
& C:\app\oracle\user_projects\domains\odiDomain\bin\startWebLogic.cmd
& C:\app\oracle\user_projects\domains\odiDomain\bin\startManagedWebLogic.cmd ODI_server1
ODI
Once everything is running, you can start ODI as follows:
& C:\app\oracle\odi\studio\odi.exe
As mentioned earlier, you need a Windows graphical environment on the server where ODI is installed. Once started, under the “Security” tab, click on “Connect to Repository”, add a new login, and connect to it. This is described here with screenshots.
To connect to a database, you must first create the physical topology (Connection Manager in SSIS). On the “Topology” tab, expand “Physical Architecture”, then “Technologies”, then right-click “Oracle” and select “New Data Server”:


Enter a name for it and the user and password, in my case I’m using SYS AS SYSDBA since it is a test environment and it’s the only user that can connect remotely:
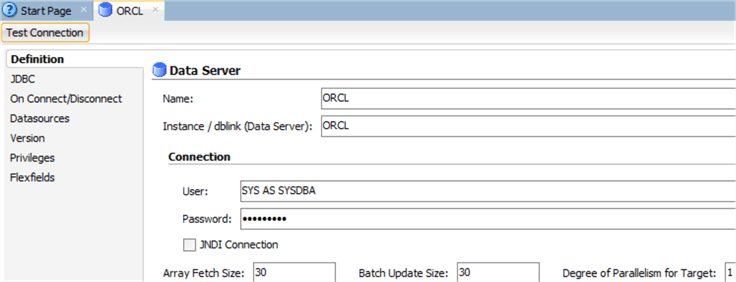
Then go to “JDBC.” Enter the URL to connect, in my case I’m using localhost instead of a server name or IP, the default port 1521, and my instance name is ORCL:

Notice there are other properties you can specify regarding the database server connection: On Connect/Disconnect, Datasources, Version, Privileges, and Flexfields. Fill them in only if needed. For this example, we didn’t. Also, notice there is a button at the top left corner titled “Test Connection.” Click it to verify everything is correct, as it helps you resolve any issue with descriptive messages. For the physical agent, you can use Local since the database is on the same server, or you can use another from WebLogic. Click “Test.”


Remember to “Save” the data server once done. You can save it from the toolbar and menu bar.
Now create the physical schema from it. Right-click it and select “New Physical Schema”:

You only need to select the schema to be used. In my case, the table I want to extract is in the SYS schema and everything else is left with the defaults. Then “Save” the physical schema:

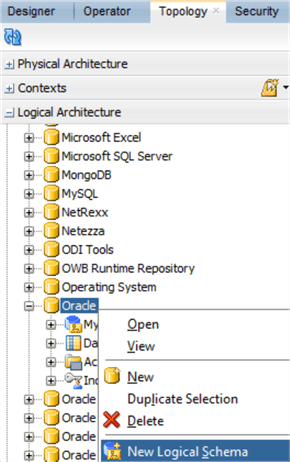
Finally, for the topology, expand “Logical Architecture”, right-click “Oracle,” and select “New Logical Schema”:

Enter a name and ensure the physical schema is the one created in the previous step, then “Save” the schema:

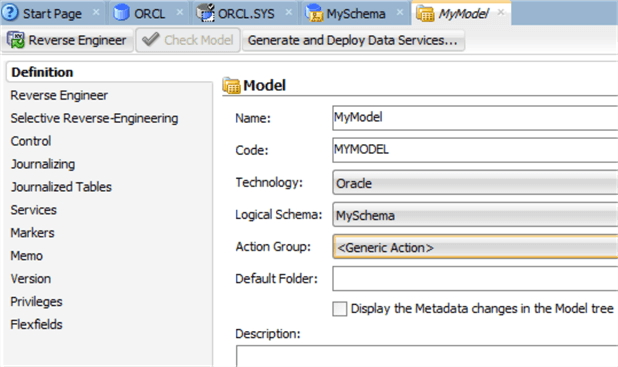
At this moment, we’ve only defined where we will get the data in the Topology. To use this data, we need to go to the “Designer” tab. Click on the folder next to “Models,” and click on “New Model”:

Enter the name and ensure the logical schema is the one created in the previous step, then “Save” the model:
Once created, right-click it, and select “New Datastore”:

Enter a name for it, select the datastore type (view or table), and enter the resource name (there is no dropdown to choose it, so make sure it is entered correctly), then “Save” the datastore:

Upon saving, a prompt will appear to lock the datastore while you’re editing it:

Once saved, go to “Attributes”:

Click the “Reverse Engineer” button, which will automatically get the schema definition from the specified table, then “Save” the datastore:

Now, you will see it appears under the model. You can right-click it and select “View Data”:

A new tab will open with the data from the datastore:

Now you need to repeat some of the steps for the target table (unless you load it into a different database). On the “Topology” tab under “Logical Architecture”, right-click “Oracle” and select “New Logical Schema”:
Enter a name for it and make sure the correct physical schema is selected. If the target won’t be the SYS schema, you need to create a different one. Then “Save” the logical schema:

In the “Designer” tab, click on the folder next to “Models” and select “New Model”:

Enter a name for it and select the logical schema created in the previous step, then “Save” the model:

Under “Models,” right-click the newly created model and select “New Datastore”:

Enter a name and the name you want for the physical table to be created in the database. In my case, I entered “MyTargetDatastore,” which contains lowercase characters, so I will have to enclose this name in double quotes when querying the database:

Go to “Attributes” and, since this will be a new table, we must manually add the columns we want using the plus sign:

In my case, I added one column for each of the fields in the original table, but with different names. Once done, “Save” the datastore:

So far, we’ve only defined the source and target, but we haven’t defined the workflow. For that, in the “Designer” tab, click on the button next to “Projects” and click “New Project.” Enter a name and “Save” it:

In my case, it is named “MyProject.” Expand it and there will be a folder named “First Folder,” expand it, right-click on “Mappings,” and select “New Mapping”:

Enter a name for it, uncheck “Create Empty Dataset,” and “Save” it:

When you open the mapping, there is a whiteboard where you can design the workflow. Under “Models,” select the source datastore and drag it over the whiteboard. Notice it has the alias and fields from the table:
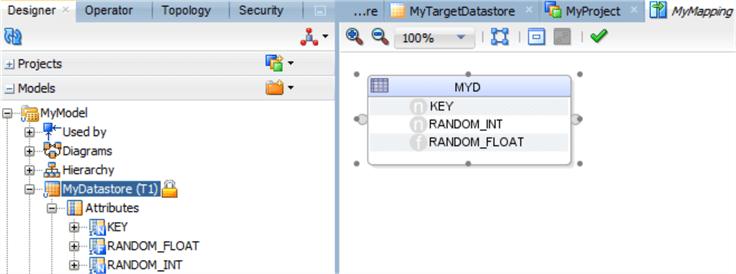
Do the same for the target datastore:

Connect the first datastore with the second by dragging the gray circle on the right of MYD to the gray circle on the left of MYT:

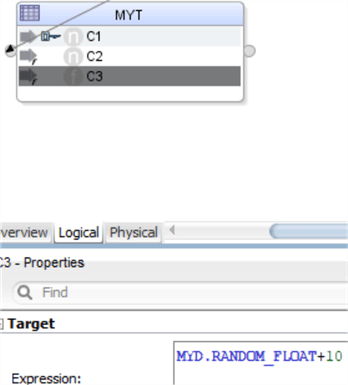
Select the target “MYT” first column “C1”, confirm it will be populated from the “KEY” field, mark the checkbox saying “Key” because it will be the primary key, and additionally notice there are three tabs in the whiteboard and we’re currently in the “Logical” one:

Now select the second column. It has already been populated with a matching field from “MYD.” We only want to update the expression to modify the data, so we add “+10”:

Do the same with the third column:
Now switch to the “Physical” tab within the whiteboard. You will see graphically the steps to be performed when run, and because this table is new, you need to change the option “CREATE_TARGET_TABLE” to “True”:

To run the mapping, select “Run” in the toolbar menu, then select “Run…” or “Debug”:

If you select “Start Debug Session…,” there are several configurations you can make. The defaults are good enough. Click “OK”:

Note: There are several tabs: Definition, Steps, Blueprint and Privileges, Blueprint shows you the actions performed:
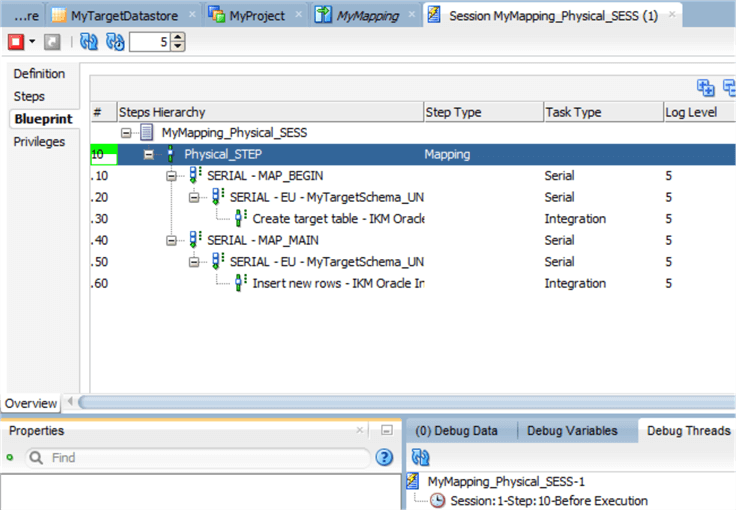
And after it has run, you will see the table has been created in the database:

And you can easily view the data in the target datastore as shown previously with the source datastore.
SQL Server Integration Services (SSIS)
Keep in mind that when you install SSIS, you also install the relational database engine; for this example, we only need the database running, but SSIS is only needed when deploying the project (not covered here). We will only create the workflow in Visual Studio 2019, which you need to install on a machine that can connect to the database. However, you need to add the SSIS component as described in Install SQL Server Integration Services in Visual Studio 2019.
First, start Visual Studio 2019, and at the bottom right corner, choose “Continue without code”:

Then, in the toolbar menu, choose “Extensions,” and select “Manage Extensions”:

Type “integration” and next to “SQL Server Integration Services Projects,” click “Download”:

Once downloaded, close Visual Studio and install the downloaded component until completion:


Launch Visual Studio 2019 again. Choose “Create a new project.” Type “integration” and select “Integration Services Project”:

In the new project properties page, enter a name and create it:

By default, there is a Package.dtsx open in the “Control Flow” tab. Drag a “Data Flow Task” into it and rename it:

Double click the Data Flow Task or switch to the “Data Flow” tab:

There are several ways to connect to SQL Server. First, let’s see how it is done using the “Source Assistant.” Double click on the left pane “SSIS Toolbox” the “Source Assistant”, select the source type “SQL Server,” and click “New” on the right pane:

There are several drivers for SQL Server. The default is “Microsoft OLE DB Driver for SQL Server” (in gray):

Specify the properties of the connection. In my case, I used a single dot (“.”) for the server name, a username and password. And I don’t specify the initial catalog, but the default is “master”:

The second option to connect to the database is adding from the “SSIS Toolbox” in “Other Sources,” the “ADO NET Source”:

Double click it to open the properties. Since there is no connection manager, click “New”:

There are no data connections, so click “New” at the bottom right corner:

Note: By default, the driver is “SqlClient Data Provider,” but you can also use ODBC or OleDb:

Specify the properties. In my case, I specified a single dot (“.”) for the server name, the username, and password. I left empty the database name, but by default, it will be “master.” Click on “Test Connection”:

You will see the connection was successful:

Now you can select this in the “Data connections”:

And you can select it in the ADO.NET connection manager. Select data access mode “SQL command”:

You can see the whole transformation can be specified as a T-SQL query. For now, only enter “SELECT * FROM MyDb.dbo.T1;” and click on “Preview”:

The data from the table is shown:

After selecting the connection manager, on the left pane, switch to “Columns,” and confirm which ones you want from the database and what names will be assigned:
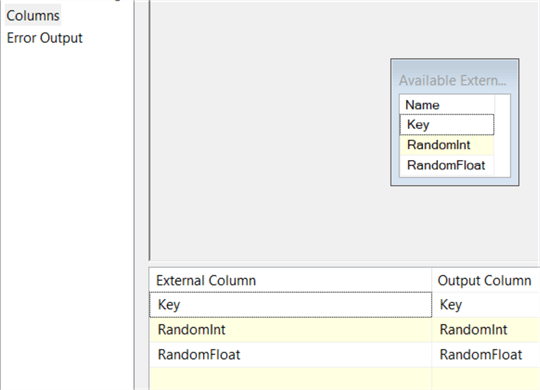
There is another pane for “Error Output,” which allows you to perform actions on errors and truncations:

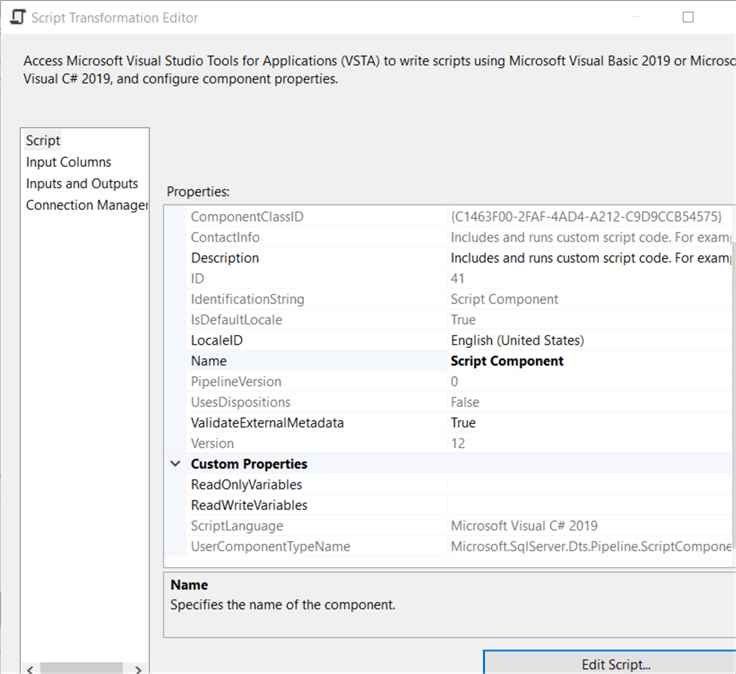
Now we want to modify the data. We can use multiple “Derived Column” components, or we can use a single “Script Component” to perform all modifications at once. Drag and drop this component into the Data Flow and select “Transformation” because it will have inputs and outputs:

Then, connect the source to the script by dragging the down arrow from the first component into the second:

Then double click the script components, and in the left pane, select “Input Columns.” Select them all, change the alias as needed, and change the usage type to “ReadWrite”:

Select “Inputs and Outputs” and confirm there is an “Input 0” and an “Output 0” with no columns:

Now move to the “Script” tab and click on the “Edit Script” button at the bottom right corner:
It will open a completely new Visual Studio instance with this component loaded. The code you need to modify is within “main.cs,” and the procedure is “Input0_ProcessInputRow”. In my case, I will add 10 to RandomInt and RandomFloat:

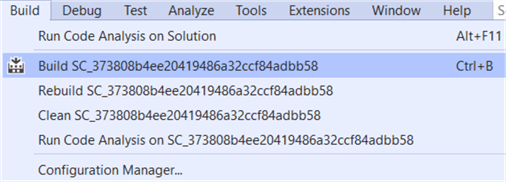
Once you’re done with the modifications, in the menu bar, select “Build” and then “Build” or Ctrl+B. When there is a message saying “Build Successful,” you can close this instance of Visual Studio to return to the previous one.
Now add an ADO NET Destination and connect the Script Component to it:

Select the Connection manager created previously, unless you want to insert it into a different database:
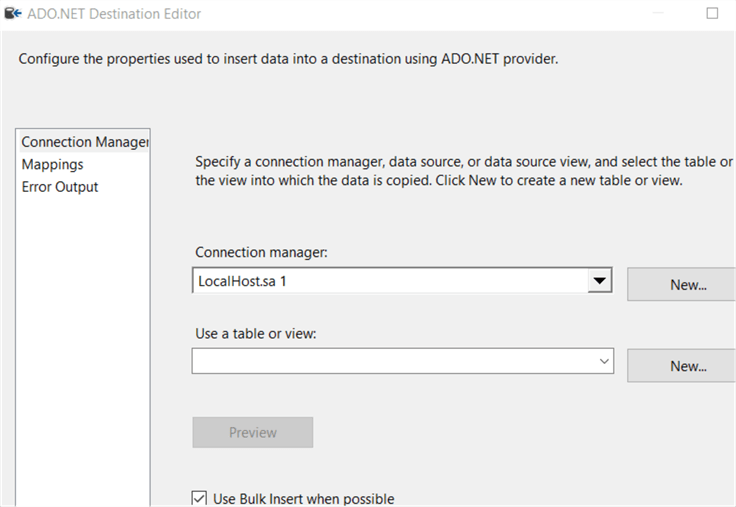
Note: You only have the option to use an existing table or view. But since it is new, you need to click “New” to create it beforehand:
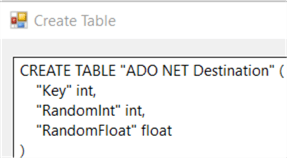
We need to change it to MyDb.dbo.”ADO NET Destination”:

And you can “Preview” it:


Now select “Mappings” and make sure the fields are correctly set:

Now you can run the project, or select from the toolbar menu “Debug” and “Start Debugging”:

Note: A spinning wheel in the Data Flow task will convert to a green checkmark when it’s done:

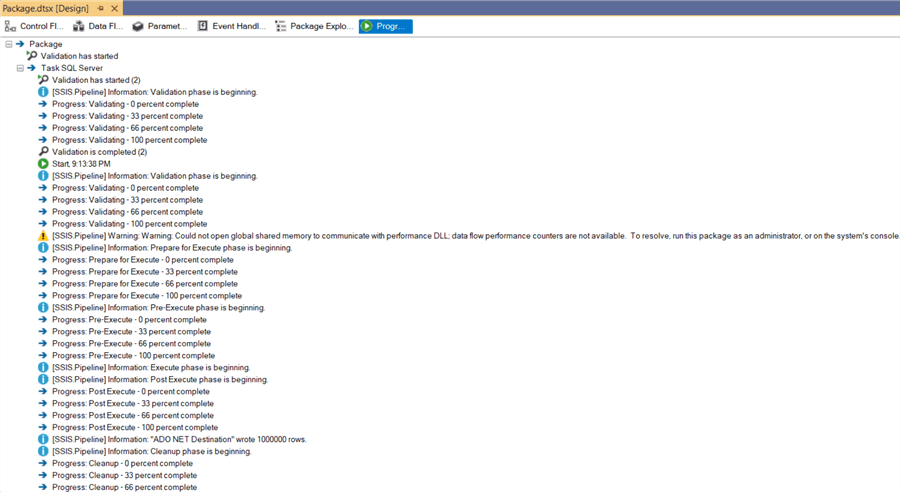
Once completed, you can select the “Progress” tab and see all the operations that occurred in the system:

When you query the table, you will see the records:

Next Steps
You can find more information about SSIS in the tips below:
- What is SSIS?
- SQL Server Integration Services (SSIS) Tutorial
- Install Visual Studio
- Install SQL Server Integration Services in Visual Studio 2019
- Visual Studio 2019 Configuration for the Production DBA
- Installing SQL Server Integration Services
- SQL Server Integration Services SSIS Data Flow Task Example
Check out these Cloud-Based ETL \ ELT tips as well:
- SQL Server Azure Data Factory Tips
- Serverless ETL using AWS Glue for RDS databases
- ETL vs ELT Features and Use Cases

Pablo Echeverria has worked for more than 10 years as a software programmer and analyst, during which time I studied parallel programming and became a senior programmer specialist. Afterward, he switched to a DBA position implementing new processes and creating better monitoring tools, while growing his data scientist skills to improve my customer’s businesses. Check out Pablo’s most recent book, “Hands-on Data Virtualization with Polybase“. This book brings exciting coverage on establishing and managing data virtualization using Polybase. It teaches how to configure Polybase on almost all relational and nonrelational databases, to setup a test environment for any tool or software instantly without any hassle, and to rapidly design and build high performing data warehousing solutions.
- MSSQLTips Awards: Rising Star (50+ tips) – 2024 | Author Contender – 2018, 2022, 2023 | Rookie Contender – 2017