Problem
Python is one of the most popular programming languages and opens the door to solving many business problems. However, some end users may have difficulty running Python scripts (Marin, 2021). For example, business users who use the Windows operating system may not have Python installed or know how to run Python scripts from a command prompt. Some tools like “PyInstaller” and “Auto PY to EXE” can convert Python scripts into executables. Nevertheless, distributing these executables to users still seems to be a complicated installation process, which can be a barrier to entry for these users (Rossant, 2013). Since the Windows installer (alternatively known as Microsoft installer or MSI) enables regular Windows users to install and configure applications efficiently, we want to create an MSI installer from a Python application.
Solution
We can build an MSI installer from a Python application using Visual Studio 2022 (Microsoft, 2023) and WiX Toolset V3 (WiX, 2023). WiX (i.e., Windows Installer XML), an accessible, open-source XML markup, makes the Windows Installer technology simple (Shah, 2023). When using WiX to create an MSI, we can register the application with the “Programs and Features” tool. We can also provide users with installation instructions on wizard-style dialogs.
The article describes the steps to create an MSI for a Python application. After obtaining the “WiX Toolset v3.11.2” from GitHub, we install the “WiX v3 – Visual Studio 2022 Extension” to build integration with WiX v3 in Visual Studio. We can get the extension from the Visual Studio Marketplace. We then create a simple WiX setup project for demonstration purposes, which installs several documents on a target machine. Next, we explore some WiX XML elements in the WiX source file.
After successfully installing the MSI to a target machine, we improve on this simple project. We first add a user-friendly wizard. We then create shortcuts. Next, we use the heat.exe tool to harvest files. Furthermore, we show how to use the HeatDirectory to integrate the heat.exe tool into the WiX setup project.
We use Microsoft Visual Studio 2022 Community Edition to create WiX setup projects and build MSI files. The development environment is Windows 10 Pro 10.0 <X64>. When creating WiX elements, we used the Online GUID/UUID Generator(https://guidgenerator.com) to generate GUIDs. After building an MSI, we installed the installer on Windows 10 home <X64>.
Click here to download the complete source code.
1 – Creating a Simple MSI
We produce a simple MSI to demonstrate creating and building a WiX setup project in Visual Studio 2022. First, we make up an application containing seven PDF files, three in a subfolder. Figure 1 illustrates the application folder structure. The MSI should be able to install these files to a target machine. The folder on the target machine should have the same structure as the one shown in this figure.
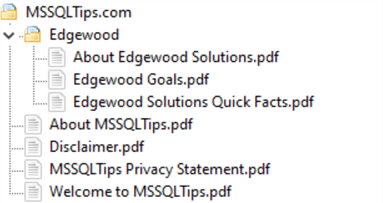
Figure 1 The Application Folder Structure
1.1 Setting Up the Development Environment
When landing on the web page https://wixtoolset.org/docs/wix3/, we can find installers for WiX Toolset build tools (WiX v3.11.2) and the WiX v3 – Visual Studio 2022 Extension, as shown in Figure 2. If the development environment does not have these WiX tools installed, we should download and install these packages.
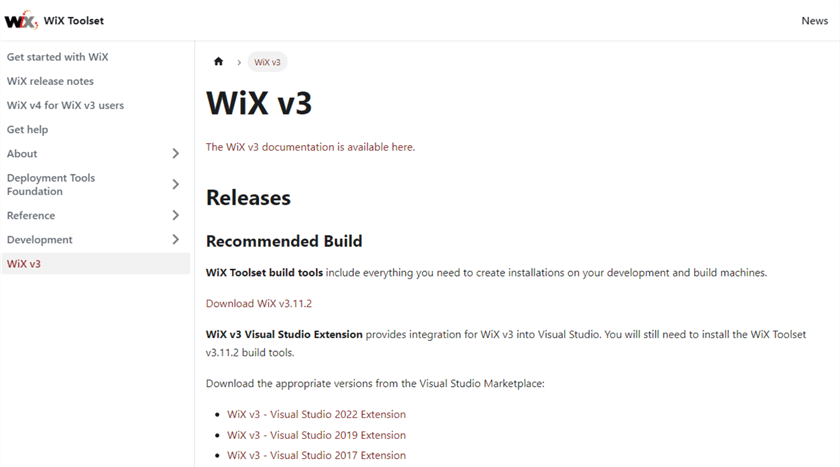
Figure 2 The Web Page for Downloading the WiX Tools
The tool “Orca.exe” is a database table editor for creating and editing Windows Installer packages. This tool is found in the Windows SDK Components for Windows Installer Developers, available at https://developer.microsoft.com/en-us/windows/downloads/windows-sdk/. After installing the Windows SDK, we locate the installer at “C:\Program Files (x86)\Windows Kits\10\bin\10.0.22000.0\x86\Orca-x86_en-us.msi” in our development environment. Next, we double-click the MSI file to install Orca.exe. After the successful installation, we can see the “Edit with Orca” in the context menu, as shown in Figure 3, when right-clicking any MSI file.
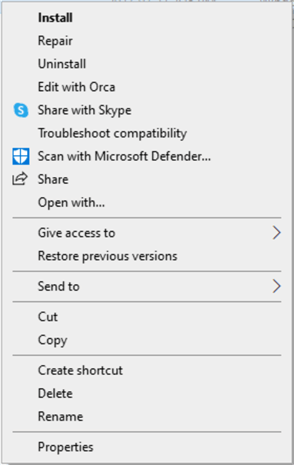
Figure 3 The “Edit with Orca” Menu Item in the Context Menu
1.2 Creating a Setup Project for WiX v3
We place all source documents into the “C:\temp” folder. We want to pack all documents in the “C:\temp\MSSQLTips.com” folder into an MSI file. First, open Visual Studio 2022 and select “Create a new project” in the startup screen. Next, select the “Setup Project for WiX v3” template from the project template list. We name the project “MSSQLTips_Document” and click on the “Create” button to create the project. This procedure creates a WiX setup project with a default “Product.wxs” file, as shown in Figure 4. The file includes several XML elements, for example, Product, Package, Feature, Fragment, and ComponentGroup.

Figure 4 The WiX Project with the Default WiX source File.
1.2.1 The Product Element
We use the Product element to describe the application, such as Id, name, language, version, and manufacturer. These characteristics usually remain the same from build to build. However, the version may vary from time to time. The attribute names explain the purpose of the attributes; thus, it is easy for us to assign values to these attributes. The following code snippet shows how we use the attribute values to characterize the application. In addition, the snippet indicates that we hardcode the Product element's Id attribute, the ProductCode of the application. In this case, WiX will not change the ProductCode each time we compile the project.
   <Product Id="233EF61A-BEB0-4250-9F68-B19C37EAF7E7"
          Name="MSSQLTips Document"
          Language="1033"
          Version="1.0.0.0"
          Manufacturer="MSSQLTips"
          UpgradeCode="F3BF7056-BA4E-4858-B714-C7A67D9E3A16 ">
   </Product>
1.2.2 The Package Element
Compared to the Product element, which represents the application in the MSI, the Package element, a child element of the Product element, describes the installer itself. Since the package changes each time we compile the project, we ignore the Id attribute and let WiX tools create one for us. When assigning the value of “perMachine” to the InstallScope attribute, we install the application in the “All Users” context. Another option is “perUser,” meaning we install the application only for the current user (Ramirez, 2012).
      <Package InstallerVersion="200"
             Compressed="yes"
             InstallScope="perMachine" />
1.2.3 The Directory Element
We use the Directory element to decide where the application gets installed on the end user’s hard drive. A Directory element can be inside another element, so we can create a Directory hierarchy to represent a tree-like folder structure on a target machine. The top level of the Directory hierarchy should always have an Id attribute of TARGETDIR and a Name attribute of SourceDir. This setting defines the “root” directory of the installation (Ramirez, 2012). We also notice that the Directory is inside a Fragment element. The Fragment element is a container that does not need any attributes. We use the Fragment elements to make XML code manageable by splitting up the code.
   <Fragment>
      <Directory Id="TARGETDIR" Name="SourceDir">
         <Directory Id="ProgramFilesFolder">
            <Directory Id="INSTALLFOLDER" Name="MSSQLTips.com " />
         </Directory>
      </Directory>
   </Fragment>
A Directory element should always have an Id attribute to identify the corresponding directory on a target machine. We can use a predefined directory name as a value of the Id attribute. For example, the “ProgramFilesFolder” used in this exercise represents the full path to the 32-bit Program Files folder (Batchelor et al., 2021). We do not need to specify the name attribute if installing our applications to these predefined directories. However, when creating our directories, we must provide the name attribute. For example, the preceding code snippet indicates that we want to install our application into the “C:\Program Files (x86)\MSSQLTips.com\” folder.
1.2.4 The File, Component, and ComponentGroup Elements
A file element describes the file; for example, the Source attribute specifies the file's relative or absolute path. When we add a file element to a component element, the component element can tell which file we want to install. We should assign every component a unique GUID so the Windows operating system can track every file installed on the target machine. When an MSI needs to include many files, we create a ComponentGroup element that groups all Component elements. In this case, when another element, such as a Feature element, wants to reference all Component elements, it can only reference the ComponentGroup element.
      <ComponentGroup Id="ProductComponents">
         <Component Id="About_MSSQLTips"
                  Guid="19004671-C94C-44E9-AA6B-A674126835F5"
                  Directory="INSTALLFOLDER">
            <File Id="About_MSSQLTips"
                 Source="C:\temp\MSSQLTips.com\About MSSQLTips.pdf"
                 KeyPath="yes" />
         </Component>
         <Component Id="Disclaimer"
                  Guid="83723736-0219-4610-BA3D-F40E57CC7FB8"
                  Directory="INSTALLFOLDER">
            <File Id="Disclaimer"
                 Source="C:\temp\MSSQLTips.com\Disclaimer.pdf"
                 KeyPath="yes" />
         </Component>
         <Component Id="MSSQLTips_Privacy_Statement"
                  Guid="69F3C5F5-BF64-4189-916D-855B6BCDF7F4"
                  Directory="INSTALLFOLDER">
            <File Id="MSSQLTips_Privacy_Statement"
                 Source="C:\temp\MSSQLTips.com\MSSQLTips Privacy Statement.pdf"
                 KeyPath="yes" />
         </Component>
         <Component Id="Welcome_to_MSSQLTips"
                  Guid="F0976A0E-2D10-405B-A33E-0BD6687C729B"
                  Directory="INSTALLFOLDER">
            <File Id="Welcome_to_MSSQLTips"
                 Source="C:\temp\MSSQLTips.com\Welcome to MSSQLTips.pdf"
                 KeyPath="yes" />
         </Component>
         <Component Id="About_Edgewood_Solutions"
                  Guid="6944BFD4-6C16-4471-AF11-2DCC2D302473"
                  Directory="SubDir_Edgewood">
            <File Id="About_Edgewood_Solutions"
                 Source="C:\temp\MSSQLTips.com\Edgewood\About Edgewood Solutions.pdf"
                 KeyPath="yes" />
         </Component>
         <Component Id="Edgewood_Goals"
                  Guid="DC7E7987-0659-453B-8074-A9EEA51DF8AA"
                  Directory="SubDir_Edgewood">
            <File Id="Edgewood_Goals"
                 Source="C:\temp\MSSQLTips.com\Edgewood\Edgewood Goals.pdf"
                 KeyPath="yes" />
         </Component>
         <Component Id="Edgewood_Solutions_Quick_Facts"
                  Guid="C627B54E-0924-42BF-A2BA-32F62A599665"
                  Directory="SubDir_Edgewood">
            <File Id="Edgewood_Solutions_Quick_Facts"
                 Source="C:\temp\MSSQLTips.com\Edgewood\Edgewood Solutions Quick Facts.pdf"
                 KeyPath="yes" />
         </Component>
      </ComponentGroup>
1.2.5 The Other Elements
We can find some other XML elements in the default “Product.wxs” file:
- MediaTemplate: Setting the EmbedCab attribute to “yes” informs WiX to embed all the CAB files in the MSI.
- Feature: The Feature element references a group of components users can install. Every component must be in a Feature element.
- ComponentGroupRef: The element allows other elements to reference a ComponentGroup element indirectly.
The following code snippet demonstrates how we use these elements in this project. First, we embed all the CAB files in the MSI. Then, we install a ComponentGroup under the feature “ProductFeature.” Note that we use the ComponentGroupRef element to reference the ComponentGroup. The Id attribute of ComponentGroupRef is the Id attribute from the corresponding ComponentGroup element.
      <MediaTemplate EmbedCab="yes" />

      <Feature Id="ProductFeature" Title="MSSQLTips_Document" Level="1">
         <ComponentGroupRef Id="ProductComponents" />
      </Feature>
1.2.6 Building the Project to Generate an MSI
We created a simple WiX setup project that installs seven documents to target machines. Now, we want to create the “MSSQLTips_Document.msi” installer. Double-clicking on the MSI file, we install all the documents to the “C:\Program Files (x86)\MSSQLTips.com” folder. Figure 5 illustrates the folders and documents installed on a target machine.
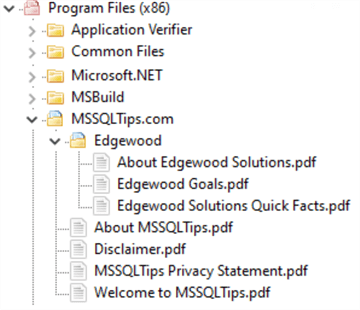
Figure 5 The Application Folder Structure on the Target Machine
The MSI installer is a relational database describing how the Windows Installer unpacks and copies an application's components to the end user's machine. We can use Orca.exe to view the database structure of an MSI file. Figure 6 illustrates the database tables. The elements we mentioned, such as Feature, Directory, File, and Component, have corresponding tables in the MSI. The tables contain the element definitions in the XML markup. We can edit the MSI package directly with Orca.
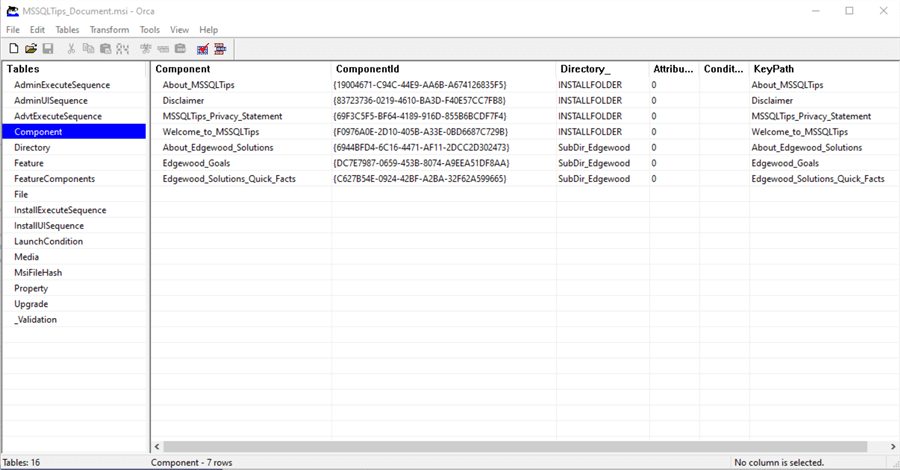
Figure 6 The Windows Installer Database Tables
2 – Improving on the Simple WiX Setup Project
We created a simple MSI to install seven documents on a target machine. However, we note some room for improvement:
- The installer does not have an interface. Users can not change the install folder location.
- The installer does not add shortcuts to the Windows Start Menu and desktop.
- We must manually define the seven files in the .wxs file. When there are many files, writing XML elements by hand is impractical.
To overcome these downsides, we add a user interface wizard to the installer, create shortcuts for the application and use the “heat.exe” tool to harvest files.
2.1 Adding a User Interface Wizard
The WiX toolset contains several predefined (namely, built-in) user interface wizards that provide a familiar setup user interface:
- WixUI_Minimal,
- WixUI_Advanced,
- WixUI_FeatureTree,
- WixUI_InstallDir,
- WixUI_Mondo
To add a built-in WixUI dialog set to the application installer, we should first add a reference, “WixUIExtension.dll,” to the WiX project. Our development environment has this DLL in the “C:\Program Files (x86)\WiX Toolset v3.11\bin\” folder. We then add a UIRef element as a child of the Product element. The UIRef element's Id should match the name of one of the dialog sets described above. With these built-ins, we can customize the installation process. The following code snippet demonstrates the syntax of adding a UIRef element:
       <UIRef Id="WixUI_InstallDir" />
      <Property Id="WIXUI_INSTALLDIR" Value="INSTALLFOLDER"/>
      <Property Id="WIXUI_EXITDIALOGOPTIONALTEXT" Value="Thank you for installing MSSQLTips.com documents." />
      <WixVariable Id="WixUILicenseRtf" Value="License.rtf" />
      <WixVariable Id="WixUIDialogBmp" Value="WixUIDialogBmp.bmp" />
      <WixVariable Id="WixUIBannerBmp" Value="WixUIBannerBmp.bmp" />
The built-in WixUI_InstallDir dialog set allows users to change the install path. Therefore, we must add a Property element to store the path. The Id attribute of the Property element should be “WIXUI_INSTALLDIR,” and the value attribute should be the Id attribute of the install folder (e.g., INSTALLLDIR in this exercise). The WixUI_InstallDir dialog set also includes an “End-user License Agreement” dialog. We use a WixVariable to provide the file path of the license document. The built-in WixUI dialog sets are also customizable. For example, the preceding code snippet adds a text message and bitmaps to the UI. When building the WiX setup project to generate an MSI file and installing the MSI, we should see six dialogs, as shown in Figures 7, 8, and 9.
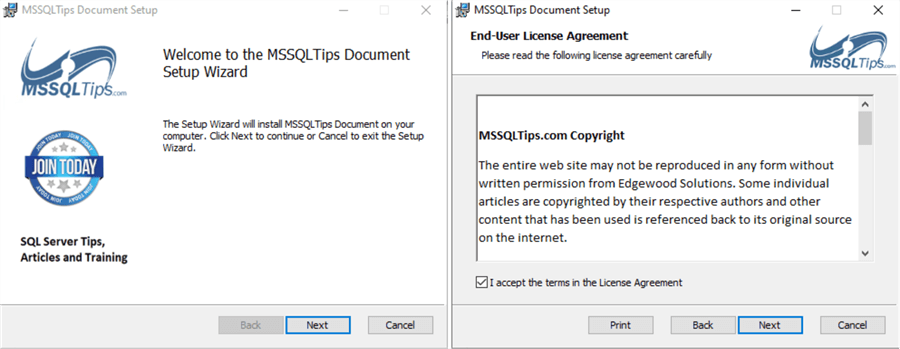
Figure 7 WixUI_InstallDir Dialogs 1 & 2
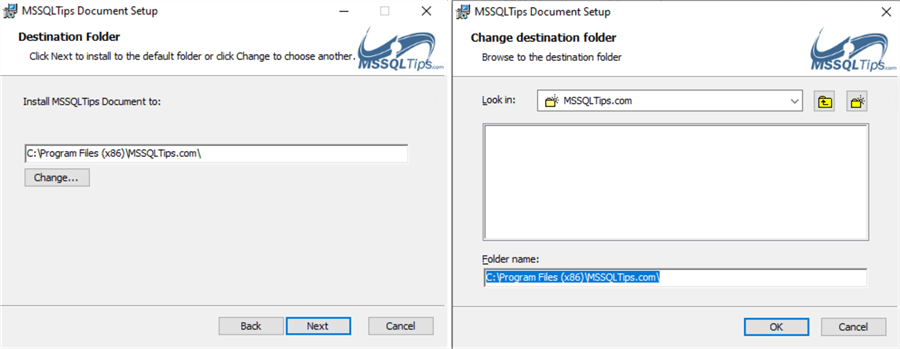
Figure 8 WixUI_InstallDir Dialogs 3 & 4
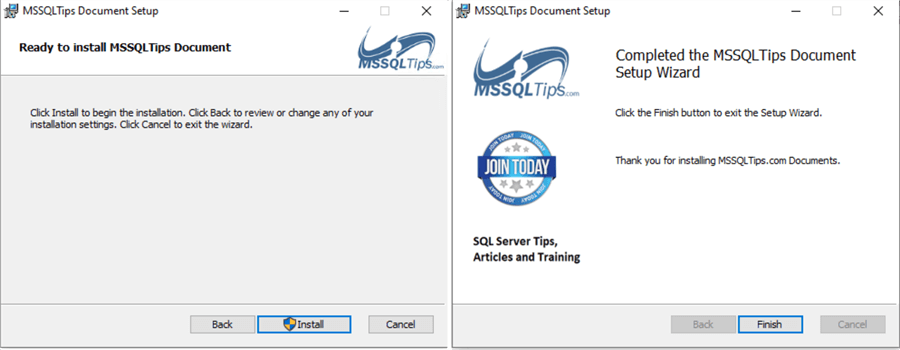
Figure 9 WixUI_InstallDir Dialogs 5 & 6
2.2 Creating Shortcuts in the Start Menu and on the Desktop
The Windows installer has two built-in properties: the ProgramMenuFolder property and the DesktopFolder property. The installer sets the ProgramMenuFolder property to the current user's full path of the Program Menu folder. The DesktopFolder property is set to the full path of the current user's Desktop folder. When adding components to these folders, we create shortcuts to launch applications in the Start menu and on the Desktop. We first add two Directory elements to the project to implement this method.
   <Fragment>
      <Directory Id="TARGETDIR" Name="SourceDir">
         <Directory Id="ProgramFilesFolder">
            <Directory Id="INSTALLFOLDER" Name="MSSQLTips.com">
               <Directory Id="SubDir_Edgewood" Name="Edgewood" />
            </Directory>
         </Directory>
         <Directory Id="ProgramMenuFolder">
            <Directory Id="ProgramMenuDir" Name="MSSQLTips.com" />
         </Directory>
         <Directory Id="DesktopFolder" />
      </Directory>
   </Fragment>
Next, we create two Component elements that contain Shortcut elements. Since a shortcut is not a physical file, it does not have the KeyPath item. However, every component must have a KeyPath item. Therefore, The RegistryValue element always accompanies a shortcut. In addition, when adding a shortcut to the Windows start menu, we always add a RemoveFolder element that ensures the uninstallation process can remove the new Start menu subdirectory. The following code snippet demonstrates how to create shortcuts.
         <Component Id="ProgramMenuShortcut"
                  Guid="C03B4971-E4CB-426C-920D-DA7325903325"
                  Directory="ProgramMenuDir">
            <Shortcut Id="MSSQLTipsStartMenuShortcut"
                    Name="Welcome to MSSQLTips"
                    Description="Read MSSQLTips.com Documents"
                    Target="[INSTALLFOLDER]Welcome to MSSQLTips.pdf"
                    Icon="MSSQLtips_ico"
                    WorkingDirectory ="INSTALLFOLDER"/>
            <Shortcut Id="UninstallShortcut"
                    Name="Uninstall MSSQLTips"
                    Description="Uninstalls MSSQLTips Documents"
                    Target="[System64Folder]msiexec.exe"
                    Arguments="/x [ProductCode]" />
            <RemoveFolder Id='ProgramMenuDir' On='uninstall' />
            <RegistryValue Root='HKCU'
                        Key='Software\[Manufacturer]\[ProductName]'
                        Type='string'
                        Value=''
                        KeyPath='yes' />
         </Component>
         <Component Id="DesktopShortcut"
                  Guid="246F0877-F3AD-4B2F-A91D-ABA32E6C076D"
                  Directory="DesktopFolder">
            <Shortcut Id="MSSQLTipsDesktopShortcut"
                    Name="Welcome to MSSQLTips"
                    Description="Read MSSQLTips.com Documents"
                    Target="[INSTALLFOLDER]Welcome to MSSQLTips.pdf"
                    Icon="MSSQLtips_ico"
                    WorkingDirectory ="INSTALLFOLDER"/>
            <RegistryValue Root='HKCU'
                        Key='Software\[Manufacturer]\[ProductName]'
                        Type='string'
                        Value=''
                        KeyPath='yes' />
         </Component>
The preceding code snippet also adds a shortcut to uninstall the application. When adding this Shortcut element, we set the Target attribute to an executable, i.e., the msiexec.exe. In this case, when users click the shortcut, the Windows operating system launches the executable to uninstall the application. Figure 10 illustrates that the MSI created the shortcuts successfully.
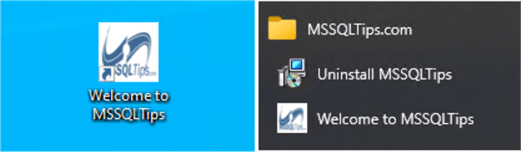
Figure 10 Shortcuts on the Desktop and in the Windows Start Menu
The preceding code snippets set the Icon attributes of Shortcut elements to the Id of an Icon element. We placed an Icon element as a child of the Product element. The following code demonstrates how we add the Icon element to the .wxs file:
   <Product Id="233EF61A-BEB0-4250-9F68-B19C37EAF7E7"
          Name="MSSQLTips Document"
          Language="1033"
          Version="1.0.0.0"
          Manufacturer="MSSQLTips"
          UpgradeCode="DF8AC3F7-7FF2-4534-9582-4DFE55F95DAD">
      ……
      <Icon Id="MSSQLtips_ico" SourceFile="MSSQLtips.ico" />
   </Product>
2.3 Harvesting Files with the heat.exe Tool
A typical application contains more files than the sample project used in this exercise. Therefore, it is impractical to always create File and Component elements manually. Instead, we can use a WiX tool, heat.exe, to inspect the application folder, evaluate all files, and create a .wxs file defining the components. We can enter the command “heat -?” in the Windows command prompt to view information about the command. The head.exe tool has many arguments. For example, we can run the following command to generate a .wxs file for this project.
heat.exe dir "C:\temp\MSSQLTips.com\\" -cg MSSQLTipsDocComponentGroup -dr INSTALLFOLDER -sreg -srd -var var.ApplicationSourcePath -ag -sfrag -out "C:\temp\MSSQLTipsDoc.wxs"
The following code snippet shows the generated .wxs file. This file takes care of the subfolder “Edgewood” already. Therefore, we should remove the “SubDir_Edgewood” element in the “Product.wxs” file. In addition, we notice these settings in the generated file:
- The Source attribute of a File element uses the “$(var.ApplicationSourcePath)” variable.
- All Component elements are children of a ComponentGroup element.
- The Id of the ComponentGroup element is “MSSQLTipsDocComponentGroup.”
We defined the settings through the head.exe command line arguments.
<?xml version="1.0" encoding="utf-8"?>
<Wix >
    <Fragment>
        <DirectoryRef Id="INSTALLFOLDER">
            <Component Id="cmpA9E903A732DF8D3A7D6F320F48B978DE" Guid="*">
                <File Id="fil772DC9FB0E94B44D8E66CC3D75C41A16" KeyPath="yes" Source="$(var.ApplicationSourcePath)\About MSSQLTips.pdf" />
            </Component>
            <Component Id="cmp1285F44CB7576FDE4E29C187EC183A36" Guid="*">
                <File Id="fil3AD04801D7F6E7C6775D203B3E48EB92" KeyPath="yes" Source="$(var.ApplicationSourcePath)\Disclaimer.pdf" />
            </Component>
            <Component Id="cmpDF17D48A9649D1ED9AA96DB50BF209D7" Guid="*">
                <File Id="fil3EAA9D8D282E276E39A6D7C0B511D36F" KeyPath="yes" Source="$(var.ApplicationSourcePath)\MSSQLTips Privacy Statement.pdf" />
            </Component>
            <Component Id="cmp4A52102B59BD462A7F2D0D79AE4FE20E" Guid="*">
                <File Id="fil41B435C9C7AFF2E6B53600546962CA2E" KeyPath="yes" Source="$(var.ApplicationSourcePath)\Welcome to MSSQLTips.pdf" />
            </Component>
            <Directory Id="dir64545EAD3AAEEA7F69402975678F843C" Name="Edgewood">
                <Component Id="cmp9FD51562BC7C2503BB688561A1DF0A86" Guid="*">
                    <File Id="filC32168D1A721ED6BD58987B5FFB847E7" KeyPath="yes" Source="$(var.ApplicationSourcePath)\Edgewood\About Edgewood Solutions.pdf" />
                </Component>
                <Component Id="cmp34322C87D0F58315760FECFBB29F09FE" Guid="*">
                    <File Id="filCFA9FFC6933CC7D86A2D314C55B0EDA2" KeyPath="yes" Source="$(var.ApplicationSourcePath)\Edgewood\Edgewood Goals.pdf" />
                </Component>
                <Component Id="cmp22D7AC3B4D4B0329B8E2AB67471ABCDA" Guid="*">
                    <File Id="fil2C3968BE5EE18F4CC3577AB523EA3D85" KeyPath="yes" Source="$(var.ApplicationSourcePath)\Edgewood\Edgewood Solutions Quick Facts.pdf" />
                </Component>
            </Directory>
        </DirectoryRef>
    </Fragment>
    <Fragment>
        <ComponentGroup Id="MSSQLTipsDocComponentGroup">
            <ComponentRef Id="cmpA9E903A732DF8D3A7D6F320F48B978DE" />
            <ComponentRef Id="cmp1285F44CB7576FDE4E29C187EC183A36" />
            <ComponentRef Id="cmpDF17D48A9649D1ED9AA96DB50BF209D7" />
            <ComponentRef Id="cmp4A52102B59BD462A7F2D0D79AE4FE20E" />
            <ComponentRef Id="cmp9FD51562BC7C2503BB688561A1DF0A86" />
            <ComponentRef Id="cmp34322C87D0F58315760FECFBB29F09FE" />
            <ComponentRef Id="cmp22D7AC3B4D4B0329B8E2AB67471ABCDA" />
        </ComponentGroup>
    </Fragment>
</Wix>
We add the “MSSQLTipsDoc.wxs” file to the WiX setup project. We then define the preprocessor variable through the project Properties page. Figure 11 illustrates the definition. In this case, we pass the path “C:\temp\MSSQLTips.com” to the “$(var.ApplicationSourcePath)” variable when generating the MSI file.

Figure 11 Define the Preprocessor Variable
Since we created a new ComponentGroup, we should add this element to the Feature element. The following code snippet shows the final version of the Feature element. In addition, we should remove all Component elements we manually defined to wrap all files. In the end, the “ProductComponents” element only contains shortcuts.
      <Feature Id="ProductFeature" Title="MSSQLTips_Document" Level="1">
         <ComponentGroupRef Id="ProductComponents" />
         <ComponentGroupRef Id="MSSQLTipsDocComponentGroup" />
      </Feature>
The following code snippets show all the Directory elements in this project. The generated file uses a DirectoryRef element to reference the INSTALLFOLDER element. That way, the MSI copies all the components into that directory during the installation. We use the heat.exe argument “-dr” to create this reference to set the referenced Directory element.
   <Fragment>
      <Directory Id="TARGETDIR" Name="SourceDir">
         <Directory Id="ProgramFilesFolder">
            <Directory Id="INSTALLFOLDER" Name="MSSQLTips.com" />
         </Directory>
         <Directory Id="ProgramMenuFolder">
            <Directory Id="ProgramMenuDir" Name="MSSQLTips.com" />
         </Directory>
         <Directory Id="DesktopFolder" />
      </Directory>
   </Fragment>
2.4 Using the HeatDirectory Task to Invoke the heat.exe Tool
We ran the heat.exe from the command window to harvest files, copied the .wxs file to the WiX project folder, and built the WiX setup project. We can use the HeatDirectory task to combine these steps into a single step. We must modify the project properties and the wixproj file to use the task. The modification is a one-time setup. We do not need to make the change at every build.
We start with defining a pre-processor variable, as shown in Figure 11. We then add an empty “MSSQLTipsDoc.wxs” file to the project. Next, we need to modify the wixproj file manually. The last block with the Target elements is commented-out when we open the project file. We must uncomment this block and add a HeatDirectory element containing the settings for harvesting the application files. The following code snippets demonstrate the syntax:
  <Target Name="BeforeBuild">
    <HeatDirectory
      Directory="C:\temp\MSSQLTips.com\"
      RunAsSeparateProcess="$(RunWixToolsOutOfProc)"
      PreprocessorVariable="var.ApplicationSourcePath"
      outputFile="MSSQLTipsDoc.wxs"
      ComponentGroupName="MSSQLTipsDocComponentGroup"
      DirectoryRefId="INSTALLFOLDER"
      AutogenerateGuids="true"
      ToolPath="$(WixToolPath)"
      SuppressFragments="true"
      SuppressRegistry="true"
      SuppressRootDirectory="true" />
  </Target>
After building the project, we noticed that the build process added XML elements into the “MSSQLTipsDoc.wxs” file and created an MSI file. The Directory attribute is the directory name in which the application files live. We used a hardcoded directory path in this exercise. We can use a project variable to store the path, making the solution flexible. We can find the usage of other HeatDirectory attributes in the WiX Toolset documentation (Firegiant, 2023).
3 – Creating an MSI for a Python Application
We explored all techniques to create a Windows installer for a simple application. Now we can generate an MSI for the Python GUI application (Zhou, 2023). First, we follow the instructions in the tip, “Creating a Standalone Executable for a Python Application,” to create a one-folder package containing an executable and all necessary Python dependencies to run the executable. Then, we copy the output folder to the “C:\temp” folder in the development environment. Next, we create a WiX setup project to wrap all contents in the “C:\temp\MSSQLTips_GUI_app” folder to an MSI file.
We can use the WiX project created in Section 2.4, but we need to make some modifications. First, we change the folder names:
   <Fragment>
      <Directory Id="TARGETDIR" Name="SourceDir">
         <Directory Id="ProgramFilesFolder">
            <Directory Id="INSTALLFOLDER" Name="MSSQLTips GUI" />
         </Directory>
         <Directory Id="ProgramMenuFolder">
            <Directory Id="ProgramMenuDir" Name="MSSQLTips GUI" />
         </Directory>
         <Directory Id="DesktopFolder" />
      </Directory>
   </Fragment>
Next, we change some attributes of the two Shortcut elements, as shown in the following code snippet.
            <Shortcut Id="MSSQLTipsStartMenuShortcut"
                    Name="MSSQLTips Finance"
                    Description="MSSQLTips GUI finance application"
                    Target="[INSTALLFOLDER]MSSQLTips_GUI_app.exe"
                    Icon="MSSQLtips_ico"
                    WorkingDirectory ="INSTALLFOLDER"/>
We must also add the following preprocessor variable to the project Properties page. Figure 11 illustrates the interface in which we configure this setting.
ApplicationSourcePath=C:\temp\MSSQLTips_GUI_app
Then, we change the Directory attribute of the HeatDirectory element in the last block of the project file. The Directory points to a folder location where we harvest files.
   <Target Name="BeforeBuild">
      <HeatDirectory
         Directory="C:\temp\MSSQLTips_GUI_app\"
         RunAsSeparateProcess="$(RunWixToolsOutOfProc)"
         PreprocessorVariable="var.ApplicationSourcePath"
         outputFile="MSSQLTipsDoc.wxs"
         ComponentGroupName="MSSQLTipsDocComponentGroup"
         DirectoryRefId="INSTALLFOLDER"
         AutogenerateGuids="true"
         ToolPath="$(WixToolPath)"
         SuppressFragments="true"
         SuppressRegistry="true"
         SuppressRootDirectory="true" />
   </Target>
We build the project to create an MSI file. Then, we can install the MSI on a machine without Python installed and run the Python application. This advantage allows us to distribute Python applications to various Windows users. It is a pleasure to make things applicable to others (Brooks, 1995). In addition, the build process updated the “MSSQLTipsDoc.wxs” file. Because the application has 1,656 Files and 86 Folders, the generated .wxs file is large. Finally, it is worth noting that we set the AutogenerateGuids attribute to True. The author of the WiX toolset, Rob Mensching, noted that the auto-GUID Components are safe (Mensching, 2013).
Summary
Python developers may have a challenge in sharing their applications with non-technical users. Even though these users have a Windows operating system, their settings vary. Moreover, they may not get used to running an application through a command-line interface. Instead, we can create an MSI file that contains an executable and all the necessary modules. We then can give the MSI to users to install. Eventually, they can run a Python application with a shortcut in the start menu or desktop. This article explored how to create an MSI installer for a Python application.
We started with a simple WiX setup project that built an MSI file to install several documents to a target machine. First, we briefly covered some WiX elements, such as Product, Package, Directory, File, Component, and ComponentGroup. Then, we used these elements to compose a .wsx file and built a simple MSI.
Next, we added a user interface wizard to the MSI so that users could change the install path. We also used the MSI to create shortcuts for easy access. Then, the article introduced the heat.exe tool that could harvest files in a folder. Finally, we could use the HeatDirectory task to automate the build process.
After exploring all these basics to generate an MSI, we created a folder with an executable and all Python dependencies. Then, we harvested files from the folder to generate a .wxs file and added this file to a WiX setup project. Next, we built the project to create an installer that copies this folder to the users' machines, along with shortcuts to run the application. Finally, we could install the MSI to a Windows operating system.
Reference
Batchelor, D., Sharkey, K., Coulter, D. & Satran, M. (2021). Property Reference.https://learn.microsoft.com/en-us/windows/win32/msi/property-reference.
Brooks, P. F. (1995). Mythical Man-Month, The: Essays on Software Engineering, Anniversary Edition. Boston, MA: Addison-Wesley.
Firegiant. (2023). HeatDirectory Task. https://wixtoolset.org/docs/v3/msbuild/task_reference/heatdirectory/
Marin, A. (2021). How to Create an MSI for a Python Application. https://www.advancedinstaller.com/create-msi-python-executable.html
Mensching, R. (2013). The auto-guid Component/@Guid are safe.
https://stackoverflow.com/questions/16120473/is-it-safe-to-use-autogenerated-guid-on-component-tags.
Microsoft. (2023). Create the future with Visual Studio 2022. https://visualstudio.microsoft.com/vs/.
Ramirez, N. (2012). WiX 3.6: A Developer's Guide to Windows Installer XML. Birmingham, UK: Packt Publishing.
Rossant, C. (2013). Create a standalone Windows installer for your Python application. https://cyrille.rossant.net/create-a-standalone-windows-installer-for-your-python-application/.
Shah, V. (2023). What is a WiX toolset. https://www.tatvasoft.com/blog/what-is-a-wix-toolset/.
WiX Toolset. (2023). The Most Powerful Set of Tools Available to Create Your Windows Installation Experience. https://wixtoolset.org/
Zhou, N. (2023). Creating a Python Graphical User Interface Application with Tkinter. https://www.mssqltips.com/sqlservertip/7587/python-gui-with-tkinter/.
Next Steps
- The article covered the basics of using the WiX toolset to create an MSI file for a Python application. The WiX toolset is one of the most powerful and promising toolsets to create Windows installers. We can customize dialogs, define custom actions, select installed features, build package bundles, and roll back the installation. In addition, we can use the WiX toolset to create installers for windows services, MS SQL server databases, and IIS websites. Some other free software products, such as Inno Setup, are also available for creating Windows installers. They have many excellent features, including desktop and start menu shortcuts, and predefined wizards.
- Check out these related tips:
- Creating a Python Graphical User Interface Application with Tkinter
- Creating a Standalone Executable for a Python Application
- Creating Animated Line Plots with Python
- Connect to SQL Server with Python to Create Tables, Insert Data and Build Connection String
- Using Advanced Python Web Scraping to Conduct a Web Content Audit
- Import Data from an Excel file into a SQL Server Database using Python
- CRUD Operations in SQL Server using Python
- Load API Data to SQL Server Using Python and Generate Report with Power BI

Nai Biao Zhou has twenty years of experience in software development, with strong analytical skills and a broad range of computer expertise.
He has fifteen years of experience in development and maintenance of database applications on SQL Server in OLTP/OLAP/BI environments.
He has a master’s degree in Control Engineering and is pursuing a Master of Science degree in Predictive Analytics.
Knowledge/Skills
Advanced computer programming skills and well versed with C/C#, Java, ASP.NET, JavaScript, and SQL.
In depth knowledge of Solution Architecture, and Software Development Life Cycle (SDLC).
Microsoft Certified Application Developer (MCAD) since 2004.
- MSSQLTips Awards: Author of the Year – 2021 | Rising Star (50+ tips) – 2024 | Author Contender – 2020, 2023


