Problem
Power Query is a powerful tool for developing self-service business intelligence solutions. With this tool, anyone who works with data as part of their job can save much time in repetitive data cleansing and transformation tasks. The Power Query Editor graphical user interface (GUI) is user-friendly, enabling users to manipulate data without coding anything. However, users may find that the GUI can only help solve about 40% of their problems (Raviv, 2018). They also want to reuse and share data preparation procedures to work more efficiently. How can these people use Power Query to solve more data analysis challenges and improve productivity?
Solution
The M, standing for data Mash-up, is a functional language behind the scenes of Power Query. A core capability of Power Query is to mash up data from a wide range of data sources. Microsoft Excel translates each step into the Power Query M language when we perform data operations through the Power Query Editor GUI. M is not a scary language, and we have used this programming language already if we know how to manipulate data through the GUI.
The Power Query Editor GUI allows us to perform many transformation steps. However, we can perform more data operations with M code. Learning M language is a great advantage when we deal with complex scenarios. Therefore, we must learn M language to go beyond the basics of Power Query and solve more data challenges.
M provides a vast library of predefined functions. We can also create user-defined functions. We use these functions to construct M expressions. The Power Query engine evaluates an expression to a value. We often create or edit M code through three user interfaces in the Power Query Editor:
- The Formula Bar: We can use this tool to view and edit the M expression for the selected step in the Applied Steps list. We can also create a new step using this tool. With an understanding of some M functions and syntax, we can solve 60% of the data challenges by editing M code in the Formula Bar (Raviv, 2018).
- The Custom Column dialog box: We can use this dialog box to create a new column in a table based on a custom formula. Rather than writing a formula from scratch, we may use ribbon commands on the “Add Column” tab to create a new column and modify the M code in the dialog box. We can address 80% of data challenges with more practice in using M language through this dialog box (Raviv, 2018).
- The Advanced Editor: We can view and edit an entire query in this editor. The editor allows us to write complex M code, including user-defined functions, to implement business requirements. We also can optimize the M code through the editor to improve readability and reduce processing time. When using this editor to write or edit M code, we can solve 95% of the data challenges (Raviv, 2018).
This article aims to introduce M language concepts through creating or editing M code in the three user interfaces. We explore the following M features and functions:
- Date.Year
- each expression
- Excel.CurrentWorkbook
- If-else-then
- let expression
- Number.From
- Number.Power
- Record.TransformFields
- Table.AddColumn
- Table.FromRecords
- Table.RenameColumns
- Table.ReplaceValue
- Table.Sort
- Table.SelectRows
- Table.TransformRows
- Text.Length
- Text.Repeat
- Text.Start
- The COALESCE operator ??
- The COMBINATION operator &
The article uses sales data from a fictitious multinational manufacturing company, i.e., Adventure Works Cycles (Zhou, 2023). We extract data from the Microsoft SQL server database to an Excel workbook. We can click here to download the workbook. We then perform data operations using Microsoft® Excel® for Microsoft 365 MSO (Version 2303 Build 16.0.16227.20202) 32-bit.
1 – Editing M Code in the Formula Bar
There are many data operations we cannot perform through the Power Query Editor GUI. We often use GUI to create a step similar to the desired operation, and then modify the M code in the Formula Bar. Alternatively, we can use the “Insert a Function” button fx to add an empty step and write M code from scratch. In this way, we can employ over 700 functions provided in the M language (Klopfenstein et al., 2022).
1.1 Using the Formula Bar
Open the downloaded work file and select the Data -> Get Data -> From Other Sources -> Blank Query command to bring up the Power Query Editor GUI. We name the blank query “SalesTransaction,” as shown in Figure 1. The Formula Bar, below the menu bar in the Power Query Editor GUI, is a section where we can create or modify M code. We click inside the Formula Bar to write M code, then enter the following expression into the Formula Bar:
= Excel.CurrentWorkbook()

Figure 1 Show and hide the Formula Bar in the Power Query Editor
If we do not see the Formula Bar, we select the Formula Bar checkbox from the View menu, as illustrated in Figure 1. The M code in the Formula Bar corresponds to each step in the Applied Steps List. The three buttons on the left of the Formula Bar improve user experiences. The X button discards our changes while the √ button accepts the changes. We can use the fx button to add new blank steps. The downward arrow on the right of the Formula Bar allows us to expand the bar vertically.
We can select a step in the Applied Steps list and edit the corresponding M code in the Formula Bar. After the modification, we press the Enter key or click the √ button to accept the changes. We then immediately preview the output of the modified step. If there is any error in the M code, the editor shows an error message.
1.2 Exploring the Standard Function Library
M provides a function library that includes many predefined functions. A function can accept no argument. Section 1.1 used the function Excel.CurrentWorkbook() to return a list of Excel tables in the current workbook. We enter the function name in the Formula Bar to view the introduction of the function, as shown in Figure 2. Most functions accept two or more arguments.

Figure 2 View help information of an M function
The step identifier in Figure 1 is “Source,” which represents the result of this step. We can access the result in the later steps by referencing the identifier. Select the Content column in the table and then select the Transform -> Rename command. The column header becomes editable. We type the new name “MyTableContent” in the textbox and press the Enter key to accept the change. We use the same method to rename the Name column. The process generates a step in the Applied Steps list, i.e., Renamed Columns. The following line shows the corresponding M code:
= Table.RenameColumns(Source,{{"Content", "MyTableContent"}, {"Name", "MyTableName"}})
The function Table.RenameColumns accepts two arguments and returns a table. The first argument should be a table where we perform the renaming operations. The second argument is a list that defines how to replace old column names with new column names. “Source” is the identifier of the previous step, representing a table. When passing “Source” to the function, we rename the column names of the results from the previous step.
Some good practices make M code readable. For example, we press Shift + Enter to enter a line break. We add comments to describe or explain the M code. Comments can be single-line or multi-line (also known as block comments). Single-line comments start with //. Multi-line comments start with /* and end with */. Figure 3 demonstrates the M code formatting.

Figure 3 Add line breaks and comments in the Formula Bar
We gave examples to introduce how to use M functions briefly. There are over 700 functions in the standard library. According to the data type on which a function can perform, we arrange all these functions into different categories, as shown in Table 1. We can see a pattern in these function names. The functions start with the category name followed by a dot and the function name. When we type a category name in the Formula Bar, a scrollable list of valid function names appears. This feature helps us quickly find the function we want to use in a formula.
| Accessing data functions | Error handling | Replacer functions |
|---|---|---|
| Binary functions | Expression functions | Splitter functions |
| Combiner functions | Function values | Table functions |
| Comparer functions | List functions | Text functions |
| Date functions | Lines functions | Time functions |
| DateTime functions | Logical functions | Type functions |
| DateTimeZone functions | Number functions | Uri functions |
| Duration functions | Record functions | Value functions |
Table 1 Power Query M functions by category (Klopfenstein et al., 2022)
The step names in the Applied Steps list are identifiers that can identify things including, but not limited to, variables. When an identifier contains some special characters, for instance spaces, we should use the hash-quotes style to reference the identifier. A quoted identifier can start with and contain any characters, including spaces (Gribaudo, 2018). This ability allows us to give a meaningful name to each step and make the Applied Steps list understandable.
Select the MyTableName column, and then select an ascending command in the Sort group on the Home tab. The command generates a new step, “Sort Rows,” shown in the Applied Steps list. The corresponding M code should look like the following line.
= Table.Sort(#"Renamed Columns",{{"MyTableName", Order.Ascending}})
The first argument in the function is a table; therefore, we pass the result from the previous step, “Renamed Columns,” to the function. The identifier contains a special character. The M code uses the quoted identifier #” Renamed Columns” to represent the result from the previous step. We must use the hash-quotes style when an identifier contains special characters. The following M code is invalid, and we receive the error: “Expression.SyntaxError: Token ‘,’ expected.”
= Table.Sort(Renamed Columns,{{"TableName", Order.Ascending}})
A regular identifier, like “Source” in Figure 3, contains no special characters. It is not necessary to apply the hash-quotes style to a regular identifier. However, applying the hash-quotes style to a regular identifier is valid. The following M code works correctly:
= Table.RenameColumns(#"Source",{{"Content", "MyTableContent"}, {"Name", "MyTableName"}})
By the way, M is a case-sensitive language that can differentiate between upper-case and lower-case characters. For example, the word Source does not represent the same thing as the word source does. The function Table.RenameColumns is a built-in function, but Table.Renamecolumns is not a built-in function.
1.3 Writing Simple Custom Functions
Power Query allows us to define and employ user-defined functions that implement specific business logic. We then reuse and share the business logic to increase consistency and reduce redundancies. Additionally, we can pass user-defined functions to built-in functions as arguments. We can define a query as a user-defined function or embed a user-defined function inside an existing query. A user-defined function may be as simple as one line of code or as complex as a block of code that defines a sequence of data operations.
A function’s definition always starts with argument declaration, which is a list of arguments inside a pair of parentheses. We may declare the data types of these arguments. Next, the definition uses the => operator to end the argument declaration, followed by the function body expression that produces a value. The following line demonstrates the Lambda style syntax:
(Argument1 as Data Type, ...) => (Function Body Expression)
The following function receives a number, increases the number by 5%, and then returns the calculated value to a caller:
(commission_rate as number) => commission_rate * (1 + 0.05)
Click the “Insert a Function” button fx to add a new blank step whose name defaults to Custom1. We then enter the function in the Formula Bar. Press the Enter key to accept the entry. The Power Query Editor provides us with an interface to test the function on the GUI, as shown in Figure 4. We pass the value of commission_rate as 0.03 and click the Invoke button. The command creates a new query, Invoked Function. The result of the query is 0.0315, which is correct. We delete the Custom1 step and the output query Invoked Function after testing.
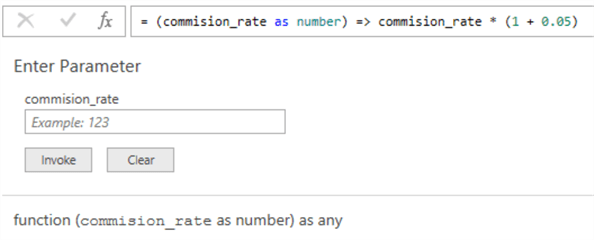
Figure 4 Enter a custom function in the Formula Bar
The argument’s name is commission_rate; however, the name is unimportant when the function only accepts one argument. In this case, we can use the underscore “_” to name the argument. We can rewrite the function as follows:
(_ as number) => _ * (1 + 0.05)
Furthermore, we can use the each keyword to make the function simpler. The each keyword helps to minimize the syntax by providing a default argument and removing the => operator. We rewrite the function as the following:
= each _ * (1 + 0.05)
Some functions may accept an argument with fields (for example, a table or record). In this case, we can even omit the underscore “_” in the each expressions. The following section will discuss the Table, List, and Record types. For now, we just need to know that a table row is a record, and the expression “row[column name]” represents a value of the column at the row. The simple form helps to write clean code when we pass a function as a parameter to another function.
Continue to use the query created in Section 1.2. The last step in the Applied Steps list is Sorted Rows. We use the inverse triangle icon in the column header to add a filter to the MyTableName column. We select a row that contains the SalesOrderDetail table. The process creates a new “Filtered Rows” step in the Applied Steps list. The corresponding M code should look like the following line:
= Table.SelectRows(#"Sorted Rows", each ([MyTableName] = "SalesOrderDetail"))
The Table.SelectRows function returns a table containing the rows that match a condition. The two arguments the function needs are a table and a logical function that returns a logical value of true or false. The Table.SelectRows function applies the logical function to each row. It keeps all rows when the logical function returns a value of true. However, the simplified function form looks confusing at first glance. We convert it to the original form.
First, we add the “_” back to the function. In this context, the “_” represents the current row, which is a record type. The above M code is equivalent to the following line:
= Table.SelectRows(#"Sorted Rows", each (_[MyTableName] = "SalesOrderDetail"))
If we do not use the each keyword, we must add the argument list and the => operator to the function definition. The above formula is equivalent to the following formula:
= Table.SelectRows(#"Sorted Rows", (_) => (_[MyTableName] = "SalesOrderDetail"))
After we replace the underscore with a meaningful argument name, the M code should look like the following line.
= Table.SelectRows(#"Sorted Rows", (CurrentRow) => (CurrentRow[MyTableName] = "SalesOrderDetail"))
1.4 Knowing Table, List, and Record Types
Figure 1 illustrates that the function Excel.CurrentWorkbook() returns a table value. The table has two columns and two rows. There are two kinds of values in M: primitive and structured values. Primitive values represent single values, such as number, text, time, and date. In contrast to primitive values, structured values can contain primitive values or even other structured values. Besides table values, two other structured values are lists and records.
Columns in a table are lists. A list value contains a sequence of values surrounded by curly brackets. For example, the “MyTableName” column contains two text values:
= {"SalesOrderDetail", "SalesReason"}
The order of items in a list is essential. We can reference items in the list with a zero-based index number. For example, the value of the following expression is “SalesReason.”
= {"SalesOrderDetail", "SalesReason"}{1}
The list in the example above contains two text values. In fact, a list can contain any kind of value, including structured values. The first item in the following list is a list.
= {{"Welcome", "to"}, "MSSQLTips.com", 2023}
Rows in a table are records. A record is a set of key-value pairs surrounded by opening and closing brackets. Keys (field names) must be unique text values in a record. Values (also known as field values) can be primitive values or structured values. For example, the second row in the table contains two key-value pairs:
= [MyTableContent = Table, MyTableName = "SalesReason"]//Pseudo code
The value of the “MyTableContent” field is a table value. In contrast, the value of the “MyTableName” field is a text value. We can access a field value through the corresponding field name by wrapping the field name in brackets. For example, the following expression accesses the value in the “MyTableName” column of the second row:
= #"Sorted Rows"{1}[MyTableName]
There may be times when we do not know the index number of the specific row. We can search for the row using a field value in this case. The field value should uniquely identify the row. The Power Query Editor throws an error if multiple rows contain the same field value. The following expression returns a row whose “MyTableName” column has a value of “SalesReason” text:
= #"Sorted Rows"{[MyTableName = "SalesReason"]}
The following expression first searches the table for a row whose Name field has a value of the text “SalesOrderDetail.” Then, by wrapping the field name “Content” in brackets, we can access the field value of the row. The field value is a table-type value that contains data loading from the Excel table “SalesOrderDetail.”
= Excel.CurrentWorkbook(){[Name = "SalesOrderDetail"]}[Content]
Figure 5 presents the query result of the expression. We name the step Source. The rest of this article performs data transformation on this table.

Figure 5 Load data in the Excel table into the Power Query Editor
After gaining familiarity with the Formula Bar, calling the M built-in functions, and writing simple custom functions, we are ready to edit or write expressions in the Formula Bar. These skills enable us to tackle 60% of data challenges.
1.5 Tweaking a Step
The Power Query provides over 700 functions. However, not all these functions are available through the Power BI Editor GUI. In addition, we may use multiple steps to implement one task. When a query has many steps, it is not easy to summarize data operations and troubleshoot data errors. With some understanding of M language, we can modify the M code generated by the GUI to satisfy our specific requirements.
The “SalesMiddleName” column contains the middle names of salespersons. We want to simplify the middle names. We use the first character of the middle name, followed by a dot. For example, we transform the middle name “Michael” to “M.” that is the middle initial. A single-letter middle name, for example, “C”, does not need any change. In addition, we replace all null values with an empty value. As of this writing, we cannot implement these requirements in a single step using the Power Query Editor GUI. We modify a step in order to make the step overcome a complicated problem.
Select the “SalesMiddleName” column in the Power Query Editor. Then, on the Transform tab, select the Transform -> Replace Values -> Replace Values command. We want to demonstrate how to replace the null value with an empty value. Fill the dialog box, as shown in Figure 6.
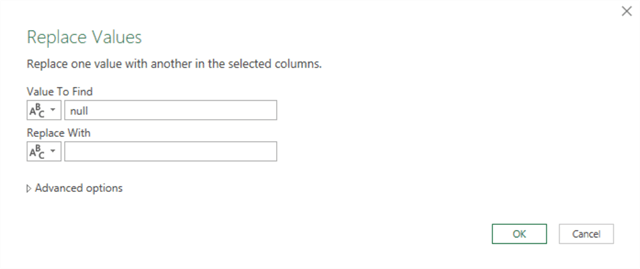
Figure 6 The Replace Values dialog box
Click on the OK button to close the dialog box, and Power Query translates the step into the following M code:
= Table.ReplaceValue(Source, null,"", Replacer.ReplaceValue, {"SalesMiddleName"})
Power Query iterates over every row in a table when we apply a table built-in function to the table. The M code generated from the Power Query loops through each row in the table and replaces a null value with an empty value. The following syntax demonstrates how to use the Table.ReplaceValue function.
Table.ReplaceValue(table as table,
   oldValue as any,
   newValue as any,
   replacer as function,
   columnsToSearch as list) as table
The oldValue and newValue arguments can be any data type, including a function type. Our requirements ask us to replace every field value in the SalesMiddleName column. Therefore, rather than passing a null value to the function, we pass a function that returns a field value of the SalesMiddle column:
(current_row) => current_row[SalesMiddleName]
We simplify the function with the each keyword:
each [SalesMiddleName]
Then, we write another function to evaluate the new value:
each (Text.Start([SalesMiddleName]??"",1) & Text.Repeat(".", Number.From(Text.Length([SalesMiddleName]??"") > 1))),
The user-defined function references some built-in functions and looks complicated. We look at each built-in function and M operator in the custom function:
- The COALESCE operator ??: replaces a null value with an empty value.
- The COMBINATION operator &: concatenates values.
- Text.Start: returns the first character of a middle name.
- Text.Length: returns the number of characters in a middle name.
- Number.From: returns a number value from the given value. When the given value is logical, the function returns 1 for true and 0 for false. Therefore, the function returns 1 when a middle name has one character and returns 0 otherwise.
- Text.Repeat: returns a dot “.” when a middle name has more than one character and returns an empty value otherwise.
All these built-in functions and operators work together to deal with these three kinds of text values in the [SalesMiddleName] column:
- A null value: The custom function converts the null value to an empty value.
- One character: The custom function does not make any changes.
- Multiple characters: The custom function takes the first character from the middle name and appends a dot character.
We then use these functions to replace two parameters in the Formula Bar. We can add line breaks and comments to the code to improve readability. The final version of the M code corresponding to this step should look like the following code block. We then copy the following code snippet to the Formula Bar.
= Table.ReplaceValue(Source,
     each [SalesMiddleName], //The old value
     /*The following function return the new value*/
     each
         (Text.Start([SalesMiddleName]??"",1) // Extract the first character from the middle name.
         &                                    // The COMBINATION operator
         Text.Repeat(".", Number.From(Text.Length([SalesMiddleName]??"") > 1))),// Append a dot when needed.
     Replacer.ReplaceValue,
     {"SalesMiddleName"})
We changed the default step name, “Replace Value,” to a meaningful name, “Transform Middle Name,” to improve readability. This step applies all the business requirements to the middle name column. If there is a change in the business requirements, we can quickly identify the step and modify the M code accordingly.
1.6 Adding a New Blank Step
We can add a new blank step to the Applied Steps list and write the M code by hand to implement the step. We need to understand M language well to write a formula from scratch. This ability allows us to tackle more complex calculations. Let us look at an example of implementing business requirements in a single step.
The company increases the commission rate by 3% every year. The commission rate in the Excel table is the rate when the company hires salespeople. Therefore, there should be an adjustment made to the commission rate. The following formula demonstrates the calculation:
Adjusted commission rate =
Commission rate X Number.Power ((1 + 3%), (product order year – employee hired year))
Click the “Insert a Function” button fx to add a new blank step whose name defaults to Custom1. We then enter the following M code in the Formula Bar. Press the Enter key to accept the entry. We immediately preview the query result. Next, we name the step “CommissionPct Adjustment” to make the step name meaningful.
= Table.FromRecords(
                     Table.TransformRows(#"Transform Middle Name",
                           (row) => Record.TransformFields(row, {"CommissionPct",
                                 each row[CommissionPct] *
                                     Number.Power((1 + 0.03),
                                        Date.Year(row[OrderDate]) - Date.Year(row[HireDate]))}))
                    )
The formula uses these three functions: Table.FromRecords, Table.TransformRows and Record.TransformFields (Bondarenko, 2016). As the function name suggests, the function Table.FromRecords converts a list of records (i.e., rows) into a table. The function Table.TransformRows creates a list of rows by applying a transform function to each row in the table. The Record.TransformFields function returns a record after applying a transform function to a row (i.e., a record).
This formula looks complicated. The purpose is to demonstrate another way of transforming a column. In fact, creating a new column that performs the adjustment calculation is more effortless in this scenario.
2 – Constructing a New Column through the Custom Column Dialog Box
Sometimes, our reports may need columns that do not exist in a data set. In this case, we may derive new columns (i.e., custom columns) from the data set. The Add Column tab in the Power Query Editor provides a group of commands to add new columns to a table. The "Custom Column" command, which brings up a dialog box, allows us to write M code to create a custom column. Such a custom column can perform complex calculations and derive new insights from data. Using this kind of custom column to help transform data and discover new insights can solve 80% of the data challenges.
2.1 Create a Custom Column
Sales revenue is a crucial aspect of profitability for a company. It is the revenue that comes from sales of products and services. However, we do not find the sales revenue data in the table. Fortunately, the table contains these columns: UnitPrice, UnitPriceDiscount, and OrderQty. We can calculate the sales revenue by multiplying the number of products or services sold by the sales price per unit. Therefore, we obtain the sales revenue using these existing columns:
SalesRevenue = [UnitPrice] X (1 - [UnitPriceDiscount]) X [OrderQty]
We want to use a new step to compute the sales revenue. Select the Add Column -> Custom Column command to open the Custom Column dialog box. Enter a new column name and the formula, as shown in Figure 7. The formula references three columns. We find all available columns from the Available columns list.

Figure 7 Create a custom column
The dialog box automatically checks the syntax for us. If there is no syntax error, we click the OK button to create the custom column. Once we add a custom column, we should check the data type. We need to make sure the custom column has an appropriate data type. By default, the step name is “Added Custom.” We give the step a meaningful name: Add Sales Revenue Column. Figure 8 illustrates the new column, step, and M code in the Formula Bar.

Figure 8 The new Sales Revenue column
2.2 Use the If-then-else Expression
When creating a new column from other columns, we may need to check for a condition and perform an action accordingly. To give an example, suppose we need to adjust the commission rate again:
- For bike sales, increase the commission rate by 2%.
- The maximum commission rate is 2%.
As of this writing, the Power Query Editor provides the “Condition Column” command to generate logical expressions. However, the Conditional Column dialog box may not implement advanced logic, such as the logic in the above example. In this case, we can write logic directly inside the formula box of the Custom Column dialog box.
Below is the generic syntax of If-then-else expression in M code:
if (condition) then true-expression else false-expression
There are three parts in the expression:
- condition: the condition we want to test.
- true-expression: the expression is evaluated if the condition is true.
- false-expression: the expression is evaluated when the condition is false.
It is worth noting that the if-then-else expression is an expression. We can use the if-then-else expression in other expressions. The following two expressions are valid and evaluate to the same text value:
= if 1 = 1 then "the answer is yes" else " the answer is no"
= "the answer is " & (if 1 = 1 then "yes" else "no")
In addition, the true-expression and false-expression can also be an if-then-else expression. For example, the following expression is valid, where we assume [Number] is a column:
= if ([Number] > 1) then
   "More than 1"
else if ([Number] > 0) then
   "Positive"
else
   "Negative"
Now, we can write an expression to compute the adjusted commission rate:
= if [ProductCategory] = "Bikes" then
    if ([CommissionPct] * (1 + 0.02) > 0.02) then
       0.02
    else
       [CommissionPct] * (1 + 0.02)
else if [CommissionPct] > 0.02 then
         0.02
      else
         [CommissionPct]
We select the Add Column -> Custom Column command to open the Custom Column dialog box. We name the new column AdjustedCommissionRate and copy the above expression to the formula box, as shown in Figure 9. Click on the OK button to generate the new column. We name the step “Adjust the Sales Commission Rate.”

Figure 9 Using if-then-else expression to create a custom column
3 – Diving into the Advanced Editor
We introduced creating and editing M code in the Formula Bar and the Custom Column Formula dialog box. Raviv says we can solve 80% of the data challenges with these skills. Suppose we want to unlock Power Query’s full potential. In that case, we must learn M and edit an entire query in the Advanced Editor window (Webb, 2014). Using the Advanced Editor to create custom functions, perform data transformation and optimize M code, we can solve 95% of the data challenge (Raviv, 2018).
3.1 Open the Advanced Editor Window
We can find the Advanced Editor button from the Home or the View tab. Click the Home -> Advanced Editor button to open the Advanced Editor window. We can view and edit an entire query in the window, as shown in Figure 10. We ask the M code editor to display line numbers through the Display Options pull-down menu. The editor is a basic text editor that does not provide many IntelliSense features.

Figure 10 The Advanced Editor window
Above the M code editor box is the query name. Below the editor box is a warning about any syntax violations in the M code. The query in the editor box is a chunk of M code. The entire query consists of a single let expression that, when evaluated, returns a single value (Webb, 2016). The expression starts with the let and ends with the in keywords, followed by the identifier of the last step. The let expression is made up of five smaller expressions. Each expression has an identifier corresponding to a step in the Applied Steps list.
3.2 Understand the let Expression
The let expression allows us to combine small expressions into a single value. Excel evaluates each small expression and then assigns the result to an identifier, which identifies a variable. We then access variables in subsequent expressions. The return value from the let expression is the value evaluated from the in the statement. Here is an example that returns the text Welcome to MSSQLTips.com!
let
    Source = Text.Proper("welcome") & " to ",
    #"Add Domain Name" = Source & "MSSQLTips.com",
    #"Add Exclamation Mark" = #"Add Domain Name" & "!"
in
    #"Add Exclamation Mark"
The above let expression consists of three steps. The in statement denotes the end of these transformation steps. The code creates three steps in the Applied Steps list. The "Source" step returns a text value of "Welcome to." The "Add Domain Name" step combines the value in the previous step and "MSSQLTips.com," and the "Add Exclamation Mark" step appends an exclamation mark to the value returned from the previous step. Since we define the "Add Exclamation Mark" step in the in statement, the let expression returns the same value as the "Add Exclamation Mark" step, i.e., Welcome to MSSQLTips.com!
We also can use a let expression to create a user-defined function with multiple steps. We first look at how to embed a one-step function inside an existing M code in the Advanced Editor. The following M code defines a function, myfunc, which concatenates two strings. Then, the subsequent steps invoke this user-defined function.
let
    Source = Text.Proper("welcome") & " to ",
    myfunc = (string1, string2) => string1 & string2,
    #"Add Domain Name" = myfunc(Source, "MSSQLTips.com"),
    #"Add Exclamation Mark" = myfunc(#"Add Domain Name", "!")
in
    #"Add Exclamation Mark"
We can wrap multiple steps into one user-defined function. The following code block shows a multi-step function. The let keyword indicates the start of the data transformation, and the in keyword implies the end of the transformation. After the in keyword, we provide the identifier to be returned by the function (Proctor, 2022).
    (domain_name) =>
    let
        step1 = Text.Proper("welcome") & " to ",
        step2 = step1 & domain_name,
        step3 = step2 & "!"
    in
        step3
Figure 11 illustrates an example of defining and invoking a multi-step custom function in a let expression. Instead of using an identifier in the in statement, we call the function after the in keyword. It is not necessary to write such an expression. We also do not recommend performing computations in the final in statement. However, some people may write M code this way, and we should understand their code.

Figure 11 Using a let expression to perform multiple steps inside a function
3.3 Embed a Custom Function Within a Query
Section 1.3 introduced a way of creating user-defined functions inside steps. However, this method does not make the M code clean. If other steps want to apply the same logic, we must copy the entire function definitions to the steps. Section 3.2 demonstrates another way of writing a function, which defines the function as a step within a query. This way, we can use the identifier to invoke the functions. Therefore, we can define a function in one step and then use the function in the subsequent steps.
As demonstrated in the following let expression, we often define functions at the beginning of the expression. We use three identifiers to identify three anonymous functions defined previously. Note that all these functions take the current row as an argument. Then, we invoke these functions in the subsequent steps. Each step becomes simple and understandable. We work on a function independently if there is a bug.
let
/* MSSQLTips.com
Define functions*/
/*Define a function to compute sales revenue from other columns
The argument is the current row*/
compute_sales_revenue = (_) => _[UnitPrice] * (1 - _[UnitPriceDiscount]) * _[OrderQty],
/*Define a function to return values in the SalesMiddleName column
The argument is the current row*/
old_middle_name = (_) => _[SalesMiddleName],
 /*Define a function to return the middle initial from the SalesMiddleName column
The argument is the current row*/
new_middle_name =
    (_) =>
        let
            middle_name = _[SalesMiddleName],
            first_character = Text.Start(middle_name??"",1),
            dot = Text.Repeat(".", Number.From(Text.Length(middle_name??"") > 1)),
            initial = first_character & dot
        in
            initial,
/*The end of function definition section*/
//Load data from the Excel sheet
Source = Excel.CurrentWorkbook(){[Name = "SalesOrderDetail"]}[Content],
//Pass the custom functions to the Table.ReplaceValue function as arguments
#"Transform Middle Name" = Table.ReplaceValue(Source,
                                            old_middle_name, //The old value
                                            new_middle_name,  /* The new value*/
                                            Replacer.ReplaceValue,
                                            {"SalesMiddleName"}), //columnsToSearch
//Use the custom function the calculate the sales revenue
#"Add Sales Revenue Column" = Table.AddColumn(#"Transform Middle Name", "SalesRevemue", compute_sales_revenue)
in
#"Add Sales Revenue Column"
The Applied Step list shows the functions embedded within the query. We define all the functions before the Source expression. In this way, we can easily find where we start to perform data transformation.
3.4 Define a Query as a Custom Function
We can define a query as a function and then share the function between multiple queries. The query returns a value of function type. The function name is the query name. To create such a function, we start with a blank query. Several methods in Excel allow us to create a blank query. One of them is to use the New Source -> Other Sources -> Blank Query command, as shown in Figure 12.
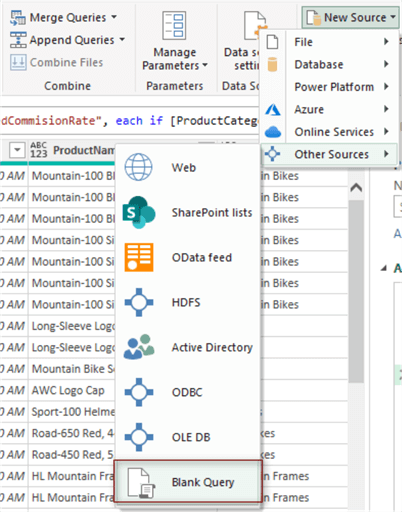
Figure 12 The command to create a blank query
Select the command to create a blank query. By default, the query name is “Query1”, as shown in Figure 13. We rename the query to “Concatenate,” and then we write a function to concatenate two strings as we did in Section 3.2.

Figure 13 Create a blank query
Open the Advanced Editor window and enter the following M code in the editor box. After clicking the OK button to accept the entry, we define the query “Concatenate” as a function. The Power Query window should look like Figure 14. We then test the function through this interface.
let
    myfunc = (string1, string2) => string1 & string2
in
    myfunc
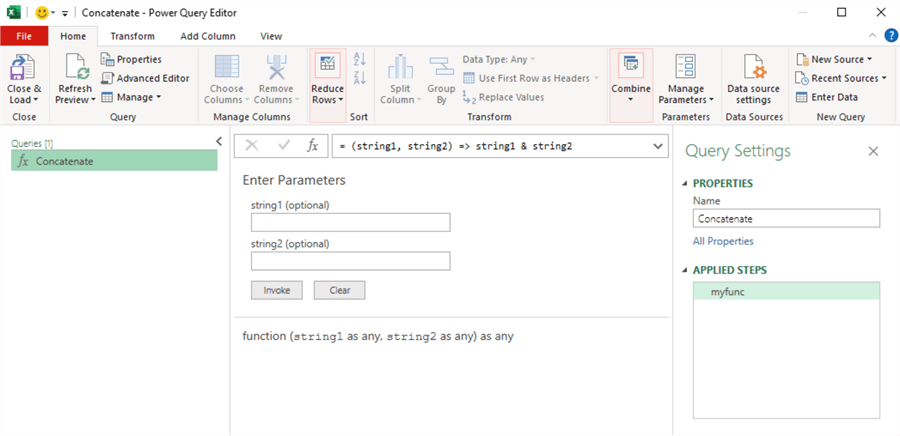
Figure 14 Create a function.
Enter a value of “Welcome to ” in the string1 box and a value of “MSSQLTips.com” in the string2 box. Click the Invoke button to call the function. Excel creates a query called Invoke Function, as shown in Figure 15. The following code demonstrates how to invoke the function in another query. This auto-generated query is for testing purposes, and we delete it after verifying the result.
let
    Source = Concatenate("Welcome to ", "MSSQLTips.com")
in
    Source

Figure 15 Invoke the function from another query
We defined a function in Section 1.6 to adjust the commission rate based on years of work experience. We can use a query to define this function:
let
    Source =
        (_) => Table.FromRecords(
                     Table.TransformRows(_,
                           (row) => Record.TransformFields(row, {"CommissionPct",
                                 each row[CommissionPct] *
                                     Number.Power((1 + 0.03),
                                        Date.Year(row[OrderDate]) - Date.Year(row[HireDate]))}))
                    )
in
    Source
We created a custom column in Section 2.2 to re-calculate the commission rate. We can use a user-defined function to create such a custom column.
let
    Source =
        (_) => Table.AddColumn(_, "AdjustedCommissionRate", each
        if [ProductCategory] = "Bikes" then
            if ([CommissionPct] * (1 + 0.02) > 0.02) then
                0.02
            else
                [CommissionPct] * (1 + 0.02)
        else if [CommissionPct] > 0.02 then
                0.02
            else
                [CommissionPct])
in
    Source
We arrange these functions in a group, as shown in Figure 16. We can call these user-defined functions in other queries in the workbook. When using all these functions, we make every step straightforward.

Figure 16 Create a function group in the Queries pane
Here is the complete M code in the Advanced Editor. When reviewing or editing M code in the Advanced Editor, we can quickly go through every step and gain a big picture of the data transformation.
let
    /* MSSQLTips.com
    Define functions*/

    /*Define a function to compute sales revenue from other columns
    The argument is the current row*/
    compute_sales_revenue = (_) => _[UnitPrice] * (1 - _[UnitPriceDiscount]) * _[OrderQty],

    /*Define a function to return values in the SalesMiddleName column
    The argument is the current row*/
    old_middle_name = (_) => _[SalesMiddleName],

     /*Define a function to return the middle name initial from the SalesMiddleName column
    The argument is the current row*/
    new_middle_name =
        (_) =>
            let
                middle_name = _[SalesMiddleName],
                first_character = Text.Start(middle_name??"",1),
                dot = Text.Repeat(".", Number.From(Text.Length(middle_name??"") > 1)),
                initial = first_character & dot
            in
                initial,
    /*The end of function definition section*/

    //Load data from the Excel sheet
    Source = Excel.CurrentWorkbook(){[Name = "SalesOrderDetail"]}[Content],

    //Pass the custom functions to the Table.ReplaceValue function
    #"Transform Middle Name" = Table.ReplaceValue(Source,
                                                old_middle_name, //The old value
                                                new_middle_name,  /* The new value*/
                                                Replacer.ReplaceValue,
                                                {"SalesMiddleName"}), //columnsToSearch

    //Use the custom function the calculate the sales revenue
    #"Add Sales Revenue Column" = Table.AddColumn(#"Transform Middle Name", "SalesRevemue", compute_sales_revenue),

    //Invoke custom function defined in a separate query to adjust the commission rate in a column
    #"CommissionPct Adjustment" = adjust_rate_by_experience(#"Add Sales Revenue Column"),

    //Invoke custom function defined in a separate query to add a new column
    #"Adjust the Sales Commission Rate" = add_adjusted_rate_column(#"CommissionPct Adjustment")

in
    #"Adjust the Sales Commission Rate"
Summary
A Power Query M formula language is a functional language behind the scenes of Power Query. We use M code to mash up data from various sources. Each query we create in the Power Query Editor is a single let expression. Each let expression consists of small expressions that, when evaluated, returns a single value. We can create or edit M code in the Power Query through three user interfaces: the Formula Bar, the Custom Column dialog box, and the Advanced Editor.
We first demonstrated how to use the Formula Bar in Power Query Editor. We then explored the M standard function library. After writing simple use-defined functions, we looked at structured values: table, list, and record. The article then introduced how to edit M code in the Formula Bar and how to add a new blank step to the query.
Next, we created a new column through the Custom Column dialog box. The Power Query Editor provides an Add column tab for us to create a new column. Only when using the Custom Column command, do we start to understand the power of M language. The article demonstrated how to write M code in the dialog box. Then, we also used if-then-else expressions to create a new column with complex business logic.
Finally, we looked at the Advanced Editor, where we can write and edit an entire query. We discussed the let expression that can define a value or function for use in other expressions. We then showed embedding customs function inside a query, and we covered the process of defining a query as a function. When we separated function definitions from other applied steps, the M code corresponding to the applied steps became simple.
Reference
Bondarenko, I. (2016). Transform Column using custom function in Power Query (part 2). https://excel.city/2016/12/transform-column-using-custom-function-in-power-query-part-2/.
Gribaudo, B. (2018). Power Query M Primer (Part 4): Variables & Identifiers. https://bengribaudo.com/blog/2018/01/19/4321/power-query-m-primer-part4-variables-identifiers.
Groot, D. R. (2023). The COALESCE Operator in M / Power Query. https://gorilla.bi/power-query/coalesce/.
Klopfenstein, D., Buck, A., Howell, J., Sharkey, K.,Duncan, O. & Kinsman, M. (2022). Power Query M function reference. https://learn.microsoft.com/en-us/powerquery-m/power-query-m-function-reference.
MacDougall, J. (2018). Introduction To Power Query M Code. https://www.howtoexcel.org/m-code/.
Proctor, M. (2022). How to use Power Query Custom Functions. https://exceloffthegrid.com/power-query-custom-functions/
Raviv, G. (2018). Collect, Combine, and Transform Data Using Power Query in Excel and Power BI, First Edition. London, UK: Pearson Education, Inc.
Rad, R. (2014). Writing Custom Functions in Power Query M. https://radacad.com/writing-custom-functions-in-power-query-m.
Webb, C. (2014). Power Query for Power BI and Excel. New York, NY: Apress.
Webb, C. (2016). Understanding Let Expressions In M For Power BI And Power Query. https://blog.crossjoin.co.uk/2016/05/22/understanding-let-expressions-in-m-for-power-bi-and-power-query/.
Zhou, N. (2023). Creating Pivot Reports in Excel: A Step-by-Step Tutorial for Beginners. https://www.mssqltips.com/sqlservertip/7705/pivot-tables-in-excel-beginners-tutorial/.
Next Steps
- Even though the functionality in the Power Query Editor GUI may not solve all our problems, we should not stop learning and using all the commands in the GUI. We should always try to use these commands to solve a problem. We can try writing M code if we cannot quickly solve the problem using the GUI commands. The M language is powerful, and learning M can lead us to be a master data-wrangler. However, there is a learning curve. The best advice is to practice. In addition, the article did not address some advanced topics, such as error handling, recursion, and loops. We should know that the M language has that potential.
- Check out these related tips:
- Simple mathematical formulas using the M Language
- Creating Pivot Reports in Excel: A Step-by-Step Tutorial for Beginners
- Using Power Query in Excel for Data Extraction from a SQL Server Database
- Using Power Query to Combine Data from Multiple Sheets in Excel
- Learning DAX in Excel: A Step-by-Step Tutorial for Beginners

Nai Biao Zhou has twenty years of experience in software development, with strong analytical skills and a broad range of computer expertise.
He has fifteen years of experience in development and maintenance of database applications on SQL Server in OLTP/OLAP/BI environments.
He has a master’s degree in Control Engineering and is pursuing a Master of Science degree in Predictive Analytics.
Knowledge/Skills
Advanced computer programming skills and well versed with C/C#, Java, ASP.NET, JavaScript, and SQL.
In depth knowledge of Solution Architecture, and Software Development Life Cycle (SDLC).
Microsoft Certified Application Developer (MCAD) since 2004.
- MSSQLTips Awards: Author of the Year – 2021 | Rising Star (50+ tips) – 2024 | Author Contender – 2020, 2023


Hello Daniel,
Thank you so much for your feedback. I will make corrections.
Nai Biao Zhou
Great article! I’m working my way through it, and I noticed a spelling error. Several times, commission is incorrectly spelled commision and it causes some of the code to fail.