Problem
This tutorial is part of the series of posts, dedicated to the building of a Lakehouse solution, based on Delta Lake and Azure Synapse Analytics technologies. In the previous post (Raw Data Ingestion Into Delta Lake Bronze tables using Synapse Mapping Data Flow), we’ve built a Synapse Analytics pipeline to ingest data into Bronze Delta Lake tables. That pipeline didn’t involve any transformations. The next stage on this data flow brings data from Bronze to Silver Delta Lake tables, and this is the stage where data cleansing and enrichment transformations are typically performed. One of such transformations is data deduplication. I’ll demonstrate how the data can be deduplicated using Azure Mapping Data Flows, in this tip.
Solution
Follow the steps below on how to implement data deduplication.
Deduplication Use Cases
Data deduplication may be required for a variety of reasons, like:
- Data quality issues, that may arise due to application problems.
- Data ingestion issues. For example, we might be required to store multiple row versions in the Bronze layer, for audit purposes. The Bronze ingestion pipeline we designed earlier, had a setting to append new versions of rows from the source on each execution. We also added an ingestion timestamp to this pipeline, which I’ll use here, to select the last ingested version of each row.
Regardless of the reasons, deduplication needs to be performed when we move the data from the Bronze to the Silver layer, to ensure only one version of the row is maintained.
Data deduplication pipeline design
Let’s open Azure Synapse Studio and create a data flow, named DataflowBonzeSilver.
We’ll design this flow in a modular and parameterized fashion, to allow it to be called for different tables, the same way we created the Bronze ingestion data flow.
Here’s how it’ll look:

Figure 1
Here is the description of the steps:
- BronzeDelta. This is a Source transformation to read from the Bronze Delta Lake table.
- AddMetadataColumns. This step replicates the key columns required for deduplication- primary key and timestamp columns. This step is a prerequisite for the next windowing transformation, which will require key columns.
- RankRowVerions. We’ll use Window transformation to rank different versions of each row, based on the ingestion timestamp.
- Deduplicate. We’ll use Filter transformation to keep only the latest version of each row.
- RemoveMetadataColumns. We’ll use a Select transformation to remove extra metadata columns added earlier.
- SilverDelta. We’ll use a Sink transformation to write into the target Silver table.
It’s worth mentioning that steps #2 and 5 of this flow have been added to serve re-usability purposes and could be skipped if the data flow is intended for single use.
In the next sections, I’ll describe each step in great detail.
Configuring Data Flow parameters
Before we proceed with the individual steps, let’s add the following parameters to the data flow:
- SourceTableName. This parameter will contain the Bronze table name.
- TargetTableName. This parameter will represent the Silver table name.
- PrimaryKey. This parameter will contain the name of the primary key column.
- TimestampColumn. This parameter will contain the name timestamp column. We’ll use the DateInserted column that was added in the Bronze ingestion pipeline.
Here’s the screenshot with these parameters:

Figure 2
Configure debugging settings
Now, let’s turn on a debug mode and add debug parameters that will allow us to build the pipeline interactively.
Please enter following values as debug parameters:
- SourceTableName: “Customer”
- TargetTableName: “Customer”
- PrimaryKey: “CustomerID”
- TimestampColumn: “DateInserted”
Here’s the screenshot:

Figure 3
Source transformation
Let’s add a Source transformation of Delta Lake type. Use the Browse button to navigate to the root folder with Bronze Delta Lake files. Add the following expression in the file name text box:
concat("delta/bronze/",$SourceTableName,"/")
Here’s the screenshot:
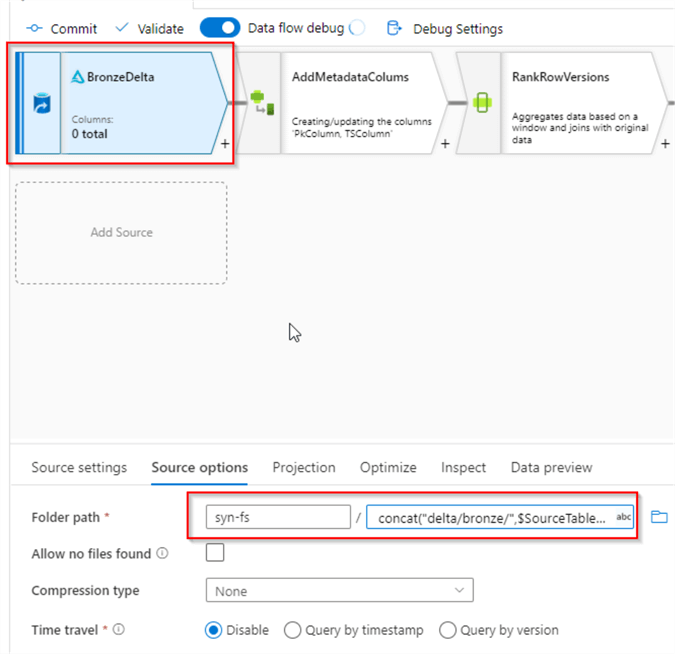
Figure 4
Adding metadata columns
The purpose of this step is to replicate existing primary key and timestamp columns with the new names. The names of these columns for each table will be supplied by the corresponding parameter. For example, let’s take a Customer table. The values of PrimaryKey and TimestampColumn parameters for this table will be supplied from the parent pipeline as CustomerID and DateInserted. Our dataflow will find these columns among existing source columns and alias them as PkColumn and TSColumn. These new columns then will be used in the next windowing transformation. We’ll use byName function to achieve this substitution (see this article for more details).
Let’s add a derived column transformation with the following column/expression pairs:
- PkColumn: byName($PrimaryKey)
- TSColumn: byName($TimestampColumn)
Here’s the screenshot:

Figure 5
Let’s navigate to the Data preview tab, to validate the new columns:

Figure 6
RankRowVersions step
In this step, we’ll use a Window transformation to group the rows based on the PkColumn column and rank the row versions within each group, based on the descending values of the TSColumn column. Let’s add a Window transformation, navigate to the Over tab and select PkColumn column.

Figure 7
Next, navigate to the Sort tab, select TSColumn and specify descending order:
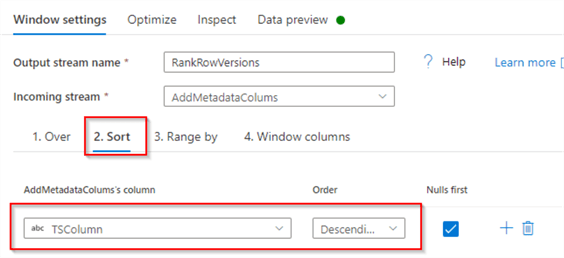
Figure 8
Finally, navigate to the Window tab, enter the expression denseRank() and name it RowVersion:

Figure 9
If we validate the results, we’ll see that RowVersion has ranked row versions and the lowest rank has been assigned to a more recent row:

Figure 10
Deduplicate step
Let’s add a Filter transformation with the condition RowVersion==1, to keep only the first-row version within each row group, as follows:

Figure 11
Here are the validation results:

Figure 12
RemoveMetadataColumn step
Let’s add a Select transformation with the rule-based mapping and use the following source column expression:
name != "PkColumn" && name !="TSColumn" && name !="RowVersion"
And add an expression $$ as the target expression. This rule directs the flow to map all the source columns, except the names it specifies. In essence, this logic will eliminate the metadata columns. Here’s the screenshot:

Figure 13
SilverDelta step
Finally, let’s add a Sink transformation of the Delta Lake data source type, and enter following expression in the file name text box:
concat("delta/silver/",$TargetTableName,"/")
Here’s the screenshot:

Figure 14
Notice I’ve selected Truncate table action, to ensure the target table is cleansed before each run. Let’s do a final validation, to ensure that we’ve removed all metadata columns:

Figure 15
Building the parent pipeline
The parent pipeline’s design will be similar to the one we built for the Bronze ingestion. Let’s create a data integration pipeline and add array-type pipeline variable Tables, with the following expression:
[{"source":"Address","destination":"Address","primarykey":"AddressID","timestamp":"DateInserted"},{"source":"Product","destination":"Product","primarykey":"ProductID","timestamp":"DateInserted"},{"source":"ProductCategory","destination":"ProductCategory","primarykey":"ProductCategoryID","timestamp":"DateInserted"},{"source":"ProductDescription","destination":"ProductDescription","primarykey":"ProductDescriptionID","timestamp":"DateInserted"},{"source":"ProductModel","destination":" ProductModel","primarykey":"ProductModelID","timestamp":"DateInserted"},{"source":"SalesOrderHeader","destination":"SalesOrderHeader","primarykey":"SalesOrderID","timestamp":"DateInserted"}]
Notice this JSON expression contains a set of four parameter values for each table. This list includes all tables from the Bronze layer, with few exceptions:
- Customer table – I’ve excluded it because I’m planning to build an individual data flow for it, in the next post, dedicated to data enrichment.
- The tables with primary keys include more than one field (for example, CustomerAddress). The reusable logic built here wouldn’t work for such tables. If you have many tables with combined keys, you might try building a generic logic, using ideas similar to what has been discussed here. Otherwise, individual pipeline could be an answer.
Next, add ForEach activity and enter expression @variables('Tables') in the Items textbox, as follows:
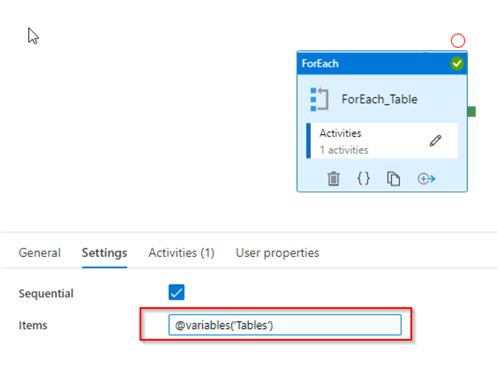
Figure 16
Edit the ForEach activity and add a Data flow activity to it. Navigate to the Settings tab and select the DataflowBonzeSilver flow, as follows:

Figure 17
Next, navigate to the Parameters tab and add following parameter values:
- SourceTableName: @item().source
- TargetTableName: @item().destination
- PrimaryKey: @item().primarykey
- TimestampColumn: @item().timestamp
Here’s the screenshot:
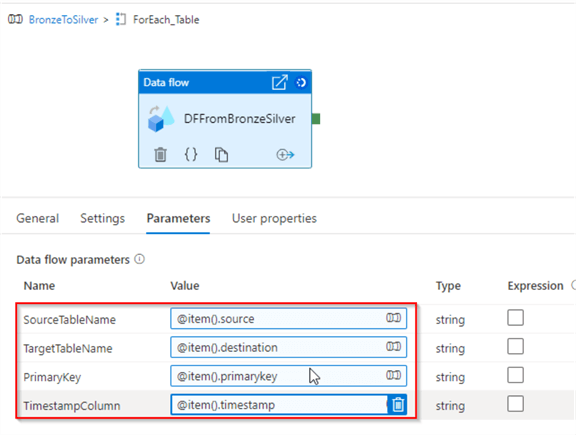
Figure 18
This concludes the design of the parent pipeline. Let’s run it in debug mode and ensure that it succeeds. We can also validate individual data flow execution, by selecting an eyeglass icon against it, as follows:

Figure 19
Here are execution results for the Address table:
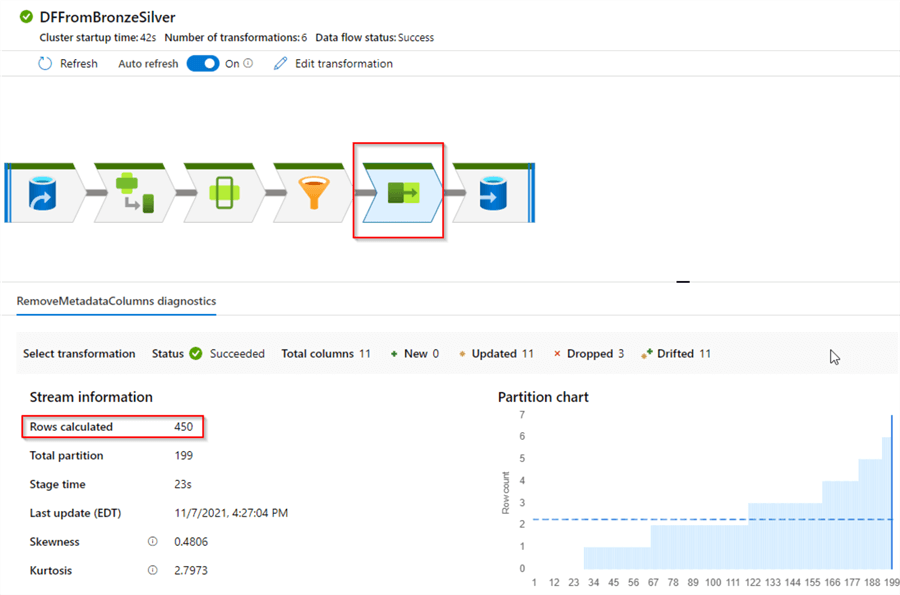
Figure 20
Select the RemoveMetadataColumns transformation and examine the number of rows transferred. This number matches the row count in the source table, which means the deduplication was successful.
Next Steps
- Read: Mapping data flows in Azure Data Factory
- Read: Azure Synapse Analytics Overview
- Read: Building Scalable Lakehouse Solutions using Azure Synapse Analytics
- Read: Common Data Warehouse Development Challenges

Fikrat Azizov (MCSE Data Platform and MCSE Azure Solutions Architect) has been working with SQL Server since 2002. Fikrat’s main passions are SQL Server performance optimization, cloud data technologies and machine learning. Fikrat is currently working as a Solutions Architect at Slalom Canada.
- MSSQLTips Awards: Author of the Year Contender – 2019-2022 | Rising Star (50+ tips ) – 2021
Hi Artur,
Thanks for letting us know. The image has been fixed.
-Greg
Hi Fikrat Azizov,
It looks, there is a wrong screenshot in “Adding metadata columns” section.
Regards,