Problem
This tip is part of the series of posts, dedicated to the building of end-to-end Lakehouse solutions, based on Azure Synapse Analytics. In the previous posts (see the links at the end of this post), we’ve discussed common data processing technics used in the Lakehouse. These processing tasks are typically part of the pipelines that bring data from Bronze to Silver layer tables. The final logical step in this process is dimensional modelling. There are several tasks, involved in dimensional modelling (see Common Data Warehouse Development Challenges for more details). In this tip, we’re going to discuss dimensional denormalization.
Solution
Why denormalize dimensions?
A schema normalization is part of the database modelling exercise for operational databases. Normalization prevents data duplications, preserves disk space, and improves the performance of the disk I/O operations. The downside of the normalization is that the queries based on these normalized tables require more table joins. On the other hand, analytical databases or data warehouses that often operate on large datasets and serve complex and analytical queries require a different modelling approach. Schema denormalization (i.e. consolidation of some dimension tables) for such databases can significantly reduce costs of the analytical queries and improve the performance. Let me explain the example from the AdventureWorks database, which contains a few product-related tables, as shown in the figure below:

Figure 1
If your analytical queries require product model and category information alongside product details, you’ll need to join them. The denormalized version of this schema would look like this:

Figure 2
This change would reduce the need for table joins and perform better on large-scale datasets. Another benefit of denormalization is that it leads to simpler and more intuitive star-like data schemas.
Data flow design
The data flow we’re going to build here will bring the data between Silver and Gold layer tables, and we’re going to leverage Synapse Mapping Data Flow. This data flow will consolidate three product-related tables, discussed above.
There’re a couple of ways to achieve dimension denormalization with Mapping Data Flow and I’m going to explore both here.
Let’s open Azure Synapse Studio, create a Mapping Data Flow and turn on Debug mode. Add a source transformation with Delta format, name it SilverProduct, select the storage account hosting our Delta Lake tables, as follows:

Figure 3
Switch to the Source options tab and use the Browse button to navigate to the folder containing Delta Lake files for the Product table within the silver folder.

Figure 4
Navigate to the Projection tab and select the Import schema button, to bring the table schema:

Figure 5
Let’s, follow similar steps to configure source transformation for the ProductCategory table, and name it SilverCategory, as follows:

Figure 6
Next, let’s add Lookup transformation at the end of the SilverProduct source and name it LookupCategory. Select SilverCategory as a lookup stream, and select ProductCategoryID column from both sides under the Lookup conditions section, as follows:

Figure 7
This transformation takes each row from the main source and attaches the corresponding row from the lookup source to it. Let’s validate the output from the transformation to ensure that category data has been added:

Figure 8
Now, let’s see how Mapping Data flow’s Join transformation can be used to address needs. Add new source with Delta format and point it to the folder having ProductModel table’s data, as follows:
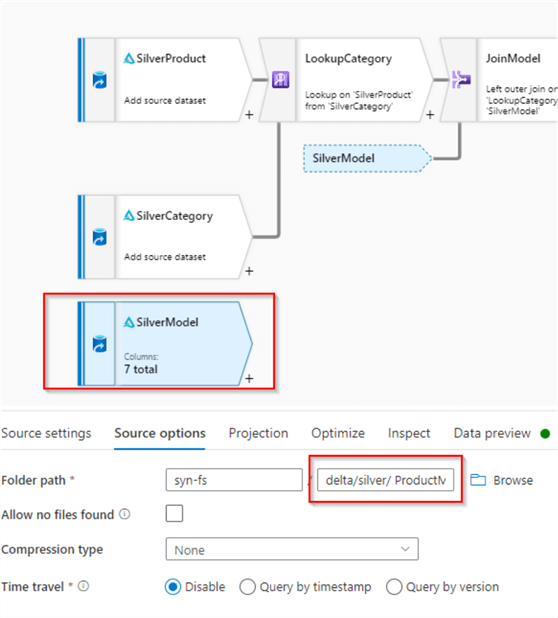
Figure 9
Next, add a Join transformation at the end of LookupCategory transformation and name it JoinModel. Select SilverModel source as a right stream and appropriate join type. Note I’ve selected Inner outer join here, as I expect all rows from the main source to have corresponding rows from the secondary source. Select ProductModelID column from both sides under the join conditions section, as follows:

Figure 10
Let’s validate the output from JoinModel transformation:

Figure 11
The steps so far have helped us to denormalize product-related data and consolidate all columns from three tables. However, we’ve got a few problems because of these transformations:
- Duplicate column names that need to be renamed.
- Unwanted columns- we’ve brought all columns from secondary tables, which are redundant.
So, we’ll add a Select transformation, to fix these problems.
Let’s first take care of renaming duplicate columns. Scroll down the column list to find SilverModel@Name and SilverCategory@Name columns on the left-hand side and enter the values ProductCategory and ProductModel on the right side, accordingly, as follows:
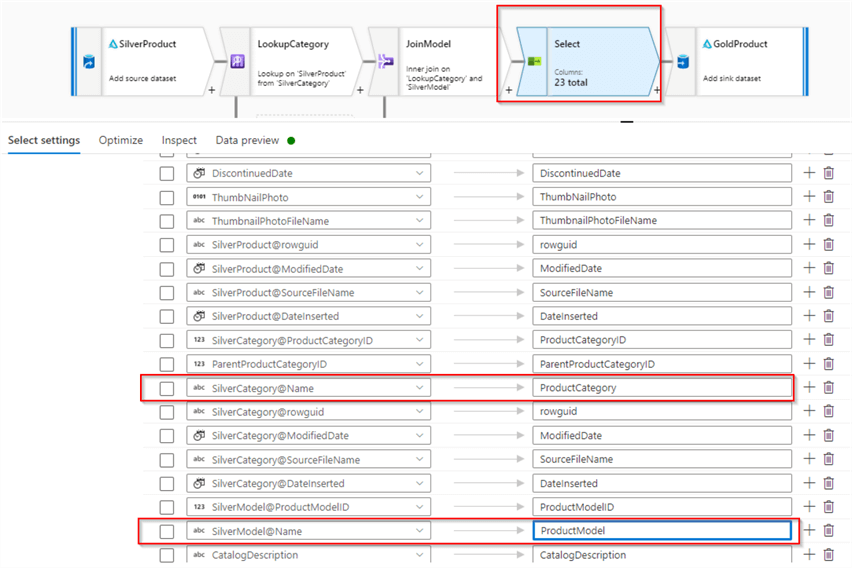
Figure 12
Now, use the delete button to remove all columns from secondary sources, except ProductCategory and ProductModel.
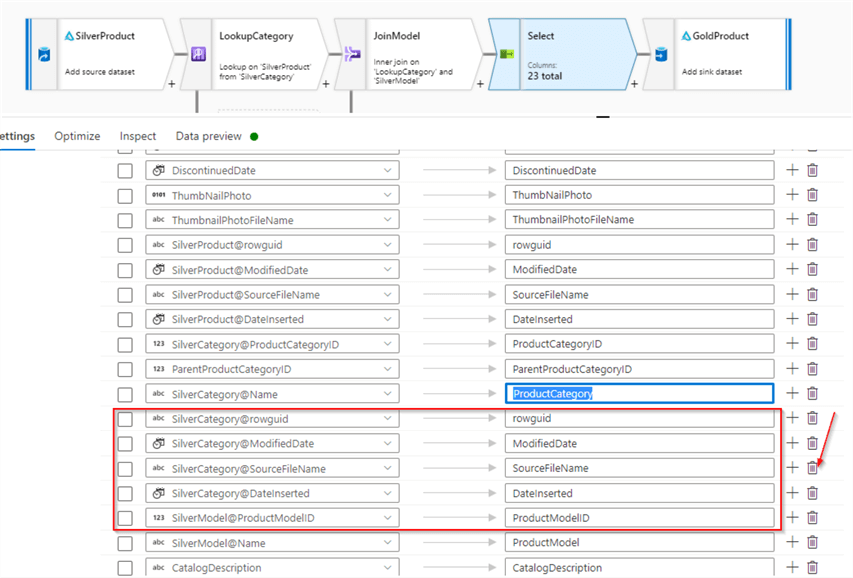
Figure 13
The final transformation in our data flow is going to be a sink transformation. Configure the sink transformation with Delta format, specify gold/DimProduct folder as the location and select the Truncate option under the Table action section:

Figure 14
Let’s do a final validation of the data flow:

Figure 15
Conclusion
In this tip, we’ve built a data flow with dimension denormalization logic. This data flow is not final yet- there are a few other dimension-related transformations that would need to be added here, which I’ll be covering in upcoming tips, so stay tuned.
Next Steps
- Read: Common Data Warehouse Development Challenges
- Read: Implement data deduplication in Lakehouse using Synapse Analytics Mapping Data Flow
- Read: Enrich your data in Lakehouse using Synapse Mapping Data Flow
- Read: Mapping data flows in Azure Data Factory

Fikrat Azizov (MCSE Data Platform and MCSE Azure Solutions Architect) has been working with SQL Server since 2002. Fikrat’s main passions are SQL Server performance optimization, cloud data technologies and machine learning. Fikrat is currently working as a Solutions Architect at Slalom Canada.
- MSSQLTips Awards: Author of the Year Contender – 2019-2022 | Rising Star (50+ tips ) – 2021