Problem
This tutorial is part of the series of posts dedicated to the building end-to-end Lakehouse solutions, based on Microsoft Azure Synapse Analytics. In the previous post, Implement Dimension Denormalization Using Synapse Mapping Data Flow, we discussed dimension denormalization that is a required step for transitioning from operational to an analytical data model. There are a few other tasks, involved in dimensional modelling (see Common Data Warehouse Development Challenges for more details), and in this tutorial, we’re going to discuss another common dimensional modelling task – surrogate key generation for database tables.
Solution
What are surrogate keys?
Dimension tables normally have natural (business) keys, which serve as primary identifiers of the dimension rows. For example, the Product table from AdventureWorks sample database has a natural key ProductId, which uniquely defines product details giving business meaning to the data, as you can see from the below figure:

Figure 1
In this example, we have 680 as the natural key value for the product ‘HL Road Frame – Black, 58’.
While natural keys are good for operational databases designed to reflect the current state of your data, they are not sufficient for some of the common data warehousing needs, especially needs to track changes to your dimensions, which is an invaluable feature allowing you to do a historical trend analysis. Surrogate keys allow tables to contain multiple versions of the same dimension row, which in turn solves the change history maintenance problem. So, in the previous example, by introducing a surrogate key, we could preserve multiple versions of the product with the same ProductIdkey. If you are interested in learning more about surrogate key values, I’d recommend you visit this article.
Surrogate keys are artificially generated keys that are usually auto-generated by RDBMS-based data warehouses.
How to generate surrogate keys in cloud data warehouses?
Unlike databases, cloud-based data platforms are often based on distributed data and do not have an auto-increment feature. This applies to Delta Lake tables too – there’s no auto-increment feature to be used for surrogate key generation purposes. However, many big data transformation systems can generate sequential numbers, that are unique in the context of the data they operate. To ensure that these sequential keys are not conflicted with the keys in the target tables, they need to be globally unique (i.e. unique within the entire table). That can be achieved by adding extra logic within the ELT pipeline. There’re multiple ways of generating global keys, and in this tip, I’m going to cover the following logic:
- Create a watermark table to store the latest surrogate key for dimensions. Initially, this table will have zero key values for each dimension.
- Calculate globally unique keys by combining the latest watermark keys with the dynamically generated sequential numbers from the source data.
- Calculate the maximum value from an entire dataset and store it in the watermark table.
- Write unique surrogate keys into the target dimensional table.
I’m going to demonstrate the implementation of the above logic for the Product table.
Preparing metadata table
Some of the tasks required to build our pipeline require an existing and pre-populated Delta Lake table for watermarking. So, let’s create a Spark SQL notebook and add the following DDL code as the first command:
CREATE TABLE IF NOT EXISTS dimWatermarks
(
    TableName string,
    LastKey bigint
)
USING DELTA
LOCATION "/delta/gold/dimWatermarks";
Insert into dimWatermarks VALUES ("DimProduct",0Insert into dimWatermarks VALUES ("DimCustomer",0Insert into dimWatermarks VALUES ("DimAddress",0
This code will create a watermarking table, and populate it with initial seed values for different dimensions.
Data flow design
I'm going to use the data flow DataflowSilverGold_Product we built in the Implement Dimension Denormalization Using Synapse Mapping Data Flow tip. This data flow contains the dimension denormalization logic for the Product table and looks like this:

Figure 2
Let's first add a few transformations to get the latest value of the surrogate key from the watermark table. So, add a source transformation with the Delta format, as follows:

Figure 3
The watermarking table we created in the previous section specified the folder /delta/gold/dimWatermarksas a location for the Delta table, so switch to the Source options tab and enter this value in the Folder path textbox, as follows:

Figure 4
Our next transformations will require the schema of this data source, so switch to the Projection tab and import the schema, as follows:

Figure 5
Next, let's add a filter transformation with the following condition:
TableName=="DimProduct"
Here's a screenshot:

Figure 6
Finally, add sink transformation, specify cache as a format and name it LastKeyCache. This will allow us to use the results of this transformations chain somewhere else in the data flow. Here's a screenshot:
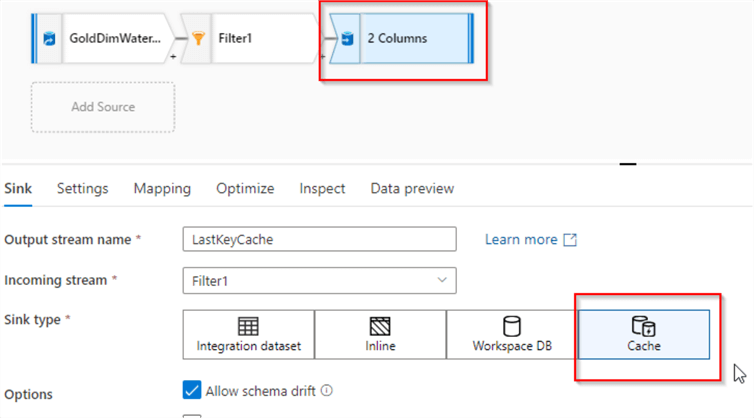
Figure 7
Now that we have the logic to read from the watermarking table, let's build the core branch. First, add a Surrogate key transformation after the Select transformation and enter ProductKey as a column name for the surrogate key, as follows:
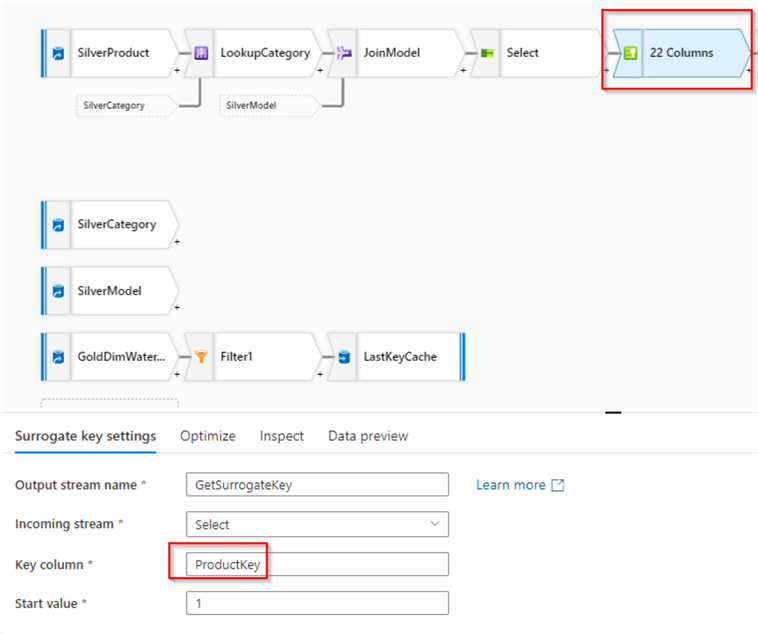
Figure 8
This transformation will generate sequential numbers, starting with the base value, which is one by default. Now we can turn on debug settings and validate the results:
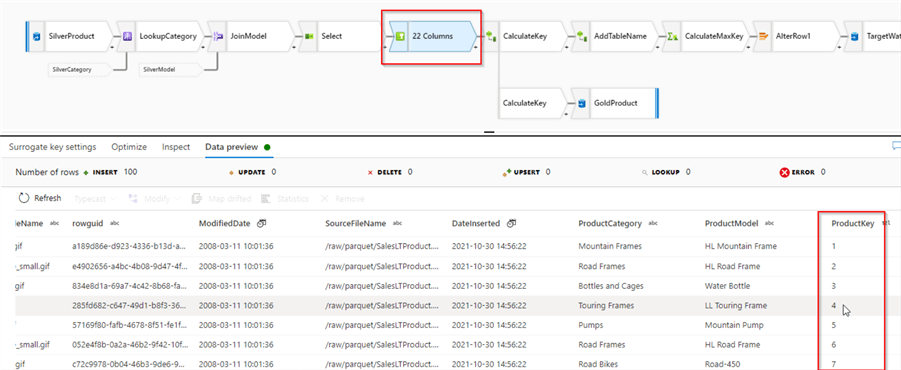
Figure 9
At this point, we have surrogate keys that are unique within the current dataset. We'll need to add the last stored key value from the watermarking table, to make these values globally unique. Let's add a Derived column transformation with the name CalculateKeyand ProductKey as a column name and specify the following expression:
ProductKey+ toInteger(LastKeyCache#outputs()[1].LastKey)
This expression gets the LastKey column value from the LastKeyCache transformation we built earlier, converts it to integer data type and adds sequential values calculated in the previous step. Note that by assigning the same name to the column, we're essentially overwriting the ProductKey column. Here's the screenshot:
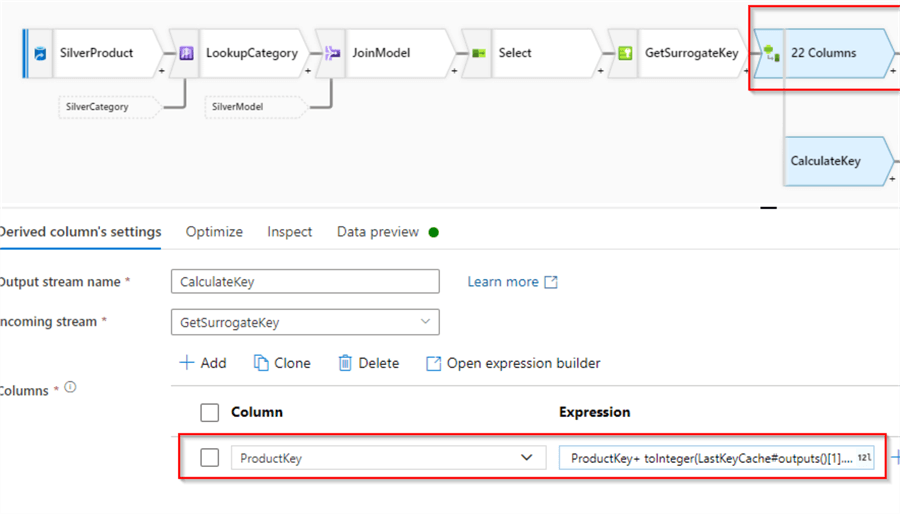
Figure 10
Now, because our initial seed values from the watermarking table are zero, this transformation will generate sequential numbers starting from one, therefore its results are would not tell us much, so we'll let it run at least once and come back to validate it a bit later.
At this point, we'll need a fork in our data flow- one branch will calculate and preserve the maximum value of all keys in the dataset, while another branch will write a detailed dataset into the target dimension table.
So, let's create a branch after the CalculateKey transformation, and add a Derived column transformation with TableName as a column name and "DimProduct" string as an expression. This step is a necessary prerequisite for the next step, which is aggregation. Here's the screenshot:

Figure 11
Next, add Aggregation transformation, and select TableName column under the Group by section, as follows:

Figure 12
Note, I've named this transformation CalculateMaxKey.
Next, switch to the Aggregates tab, and enter LastKey as column name and max(ProductKey) as an expression, as follows:

Figure 13
Now, because we need to update the target table, Alter row transformation is required here, so let's add it after CalculateMaxKeytransformation and name it AlterRow. Select Update if condition and specify TableName=="DimProduct" as an expression, to ensure that we're overwriting the required row. Here's a screenshot:
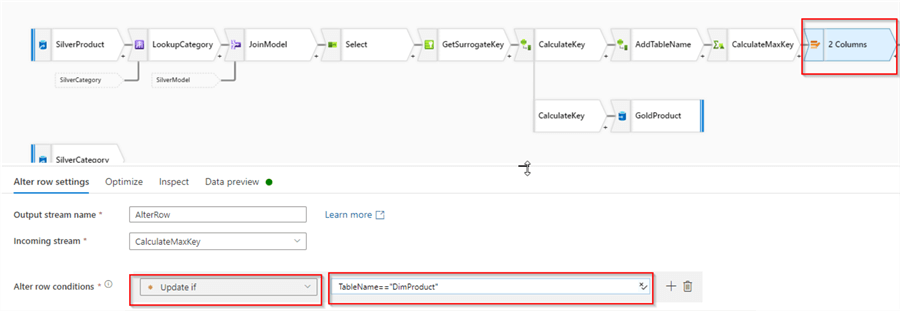
Figure 14
The final step in our data flow will be writing into the watermarking table. So, add Sink transformation with Delta format after the AlterRow, specify delta/gold/dimWatermarks as the Delta table location and enable update and upsert checkboxes, as follows:

Figure 15
Note that I've selected TableName as a key column.
Executing and validating the data flow
The data flow we built so far will need to be triggered by a data integration pipeline, so let's build a simple pipeline with the data flow activity, select the right data flow and execute it. Here's the screenshot:

Figure 16
After the initial execution, the watermarking table should be updated. Let's switch back to our child data flow and validate the output from the watermarking table:
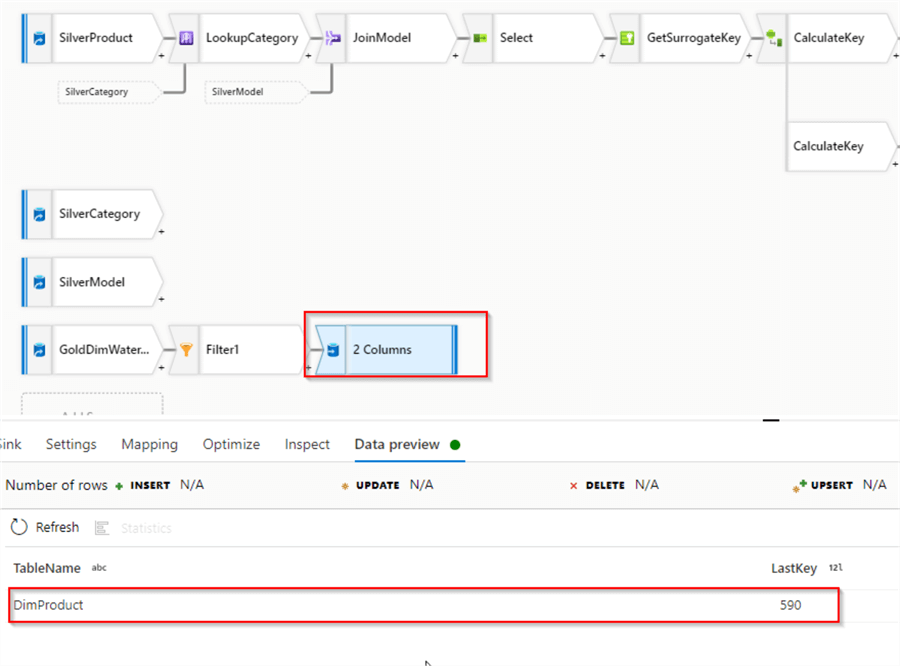
Figure 17
My source table has 295 rows, and because I've executed the pipeline twice, the last key stored for this dimension is 590.
Now, let's validate the output from the CalculateKey transformation, which calculates global keys based on the seed from the watermarking table:

Figure 18
As you can see from the figure above, the ProductKey column contains sequential numbers starting from 591, and because our latest preserved value is 590, the newly generated values will not be conflicting with the existing values in the target dimension table.
Conclusion
In this tip, we've enhanced our data flow and added surrogate key generation logic. Surrogate key generation is the prerequisite for preserving the history of changes to dimension tables. The next logical step here is adding metadata columns to manage history. This is also called Slowly Changed Dimensions (SCD), which I'll be covering in the next tip, so stay tuned.
Next Steps
- Read: Common Data Warehouse Development Challenges
- Read: Implement data deduplication in Lakehouse using Synapse Analytics Mapping Data Flow
- Read: Enrich your data in Lakehouse using Synapse Mapping Data Flow
- Read: Implement Dimension Denormalization Using Synapse Mapping Data Flow
- Read: Mapping data flows in Azure Data Factory
- Read: Surrogate Key vs Natural Key Differences and When to Use in SQL Server
- Read: SQL Server Primary Key
- Read: How to create a SQL Server foreign key

Fikrat Azizov (MCSE Data Platform and MCSE Azure Solutions Architect) has been working with SQL Server since 2002. Fikrat’s main passions are SQL Server performance optimization, cloud data technologies and machine learning. Fikrat is currently working as a Solutions Architect at Slalom Canada.
- MSSQLTips Awards: Author of the Year Contender – 2019-2022 | Rising Star (50+ tips ) – 2021
Thank you so much! It works!