Problem
This tip is part of the series dedicated to the building end-to-end Lakehouse solutions leveraging Azure Synapse Analytics. In previous posts, we’ve explored the ways to build ETL pipelines to ingest, transform and load data into Lakehouse. The Lakehouse concept is based on the Delta Lake technology, allowing you to treat the files in Azure Data Lake like relational databases. However, what makes Delta Lake technology outstanding is its time travel functionality. In this tip, I’m going to demonstrate how to use Delta Lake’s time travel functionality for ETL logging.
Solution
What is Delta Lake time travel?
Delta Lake technology uses transaction logging to preserve the history of changes to the underlying files. This allows you to go back in time and see the previous states of the rows (see Introducing Delta Time Travel for Large Scale Data Lakes for more details). This feature can be used for many different purposes, including auditing, troubleshooting, logging, etc. You can query rows by version, as well as by timestamp.
Let me illustrate this using the SalesOrderHeader Delta table I’ve created in this tip.
Add a Spark pool and create a Spark notebook with SparkSQL language (see Microsoft documentation for more details). Add a cell with the following command to browse a few rows:
Select * from delta.`/delta/silver/SalesOrderHeader/` ORDER BY SalesOrderID LIMIT 5
Notice that I’m treating the location of the Delta tables, as the table names in a relational database. There’s an alternative way of querying Delta tables, that involves prior registration of these tables in Delta Lake’s meta store (see this Delta Lake documentation for more details)
Here are the query results:

Figure 1
Add another cell to simulate updating single row in the table:
UPDATE delta.`/delta/silver/SalesOrderHeader/` SET RevisionNumber=3 WHERE SalesOrderID=71774
Now let’s see the history of the changes to this table by using the following command:
DESCRIBE HISTORY delta.`/delta/silver/SalesOrderHeader/`
As you can see from the below screenshot, we’ve got multiple changes, with the top record being the most recent change:

Figure 2
Notice that the results also contain the transaction timestamp, operation type and operation metrics columns, among other details. The operationMetrics column is in JSON format, and it includes more granular transaction details, like the number of updated rows. As you can see from the query results, the previous changes have been caused by the merge operation, which is because we’ve selected an upsert method to populate these tables from Mapping Data Flow. Let’s also examine the operationMetrics details for the Merge operation:

Figure 3
Notice the structure of the operationMetrics column is slightly different for the Merge operation. We can also get the table’s past state as of version 23, using the following command:
Select * from delta.`/delta/silver/SalesOrderHeader@v23` WHERE SalesOrderID=71774
Here’s the screenshot:

Figure 4
Finally, let’s explore the Delete command, by using following commands:
DELETE FROM delta.`/delta/silver/SalesOrderHeader/` WHERE SalesOrderID=71783DESCRIBE HISTORY delta.`/delta/silver/SalesOrderHeader/`
Here’s the screenshot:

Figure 5
Now that we know how the time travel functionality works, let’s see how this can be applied for ETL logging purposes.
The ETL logging notebook
Let’s create another Spark notebook with PySpark language. I’m going to use an alternative way of querying Delta Lake, which involves Delta Lake API. Add the parameter-type cell with the following parameters:
LoadZone='silver'
TableName='SalesOrderHeader'
Add another cell with following command:
from delta.tables import *
from pyspark.sql.functions import *
delta_table_path=''.join(['/delta/',LoadZone,'/',TableName,'/'])
deltaTable = DeltaTable.forPath(spark, delta_table_path)
These commands build the table path from the parameters and create a Delta table object based on that path.
Now we can use the history method and assign the results to a data frame, as follows:
dfLogs=deltaTable.history()
display(dfLogs)
Here’s the screenshot with query results:

Figure 6
And let’s run following commands to get merge command stats:
dfMergeLogs=(dfLogs.withColumn('LoadZone',lit(LoadZone))
.withColumn('TableName',lit(TableName))
.selectExpr('readVersion','LoadZone','TableName','timestamp','operation',
'operationMetrics.numTargetRowsInserted as RowsInserted',
'operationMetrics.numTargetRowsUpdated as RowsUpdated',
'operationMetrics.numTargetRowsDeleted as RowsDeleted')
.filter("operation='MERGE'"))
display(dfMergeLogs)
The above command creates a new data frame by extracting granular transaction details from the operationMetrics column. Here’s the screenshot:
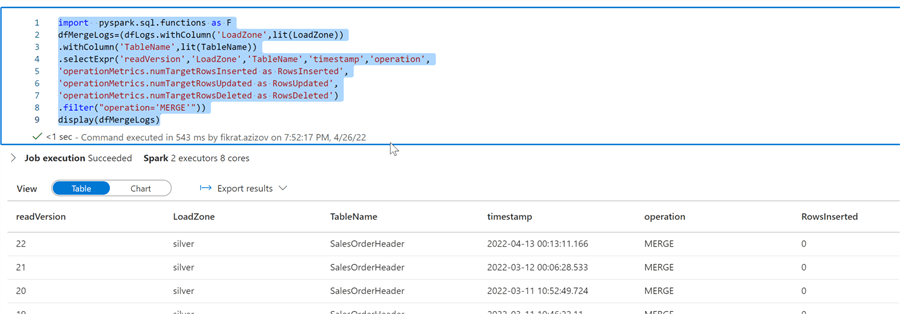
Figure 7
Let’s get details for update and delete commands, using similar methods:
dfUpdateLogs=(dfLogs.withColumn('LoadZone',lit(LoadZone))
.withColumn('TableName',lit(TableName))
.selectExpr('readVersion','LoadZone','TableName','timestamp','operation',
'0 as RowsInserted',
'operationMetrics.numUpdatedRows as RowsUpdated',
'0 as RowsDeleted',)
.filter("operation='UPDATE'"))

dfDeleteLogs=(dfLogs.withColumn('LoadZone',lit(LoadZone))
.withColumn('TableName',lit(TableName))
.selectExpr('readVersion','LoadZone','TableName','timestamp','operation',
'0 as RowsInserted',
'0 as RowsUpdated',
'operationMetrics.numDeletedRows as RowsDeleted')
.filter("operation='DELETE'"))
Finally, let’s union all three data frames and order the results by change versions, using the following command:
dfAllLogs=dfMergeLogs.unionAll(dfUpdateLogs).unionAll(dfDeleteLogs).sort(desc('readVersion'))
display(dfAllLogs)
Here’s the screenshot:

Figure 8
And now we can persist the logs in the Delta table. First, run this command to create a database:
spark.sql("CREATE DATABASE IF NOT EXISTS ETL")
And then persist the data frame in the managed Delta table, by using following command:
dfAllLogs.write.format("delta").saveAsTable('ETL.ExecLogs','delta','append')
Let’s do a quick validation:
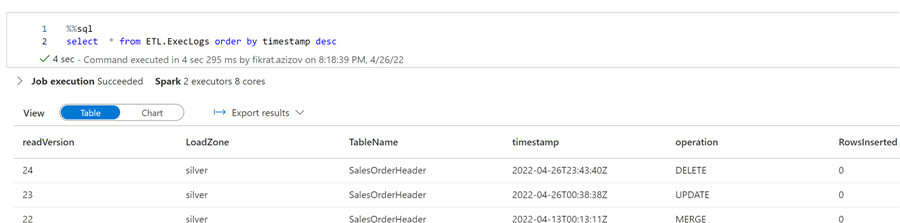
Figure 9
The last touch here would be adding limit(1) method to the final write command, to ensure that historical rows are not appended on subsequent executions:
dfAllLogs.limit(1).write.format("delta").saveAsTable('ETL.ExecLogs','delta','append')
Congratulations, we’ve built a notebook with ETL logging!
The ETL logging orchestration
The notebook we’ve created above can be kicked off from the data integration pipeline, and we can create that pipeline directly from this notebook- just use Add to pipeline button, as follows:
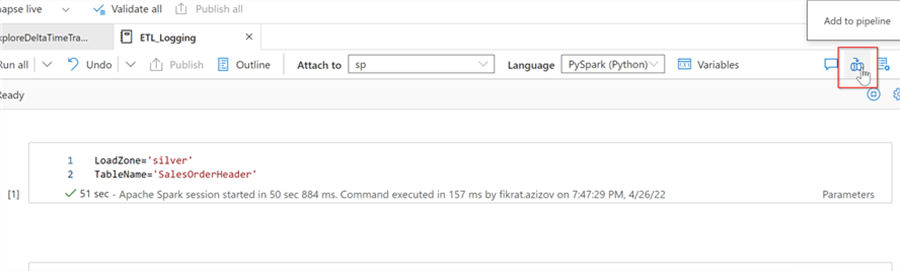
Figure 10
Once inside the pipeline, select the Notebook activity, select Spark pool and add the required parameters, as follows:
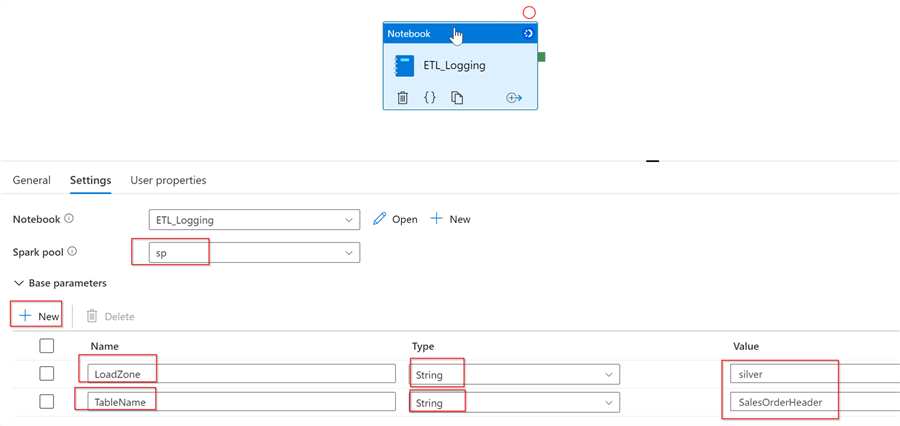
Figure 11
This activity could be included in a dedicated pipeline or be added to the existing ETL pipeline, depending on your overall ETL orchestration needs.
Next Steps
- Read: Common Data Warehouse Development Challenges
- Read: What is Delta Lake
- Read: Linux Foundation Delta Lake overview
- Read: Create, develop, and maintain Synapse notebooks in Azure Synapse Analytics

Fikrat Azizov (MCSE Data Platform and MCSE Azure Solutions Architect) has been working with SQL Server since 2002. Fikrat’s main passions are SQL Server performance optimization, cloud data technologies and machine learning. Fikrat is currently working as a Solutions Architect at Slalom Canada.
- MSSQLTips Awards: Author of the Year Contender – 2019-2022 | Rising Star (50+ tips ) – 2021
If it’s already in the history of the delta table. Which is effectively a table. Why write it to another table?