Problem
This tip is part of the series of posts dedicated to the building of end-to-end Lakehouse solutions, based on Azure Synapse Analytics. In the previous post (Implementing Slowly Changing Dimensions on Lakehouse Using Synapse Mapping Data Flow), we’ve built an ELT pipeline with Slowly Changing Dimensions logic. In this tip, we’re going to discuss another important dimensional modelling topic – time dimensions.
Solution
Importance of the time dimensions
Time dimensions are the most common type dimensions, and this is because in most cases fact data has some timestamp attributes, which are often used to do a trend analysis. Naturally, moving these timestamps into a dedicated dimension table and adding various calendar hierarchies can help create aggregated reports on higher granularity, like calendar year, calendar month, etc. The common time granularity in time dimensions is date granularity, and although it’s technically possible to create lower granularity (a minute or a second), this is not a recommended practice, as this will lead to a very large dimension tables, without bringing real analysis benefits. For those of you who want to learn more about time dimensions, I’d recommend this article by Kimball.
How to design time dimensions?
There’re a few common approaches to generate time dimensions:
- Inheriting from fact timestamp columns. This approach involves taking each value from various timestamp columns and storing it in a time dimension.
- Period-based timestamp generation. This approach involves generating sequential date timestamps within a certain date range, where fact timestamps are likely to fall and storing them in a time dimension.
In addition to the date attributes, a typical time dimension would contain calendar hierarchy attributes that can be calculated or brought from a lookup table.
I think approach #1 is more interesting from an implementation perspective, so I’ll be focusing on it for the rest of this post.
One of the challenges of building ELT process for time dimension is it needs to be reusable. Fact tables usually have many timestamp fields and creating a process to extract values from each field and adding required hierarchy attributes can become a very time-consuming task, unless you can come up with some reusable components.
I think a Flowlet feature that was recently introduced in Mapping Data Flow is a perfect tool for creating reusable time dimension processing components.
What are the Flowlets?
A flowlet is a Mapping Data Flow container that includes a set of activities. The biggest advantage of the flowlet is that it’s reusable- it can be included in other data flows as a source or transformation activity. Think of the flowlet as an equivalent of a user-defined function from programming languages- it has inputs, internal transformation logic and outputs, just like a function.
A flowlet can feed on the following sources:
- Inputs. These are external interfaces, i.e., channels that can supply the data to the flowlet from the parent data flow.
- Source transformations. The source transformations are no different than the ones from ordinary data flow, except they’re limited to Inline and Workspace Db data sources.
As to destination data sources, a flowlet can only write to outputs, which are external interfaces for passing the data to the parent process.
In this tip, I’m going to demonstrate the end-to-end flowlet build process as part of the time dimension building exercise, and if you’d like to learn more about this feature, I’d recommend visiting this article from Microsoft.
It’s worth mentioning this feature is in a public preview at the time of writing this post.
How to build a flowlet?
I’m going to build a flowlet to calculate calendar hierarchies and surrogate keys, based on input timestamp values.
The flowlet build process is like data flow building. Let’s open Azure Synapse Analytics, navigate to Develop tab, right-click on Data flows tab, and select New flowlet, as follows:

Figure 1
This flowlet will have a single input, so right-click on the design surface, and select Add Input command:

Figure 2
Add a new column with the name DateColumn under the Input settings tab, and select a timestamp data type, as follows:

Figure 3
Next, add a Derived column transformation with the following column definitions:
| Column | Expression |
|---|---|
| DateID | toLong(toString(DateColumn,'yyyyMMdd')) |
| Date | toDate(DateColumn) |
| Year | year(DateColumn) |
| Quarter | ceil(month(DateColumn)/3) |
| Month | month(DateColumn) |
| DayOfMonth | dayOfMonth(DateColumn) |
| WeekOfYear | weekOfYear(DateColumn) |
Note that my first column generates a surrogate key from the timestamp by converting it into the string with 'yyyyMMdd' format and then changing the data type to long type. Also, note that the granularity of this dimension is on date level. Here’s my screenshot:

Figure 4
Finally, add an output transformation, as follows:

Figure 5
Our flowlet is ready and I’ve named it Time_Flowlet.
How to validate a flowlet?
Because our flowlet expects data from the parent flow, we’ll need to supply sample data for its validation.
So, let’s turn on debug mode, and open Debug settings to enter a few sample date values, as follows:

Figure 6
Now, select the output transformation and check out the transformation results, as follows:
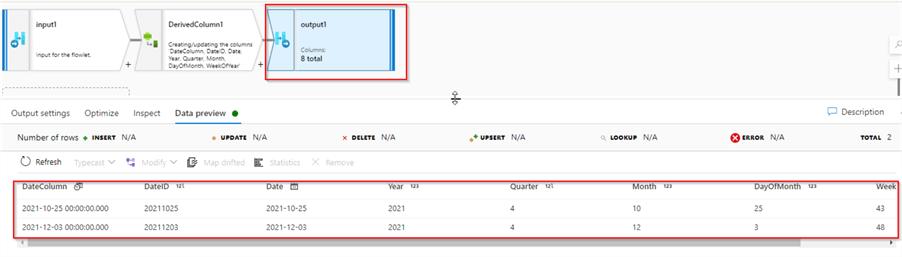
Figure 7
One of the limitations of the flowlet is that it allows validation from the output transformation only.
Data preparation
If you’ve followed my previous posts on this series, you may remember that my source database is the Azure SQL DB database, based on the AdventureWorks sample template. So, I intend to generate time dimensions for a few timestamp fields (namely OrderDate, DueDate and ShipDate fields) from the SalesOrderHeader table. A quick validation showed that each of these fields holds a single unique value. So, I’ve used the following query, to introduce variety:
update [SalesLT].[SalesOrderHeader] set
    [OrderDate]=dateadd([DAY], [SalesOrderID]-71000,[OrderDate]),
    [DueDate]=  dateadd([DAY], [SalesOrderID]-70000,[DueDate]),
    [ShipDate]= dateadd([DAY], [SalesOrderID]-69000,[ShipDate])
Here are the results:

Figure 8
Let’s run all the pipelines we’ve built so far to fetch the updated data from Azure SQL DB until Silver layer tables.
The parent data flow design
Let’s create a new data flow and add a source transformation with the Delta format. Configure delta/silver/SalesOrderHeader path as a location for Delta files, as follows:

Figure 9
Next, add a Flowlet transformation and select Time_Flowlet, as follows:

Figure 10
Navigate to the Mapping tab and select the DueDate column as a source for this flowlet:

Figure 11
At this point, we can do a quick validation of the results:

Figure 12
The results look good, so we’ve successfully generated time dimensions for the DueDate field.
We’ll need to add a new branch for each new timestamp field so that these branches could run in parallel. So, let’s add a New branch transformation, followed by a flowlet transformation, and proceed with similar flowlet configurations for the OrderDate and ShipDate fields. Here’s the screenshot with all three flowlets:

Figure 13
The next step is to consolidate outputs from these three branches, so let’s add a Union transformation at the end of the DueDateFlowlet and select ShipDateFlowlet as a second stream, as follows:

Figure 14
Next, let’s do another consolidation for OrderDateFlowlet output, as follows:

Figure 15
At this point, we have time dimensions for date values from various timestamp fields, and this output contains some duplicates, so we’ll need to add a deduplication logic here.
Let’s add a Window transformation. Navigate to its Over tab, and select DateID field, as this is the primary identifier of the source data:

Figure 16
Next, navigate to the Sort tab and select the Date field, as follows:

Figure 17
Finally, move to the Window columns tab and enter rowNumber() function, as an expression:

Figure 18
As you may have guessed, this transformation will rank the rows having the same DateID values. Now the only remaining step from the deduplication point is to filter out all of the row versions, except one. So, add a Filter transformation with the following configuration:
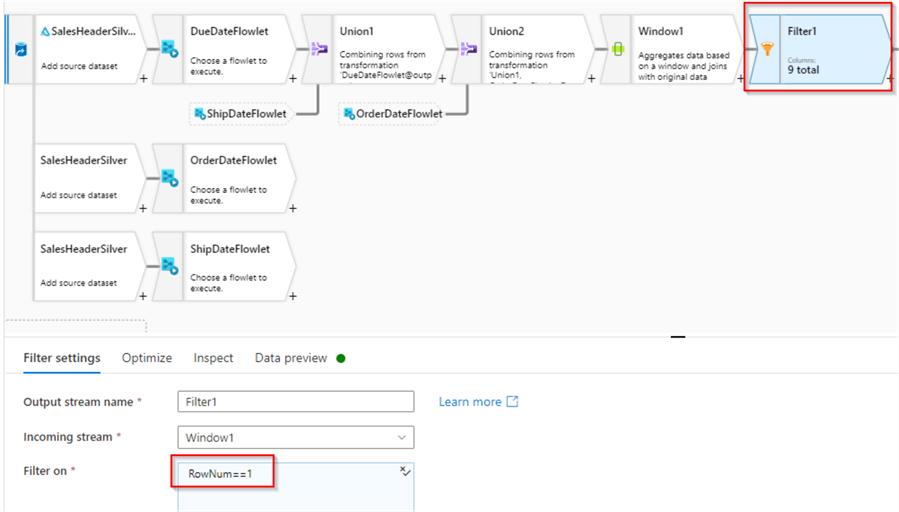
Figure 19
The next step will remove the RowNumber column, that is not required in the destination table. So, add a Select transformation to remove it, as follows:

Figure 20
We’re ready to write into the destination dimension table. The results from the previous chain of transformations will need to be compared against the target and missing data needs to be appended to it. On the other hand, if the row for a particular date is found in the target, we’ll need to update it. We can use upsert logic to achieve that. Let’s add Alter row transformation, and configure it as follows:

Figure 21
Finally, add a Sink transformation with Delta format, pointing to the delta/gold/DimTime folder, enable Allow insert and Allow upsert checkboxes and select DateID as a key column. Here’s the screenshot:

Figure 22
This concludes the data flow for the time dimension, let’s add another data flow activity to the parent data integration pipeline that we’ve created for the DimProduct table and configure them to run in parallel. Execute the parent pipeline and wait until it completes:

Figure 23
Validation
Let’s create a SQL script with the following query to validate the results:
SELECT
    TOP 100 *
FROM
    OPENROWSET(
        BULK 'https://synstg.blob.core.windows.net/syn-fs/delta/gold/DimTime/',
        FORMAT = 'DELTA'
    ) AS [result]
Order by DateID
Results look good:

Figure 24
Next Steps
- Read: Common Data Warehouse Development Challenges
- Read: Implement Surrogate Keys Using Lakehouse and Synapse Mapping Data Flow
- Read: Implement Dimension Denormalization Using Synapse Mapping Data Flow
- Read: Implementing data deduplication in Lakehouse using Synapse Analytics Mapping Data Flow
- Read: Data enrichment in Lakehouse using Synapse Mapping Data Flow
- Read: Mapping data flows in Azure Data Factory

Fikrat Azizov (MCSE Data Platform and MCSE Azure Solutions Architect) has been working with SQL Server since 2002. Fikrat’s main passions are SQL Server performance optimization, cloud data technologies and machine learning. Fikrat is currently working as a Solutions Architect at Slalom Canada.
- MSSQLTips Awards: Author of the Year Contender – 2019-2022 | Rising Star (50+ tips ) – 2021
Hello and thank you for the really very good series of articles. Is there somewhere an order of the articles in the series “building of end-to-end Lakehouse solutions leveraging Azure Synapse Analytics” e.g. 1. Start, …, N. End. Only with the links under the article it is unfortunately very difficult to understand the order